
A pressure washer foam cannon is an attachment that hooks up to your pressure washer and completely changes how you wash your car. It takes car soap, water, and air, and whips them into a thick, shaving cream-like foam. This isn't just for show—it's about pre-soaking your vehicle to lift away all the nasty, abrasive grit before you ever lay a hand on the paint. That single step dramatically cuts down on scratches and those dreaded swirl marks.
Why a Foam Cannon Is a Detailing Game Changer
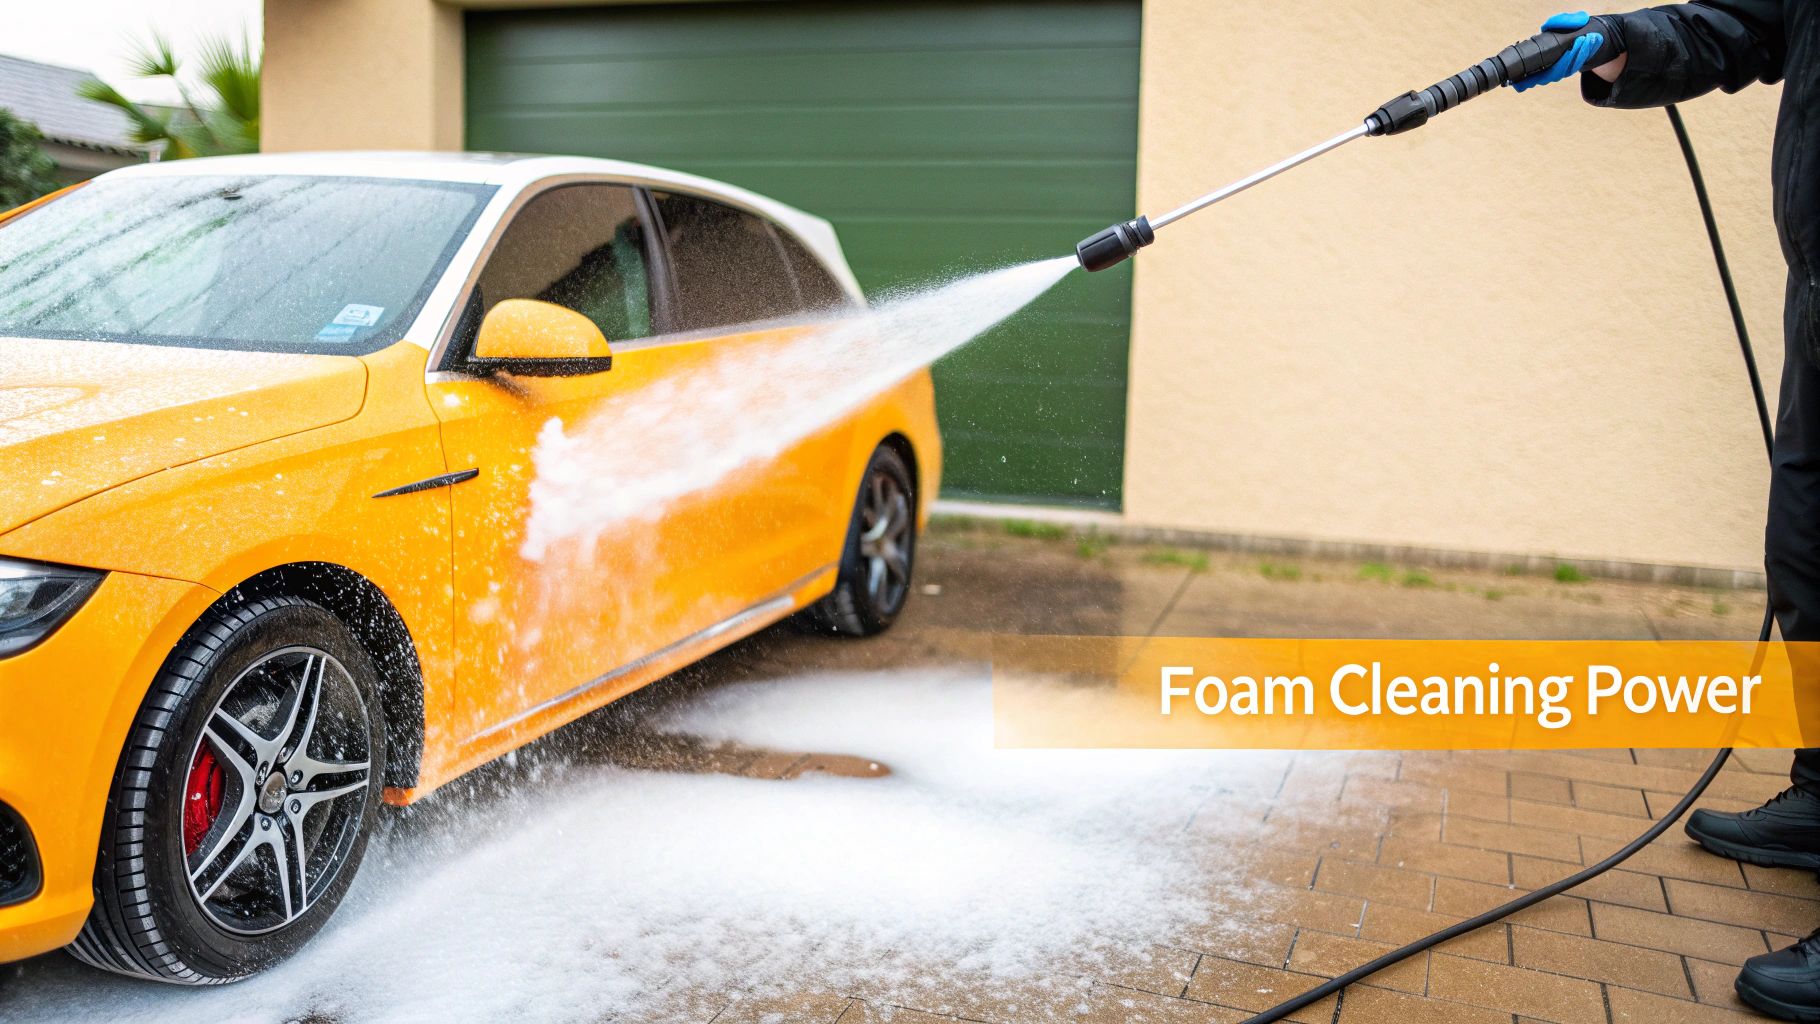
Let's face it, washing your car the old-fashioned way can feel like a real grind. The classic bucket and sponge method often means you're just grinding dirt right into your car's clear coat. That's actually the main cause of those fine, spiderweb-like scratches you notice when the sun hits your paint just right. A foam cannon flips the whole process on its head, making the first stage of the wash completely touch-free.
The real secret is the foam. It’s not like the runny soap suds you get from a bucket. This stuff is thick, and it clings to the sides of your car. This extra "dwell time" is crucial because it lets the soap's cleaning agents actually do their job—breaking down road film, dirt, and all the other gunk. As the foam eventually slides off, it takes all that loosened grime with it.
The Science of a Safer Wash
This pre-wash step isn't just for a cool photo op; it's a cornerstone of professional detailing. When you get rid of the majority of the abrasive stuff before you bring out the wash mitt, you're making sure that mitt just glides over a much cleaner surface. It's a simple change, but it makes a huge difference in keeping your car's finish looking brand new for years.
This shift towards better paint care is catching on. The global market for foam cannons shot past $500 million in 2023, and it's not slowing down. Experts are predicting a steady climb as more car lovers look for better, safer ways to get that professional-level clean.
To put it simply, here’s a quick look at why a foam cannon is such a valuable tool.
Foam Cannon Core Benefits at a Glance
| Benefit | Why It Matters | Best For |
|---|---|---|
| Touchless Pre-Wash | Lifts dirt and grime before physical contact, minimizing scratches. | Protecting new or delicate paint finishes. |
| Enhanced Cleaning Power | Foam clings to surfaces, allowing soap to break down contaminants. | Removing stubborn road film and bug splatter. |
| Faster and More Efficient | Covers large areas quickly, reducing overall wash time. | Large vehicles like trucks, SUVs, and RVs. |
| Water Conservation | Uses a concentrated soap mix, often requiring less water than a hose. | Eco-conscious car owners and areas with water restrictions. |
The bottom line is that a foam cannon makes the whole car washing process safer for your paint and more effective overall.
The single biggest advantage of a foam cannon is its ability to minimize contact-induced damage. You are essentially letting the foam do the heavy lifting, which is the secret to maintaining a swirl-free finish on any vehicle.
More Than Just Cars
While most people think of foam cannons for car detailing, their usefulness doesn't stop at the end of the driveway. The same logic applies to cleaning other things around the house that are delicate or just a pain to scrub.
- Vinyl Siding: Loosens up algae, mold, and dirt without needing to scrub siding panels.
- Boats and RVs: Makes short work of cleaning massive surface areas, breaking down road or lake grime.
- Outdoor Furniture: Gently but effectively cleans plastic, metal, and even wood surfaces.
Learning to use your own foam cannon is genuinely satisfying. But if you're looking for that flawless, professional result without the DIY effort, especially for a full restoration, it's always a good idea to consult local auto detailing services. In the end, this tool turns a routine chore into a process that's quicker, safer, and just plain better for both car enthusiasts and homeowners.
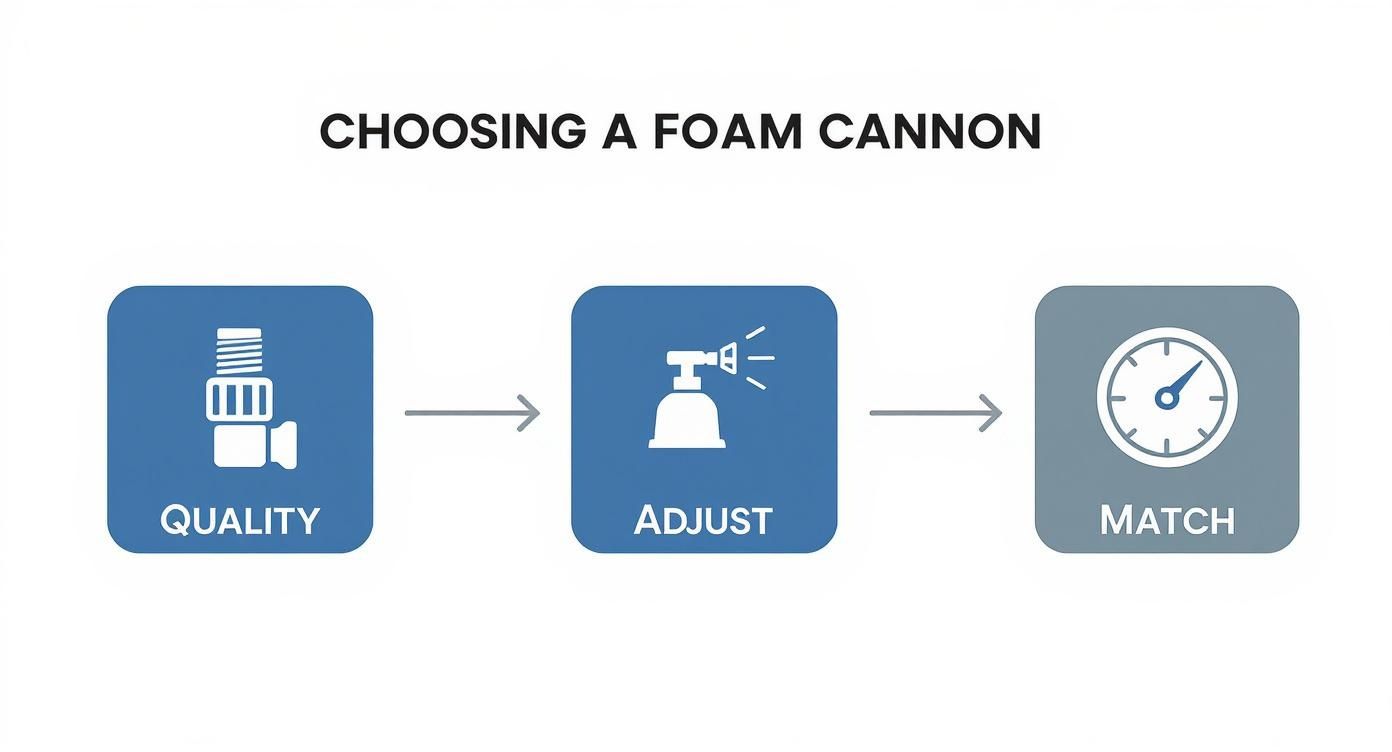
How to Choose the Right Foam Cannon
Walking into the world of foam cannons can feel a bit overwhelming. You're hit with a wall of technical specs and a sea of options that all look pretty similar. But let’s be honest, not all foam cannons are created equal. Some will give you that thick, shaving-cream-like foam you see in detailing videos, while others will just spit out sad, watery suds.
Let's cut through the marketing fluff and get down to what actually matters.
The very first thing I look at is the build quality. A foam cannon is a tool, and you want one that’s built to last. Look for models with heavy-duty brass fittings where everything connects. This isn't just for show; brass stands up to the constant exposure to water and harsh car wash soaps, which means it won't corrode and start leaking on you. Cheaper options with plastic or aluminum threads are notorious for stripping or cracking under pressure. That’s a fast track to frustration and a useless tool.
Don't overlook the bottle, either. You want one made from high-density polyethylene (HDPE), a tough, chemically resistant plastic. It won't get brittle or break down from your favorite soaps. A good bottle design also includes clear measurement lines, a wide mouth that doesn't make a mess when you pour soap in, and a solid base so it doesn't tip over the second you set it down.
Matching the Cannon to Your Machine
Here’s a classic mistake I see all the time: buying a top-tier foam cannon but pairing it with the wrong pressure washer. These two have to work together as a team. The quality of your foam is directly tied to your pressure washer’s Gallons Per Minute (GPM) and Pounds per Square Inch (PSI) ratings.
Most foam cannons you’ll find are designed to work best in a range of 1.4 to 5.3 GPM and 1000 to 3500 PSI.
- Got a lower-powered machine? Many smaller electric pressure washers fall on the low end of that spectrum. They can struggle to produce really thick foam unless you pair them with a cannon that has the right size orifice to compensate.
- Running a high-powered beast? A powerful gas machine can actually create too much pressure, which can damage the cannon’s internal parts or, even worse, strip the wax right off your car’s paint.
Before you click "buy," double-check your pressure washer's specs. Making sure the foam cannon is a good match for your machine's output is the most critical step to getting that pro-level foam.
If you're still looking for the right machine, our guide on finding the best pressure washers for cars is a great place to start. Getting this pairing right from the beginning will save you a ton of headaches.
Why Adjustability is Non-Negotiable
The best foam cannons give you two simple ways to adjust the foam, and frankly, these are non-negotiable features if you're serious about getting great results.
First is the top-mounted dial. This little knob is your foam thickness controller. Turn it one way, and it pulls more soap from the bottle, giving you a richer, thicker foam. Turn it the other way, and you get a lighter, runnier foam that's perfect for a quick pre-rinse. This lets you dial in the perfect consistency for how dirty your car is or what kind of soap you're using.
Second is the adjustable nozzle right at the front. A quick twist is all it takes to change the spray pattern.
- A wide fan pattern is your workhorse setting. It lays down a nice, even blanket of foam across big areas like doors and hoods.
- A narrow jet stream focuses all that cleaning power into one spot. It’s perfect for blasting caked-on grime in wheel wells, rocker panels, or that collection of bugs on your front bumper.
This is the kind of control that separates a real tool from a toy. It allows you to adapt on the fly, making sure every part of your car gets the attention it needs without wasting a drop of soap. Sure, a basic model might get the job done for a casual wash now and then. But if you truly enjoy detailing, investing in a well-built, fully adjustable cannon will pay for itself over and over in performance and durability.
Getting the Perfect Foam Mixture and Setup
Ever wondered what separates those watery, disappointing suds from the thick, satisfying foam you see from professional detailers? It really comes down to two things: getting your soap mixture just right and dialing in your setup. A great pressure washer foam cannon is only half the battle; mastering the mix is where the magic really happens.
If you get this part wrong, you're either wasting expensive soap or ending up with foam that just slides right off your car before it can do its job. This isn't about guesswork. It’s about a little bit of science and getting your cannon hooked up for a leak-free, high-performance wash every single time.
Nailing the Soap-to-Water Ratio
The secret to incredible foam is all in the dilution ratio. This isn't some universal number—it changes depending on the specific soap you're using, how filthy your vehicle is, and even the hardness of your water. The first place you should always look is the instructions on your car soap bottle, as manufacturers provide their own recommendations.
But if you need a solid starting point, a 1:10 ratio is a reliable go-to. That’s one part soap for every ten parts water. In a typical 32-ounce (or 1-liter) foam cannon bottle, this works out to be about 3 ounces of soap.
- For light dust & regular washes: You can often stretch your soap further with a leaner 1:12 or even 1:15 ratio. This saves product but still gives you plenty of lubrication for a safe wash.
- For caked-on mud & heavy grime: You'll want a richer mixture, maybe something closer to 1:8. This creates a denser foam that clings longer and has more muscle to break down the tough stuff.
Here's a tip I learned the hard way: Always add water to the bottle first, then pour in the soap. If you add the soap first, you'll create a mountain of suds before you've even added enough water, leading to a messy overflow and an inaccurate mix.
If you want to go deeper on this, our comprehensive foam cannon soap ratio guide has detailed charts and tips for different soaps. Mastering this balance is what gets you that thick, effective foam wash after wash.
Connecting and Dialing in Your Cannon
Okay, your soap solution is mixed. Now it's time to connect the cannon to your pressure washer wand. Most foam cannons use a standard 1/4" quick-connect fitting that should snap right into place. But a common headache is a small, annoying leak right at this connection point.
Here's an easy fix. Wrap the male fitting’s threads with two or three layers of plumber’s tape (Teflon tape). This simple, cheap trick creates a perfect seal, stops those frustrating drips, and makes sure all the pressure goes into making great foam.
With the cannon locked in, you have two key adjustments to play with:
- The Top Soap Control Knob: This dial determines how much soap solution gets siphoned from the bottle. Turn it toward the "+" for thicker, richer foam, or dial it back toward the "-" for a lighter, more watery consistency.
- The Front Nozzle: Twisting this nozzle adjusts the spray pattern. A wide fan is perfect for covering big panels like doors and the roof. A narrow, pinpoint stream lets you blast grime off specific areas like rocker panels or inside your wheel wells.
The popularity of foam cannons is exploding for a reason. The market is projected to be worth around $300 million by 2033 because enthusiasts are discovering how these simple adjustments give them a level of control and effectiveness you just can't get with a bucket and sponge.
My advice? Start with the soap knob set halfway and the nozzle on a medium fan. Spray a small test area on your car and adjust from there. You’ll quickly find that sweet spot that produces the perfect, shaving-cream-like foam you're looking for.
Mastering Your Foam Application Technique

This is the moment we all wait for—blanketing a dirty car in a thick layer of foam. It's incredibly satisfying, but there's a real method to the madness. The difference between just spraying soap everywhere and properly applying it is what gives you that professional-grade clean. Let’s get into the techniques that make your pressure washer foam cannon a true detailing weapon.
Here’s the single most important tip, and it feels completely backward at first: always start from the bottom of the vehicle and work your way up. I know, it sounds wrong. But think about it. The grimiest parts of your car are usually the rocker panels and lower doors. Starting there lets the foam sit on that caked-on gunk the longest.
If you start at the roof, the soap just runs down over the dirtiest parts, creating clean streaks and pulling the foam off the lower panels before it has a chance to work. By going bottom-up, you guarantee an even, effective pre-soak on every inch of the car.
Let It Dwell for a Deeper Clean
Once your car looks like it's covered in snow, it's time to let the foam do its thing. This is called dwell time—the crucial period where the soap is actively breaking down and lifting all that dirt and road film off the paint. Your goal is to give it enough time to work its magic without letting it dry.
For most situations, 3 to 5 minutes is the sweet spot. But you have to play it by ear. If you're washing in direct sun on a hot day, you'll need to rinse much faster to avoid dried-on soap spots. On a cooler, overcast day, you can probably let it sit for the full five minutes or even a little longer to maximize its cleaning power.
Watch the foam itself. The perfect time to rinse is right when you see it start to thin out and slide down the sides of the car. That’s your signal that it has grabbed all the grime it can and is ready to be washed away.
With the pre-wash done, most of the loose contaminants are gone. For anything left behind, a gentle contact wash is the next step. To do it right, check out our guide to help you master the two-bucket wash method for a flawless finish—it's the perfect follow-up to a foam cannon pre-soak.
Perfecting Your Spray Pattern and Consistency
How you spray is just as important as where you start. The key is a smooth, consistent application. I find that holding the nozzle about 2-3 feet away from the car gives the best coverage. This distance lays down a perfect, even layer without blasting one spot too hard.
Use steady, overlapping passes, almost like you're spray painting. Each sweep should overlap the last one by about 50%. This simple trick eliminates any missed spots or "holidays" in the foam.
- Big, flat panels? Go with a wide fan pattern to cover the doors, hood, and roof quickly.
- Tricky spots like grilles or wheels? Tighten up the spray pattern for a more focused blast that gets deep into the nooks and crannies.
Taking Your Technique Beyond the Driveway
One of the best things about a foam cannon is how versatile it is. You can use these same principles to clean all sorts of things around the house.
| Surface | Technique Adjustment | Key Consideration |
|---|---|---|
| Vinyl Siding | Work from the bottom up in sections you can manage. This prevents streaking on the house, too. | Make sure your cleaner is siding-safe and never spray water upwards underneath the panels. |
| Wooden Decks | Give the foam 2-3 minutes to lift dirt and mildew from the wood grain before rinsing. | You have to use a lower pressure setting here. Too much pressure will splinter the wood. |
| Concrete Patios | Mix your soap a little stronger and let it dwell for up to 10 minutes for deep-set grime. | A narrow, powerful spray can help blast away tough stains after the foam has done its work. |
By really dialing in these techniques, your foam cannon becomes so much more than a fun toy. It becomes a precision tool that delivers a better, safer clean for your car and makes other big cleaning jobs a whole lot easier.
Troubleshooting Common Foam Cannon Issues
https://www.youtube.com/embed/zmEgrOIrgvg
Nothing kills the vibe of a good car wash faster than a foam cannon that just won't cooperate. You're all geared up, and instead of thick, shaving-cream-like foam, you get a sad, watery mess. It's frustrating, but before you toss your cannon in the bin, take a breath.
I've been there, and I can tell you that most of the time, the problem is something incredibly simple. We're talking about five-minute fixes you can easily do yourself. Let's walk through the most common culprits so you can get back to blanketing your car in suds.
The Number One Problem: Watery Foam
So, your pressure washer foam cannon is sputtering out runny, pathetic foam? Don't worry. This is hands-down the most frequent issue people face, and the fix is usually a breeze. It almost always boils down to one of three things: your soap mix is off, your pressure washer isn't a good match, or you've got a clog.
First things first, check your soap dilution. If your soap-to-water ratio is too weak, you'll never get that thick, clinging foam. Try adding another ounce or two of your favorite car soap to the bottle and give it another go. If that doesn't do the trick, it's time to look at the cannon itself.
The magic happens inside a tiny part called the orifice nozzle. It’s a small brass piece with a very specific opening (usually 1.1mm or 1.25mm) that’s crucial for creating the pressure needed for great foam. Over time, hard water deposits or old, dried-up soap can create a blockage that ruins the effect.
A partially clogged orifice nozzle is the silent killer of foam quality. Even a tiny obstruction can drastically reduce the cannon's ability to generate thick, clinging suds, turning your pre-wash into a watery mess.
It's an issue that's becoming more common as more people get into detailing. The snow foam cannon market has been exploding, growing by an incredible 22% annually since 2022. With so many new foamers out there, understanding this simple maintenance is key. You can find more insights into the rapid growth of the foam cannon market and see why knowing how to care for your gear is so important.
Fixing a Clogged Orifice and Filter
Ready to get your hands dirty? It's easier than it sounds. Just disconnect the cannon from your pressure washer and unscrew the main body to get to the internals. You're looking for the orifice nozzle and the mesh filter.
Here’s how to get them spotless:
- Pop Out the Orifice: Use a small flathead screwdriver to carefully unscrew and remove the little brass orifice nozzle.
- Check for Clogs: Hold it up to a light. Can you see clearly through the tiny hole? If not, it's clogged. A simple paperclip or a dedicated nozzle cleaning tool can be used to gently poke out the debris.
- Clean the Mesh Filter: The stainless steel filter can also get gummed up. Pull it out and give it a good rinse under warm water. For really stubborn soap scum, let it soak in a 50/50 mix of water and white vinegar for about half an hour.
- Put It Back Together: Once everything is clean and dry, just reassemble it. This quick deep clean restores performance 90% of the time.
Tackling Annoying Leaks
A leak is another one of those things that can ruin your wash day. Whether it's dripping from the bottle or the connection to your pressure washer, it's not just messy—it also drops the pressure you need for good foam. Thankfully, the fixes are just as simple.
When your foam cannon starts acting up, a quick check of a few key spots will usually solve the problem. This table breaks down the most common issues and how to fix them in minutes.
Quick Fixes for Foam Cannon Issues
| Problem | Likely Cause | How to Fix It |
|---|---|---|
| Leaking Bottle | The threads aren't sealed, or the O-ring is damaged or missing. | Unscrew the bottle and wrap the threads with a few rounds of plumber's tape (Teflon tape). If it still leaks, check the rubber O-ring inside for cracks and replace it. |
| Leaking Connection | The quick-connect fitting isn't fully seated, or the threads are loose. | Disconnect and reconnect the cannon to your wand, making sure you hear and feel it "click" into place. For a threaded leak, plumber's tape is again your best friend. |
| No Foam at All | The internal mesh filter is completely blocked, or the siphon tube is disconnected. | Disassemble and thoroughly clean the mesh filter. While you're in there, ensure the plastic siphon tube is firmly attached to the cannon's body. |
Most issues you'll encounter are minor and can be sorted out with basic tools and a little bit of know-how. Keep these tips in mind, and you'll keep your foam cannon running like new.
Your Top Foam Cannon Questions, Answered
Alright, so you've got the basics down, but some specific questions are probably still rattling around in your head. Getting the hang of a pressure washer foam cannon is a bit of an art form, and it's totally normal to wonder if you're getting everything just right. Let's clear up some of that common confusion.
I’ve put together the most frequent questions I get from people just starting out and even from some seasoned pros. This is your go-to guide for getting the best possible performance out of your gear and saving yourself some headaches.
Can I Just Use Any Car Wash Soap in My Foam Cannon?
This is the big one, and the short answer is: technically yes, but you really, really shouldn't. If you're after that thick, shaving-cream-like foam, you need a soap that’s actually made for a foam cannon.
Here’s why it makes such a huge difference:
- Dedicated Foam Cannon Soaps are formulated with a higher viscosity and special surfactants. These are the magic ingredients that get whipped into a dense, clinging foam that hangs onto your car, giving it the dwell time needed to break down grime.
- Regular Car Wash Soaps are usually thinner and designed for suds in a bucket. Try running that through a cannon, and you'll likely get a watery, runny mess that slides right off. This completely defeats the purpose of the foam pre-soak.
So, while your standard soap won't break your cannon, it just won't perform. Stick with a quality foaming soap to get that professional clean you're looking for.
Remember, the thick foam isn't just for show. It plays a crucial role in the cleaning process by encapsulating dirt and grit, lifting it away from your paint for a safer wash.
Does My Pressure Washer's PSI and GPM Really Matter?
Absolutely. In fact, it's one of the most critical factors. Your pressure washer’s specifications—its Pounds per Square Inch (PSI) and Gallons Per Minute (GPM)—are the engine that powers the whole operation. Together, they create the force and water flow needed to generate that awesome foam.
Most foam cannons are built to work best within a specific range, usually somewhere between 1000-3500 PSI and 1.4-5.3 GPM.
If your pressure washer is too weak, it just won't have the oomph to properly mix air, water, and soap. The result? Soupy, disappointing foam. On the flip side, a beast of a machine that's way too powerful could eventually damage the cannon's internal parts. Always double-check that your cannon and pressure washer are a good match before you buy.
How Often Should I Clean the Foam Cannon Filter?
Think of this like changing the oil in your car—it's the secret to keeping your foam cannon working perfectly for years. The two main culprits for clogs are the internal mesh filter and the tiny orifice nozzle, which get gummed up with dried soap and hard water deposits.
A simple cleaning routine will prevent 99% of all performance issues. I can't stress this enough.
- A Quick Flush After Every Wash: Once you're done, run clean water through the cannon for about 30 seconds. This simple step stops soap from drying and building up inside. It takes almost no time.
- A Deep Clean Every 5-10 Washes: Take the cannon apart and let the mesh filter and brass orifice nozzle soak. A bowl of warm water works, but for tougher buildup, a 50/50 mix of white vinegar and water for about 30 minutes will dissolve anything stubborn.
This little habit guarantees you’ll get thick, consistent foam every single time. It's the best way to protect your investment and avoid the frustration of a tool that clogs up right when you need it.
Ready to create that perfect, thick foam with a tool designed for performance and ease? The SwiftJet Car Wash Foam Gun makes professional-grade detailing accessible to everyone. Get your car cleaner, faster, and safer. Check out the SwiftJet and get your free wash mitt today!