
The process of getting rid of swirls is known as paint correction. It's all about using special abrasive compounds and polishes to very carefully level your car's clear coat, which is the top protective layer of your paint. This essentially erases those fine scratches, restoring that deep gloss.
But before you grab a polisher, know that this is a multi-step game. It starts with an extremely thorough wash and decontamination, moves into the actual polishing stage, and finishes with protecting that freshly restored paint. The secret isn't just brute force; it's using the right tools and, more importantly, the right techniques to smooth out the surface without making things worse.
What Are Swirl Marks and Why Do They Happen?
Before you can tackle swirl marks, you need to know your enemy. Contrary to their name, swirl marks aren't actually circular. They are a dense network of ultra-fine, straight-line scratches that have accumulated on your car's clear coat.
When a direct light source—like the sun or a bright garage light—hits this web of scratches, the light scatters in all directions. This is what creates that frustrating, hazy, cobweb-like effect that hides the true color and depth of your paint.
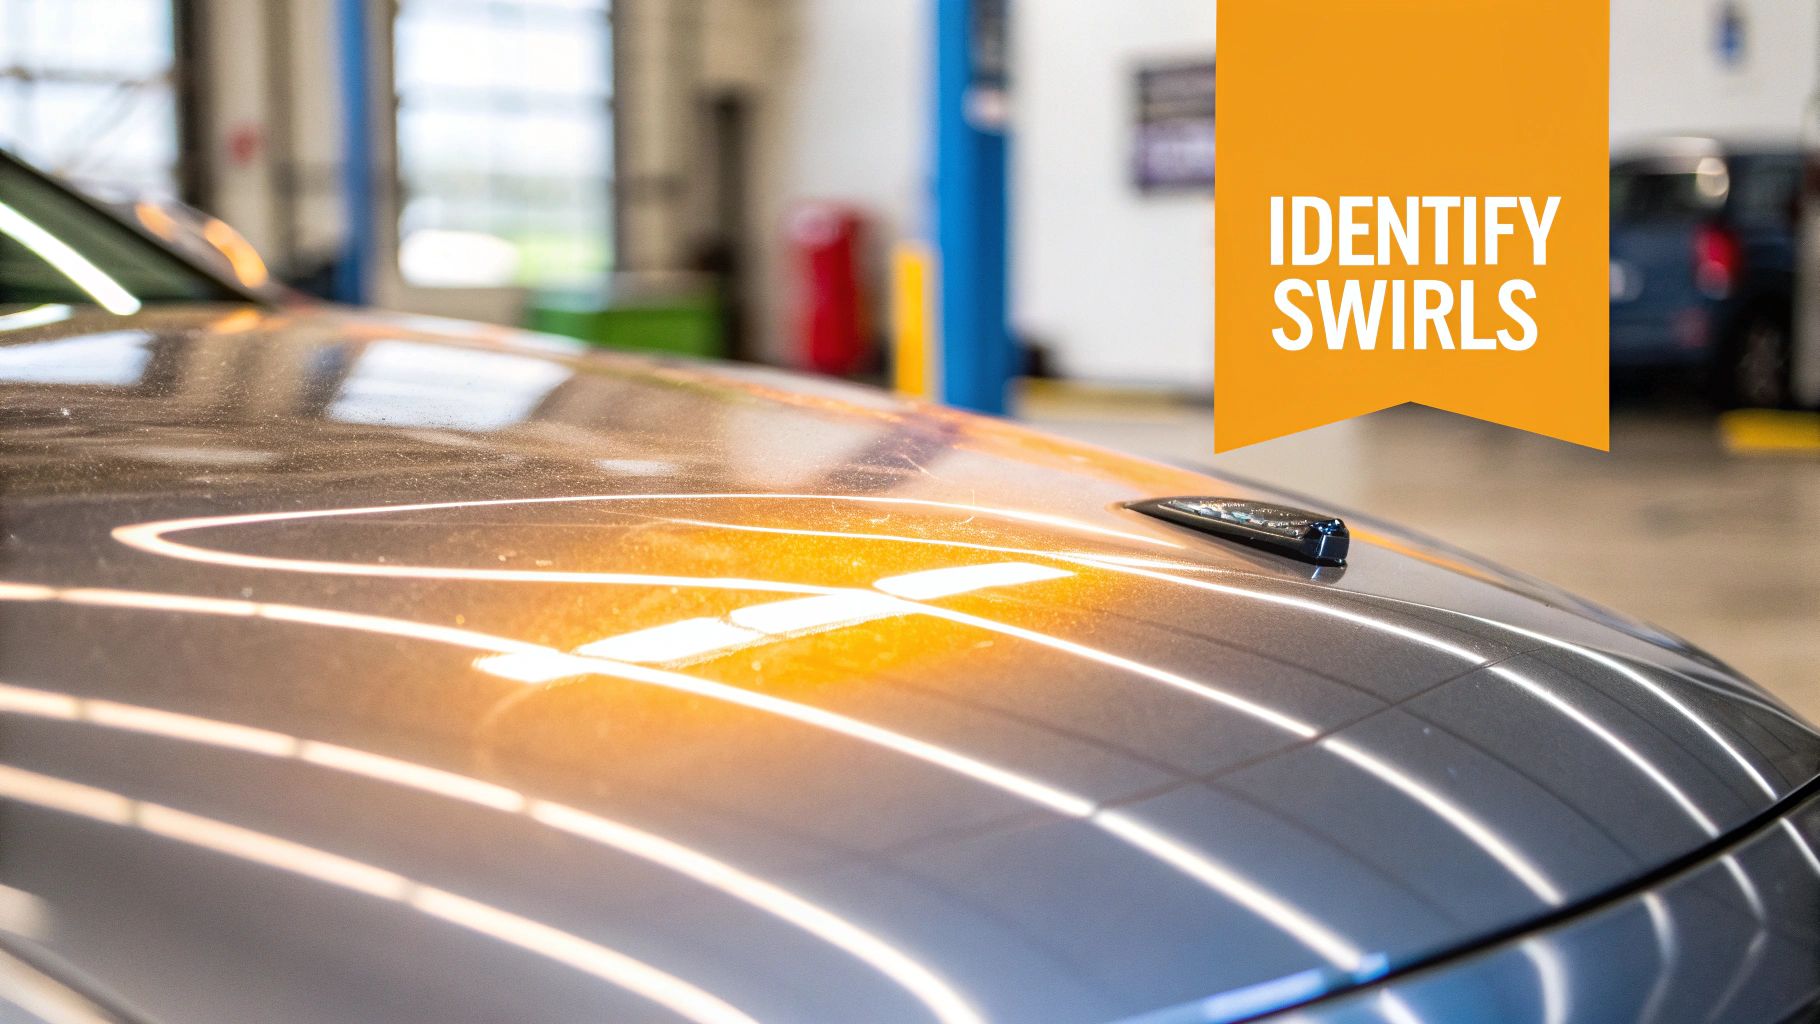
More often than not, these annoying marks are self-inflicted. They're almost always the result of improper washing and drying habits. Every time something abrasive touches your paint, it can drag tiny bits of dirt and grit across the finish, leaving behind thousands of these microscopic scratches.
The Most Common Causes of Swirls
Understanding where swirls come from is the key to preventing them from coming back. Most of the damage happens during what we think of as routine care. Here are the usual suspects:
- Automated Car Washes: Those giant, spinning brushes might seem convenient, but they are incredibly abrasive. Worse, they collect grit from every car that went through before yours, essentially turning them into massive swirl-inducing machines.
- Improper Hand Washing: Using a single bucket allows dirt to get reintroduced to your paint. Using an old, gritty sponge instead of a high-quality microfiber wash mitt is another classic mistake.
- Incorrect Drying Methods: Never use old bath towels, a traditional chamois, or even a low-quality microfiber towel. These can all easily mar the soft clear coat.
- Dry Wiping or Dusting: Wiping a dusty car with a dry cloth is one of the worst things you can do. You're basically grinding that dust directly into the paint, like using fine-grit sandpaper.
The desire for a flawless finish is a huge part of the automotive care world. In fact, the global car detailing market was valued at $47.7 billion and is expected to climb to $88.3 billion by 2034. Exterior detailing services, which include swirl removal, accounted for roughly 30% of the market share last year. That's a lot of people trying to get their paint looking perfect. You can find more car detailing market growth data on Global Insight Services.
Swirl Marks vs Deeper Scratches
Use this quick comparison to identify the paint defect you're dealing with before you start any correction work.
| Characteristic | Swirl Marks | Deeper Scratches |
|---|---|---|
| Appearance | Fine, web-like patterns visible in direct light. | Distinct, individual lines that are visible in most lighting conditions. |
| Depth | Very shallow, only in the top layer of the clear coat. | Can go through the clear coat, into the paint, primer, or even to the metal. |
| "Fingernail Test" | Your fingernail glides over them without catching. | Your fingernail will catch in the groove of the scratch. |
| Fixability | Can almost always be removed with polishing compounds and a machine or hand polisher. | Often requires more aggressive methods like wet sanding or even a repaint. |
Knowing the difference is crucial. Trying to polish out a deep scratch is a waste of time and can lead to you removing too much clear coat for no reason.
How to Inspect Your Paint Like a Pro
To figure out your game plan, you need a brutally honest look at your paint. Swirls love to hide in the shade. The best way to reveal them is with intense, direct light.
Your best bet is to pull the car out into the bright, direct sunlight. If you're working indoors, grab a powerful LED inspection light. Shine the light directly on a panel and slowly move it around, viewing the paint from different angles. This will expose the true extent of the swirls and help you spot any deeper scratches that might need special attention.
Pro Tip: A good rule of thumb is the "fingernail test." Gently run your fingernail across a scratch. If it catches, the scratch is likely too deep to be fixed with a simple polish. Swirl marks, on the other hand, are shallow enough that your nail will glide right over them.
Gearing Up: Your Paint Correction Toolkit
You can't fix a complex problem without the right tools, and paint correction is no exception. Trying to tackle swirls with the wrong gear is a recipe for frustration and, worse, could actually damage your paint. Let's walk through exactly what you'll need to get professional results in your own garage.
First things first, you have to get the car spotlessly clean. Any lingering grit or dirt will get dragged across the surface by your polisher, creating a fresh set of scratches. That's the last thing you want.
- A Quality Car Wash Soap: Stick with a pH-neutral formula. These are designed to break down grime without stripping off any wax or sealant you might already have on the car.
- Two Buckets with Grit Guards: This is a non-negotiable part of safe washing. One bucket is for your soapy water, the other for clean rinse water. The guards trap dirt at the bottom, keeping your wash mitt clean.
- A Plush Microfiber Wash Mitt: Sponges just push dirt around. A high-quality mitt has deep fibers that trap dirt particles, lifting them safely away from your paint.
- A Foam Gun or Cannon: Pre-soaking the car is a game-changer. A tool like the SwiftJet foam gun covers the vehicle in a thick layer of foam that loosens and lifts heavy dirt before you ever make physical contact. It's a critical step.
The Heavy Hitter: Your Machine Polisher
While you can technically work out the lightest swirls by hand, a machine polisher is what separates a decent job from a flawless one. It provides the consistent speed and power needed to truly level the clear coat. It's no surprise the car polisher market, valued at USD 338 million, is expected to hit USD 538 million by 2032. More and more people are realizing they can get amazing results themselves. You can dig into the car polisher market's expansion and trends if you're curious about the growth.
For most enthusiasts and DIYers, the choice boils down to two main types.
Dual-Action (DA) vs. Rotary: A Quick Breakdown
The rotary polisher is the old-school powerhouse. It spins on a single axis, generating a lot of heat and cutting power. In the hands of a seasoned pro, it's incredibly effective, but it can also burn through paint in a heartbeat if you're not careful. The dual-action (DA) polisher, however, spins and oscillates in a random pattern. This dual motion keeps heat build-up to a minimum, making it infinitely safer and the go-to recommendation for anyone starting out.
Abrasives and Pads: The Finesse Work
Paint correction is really just an ultra-fine sanding process. You're using liquid abrasives (compounds and polishes) on different types of pads to carefully remove a microscopic layer of the clear coat, leveling it out until the swirls are gone. You start with a more aggressive combo and work your way down to a fine one to restore that incredible gloss.
Compounds and Polishes
- Cutting Compound: This is your heavy-lifter. It’s a more aggressive liquid abrasive made to knock down moderate swirls and light scratches.
- Polish: This is your finishing step. A polish uses much finer abrasives to remove any hazing left by the compound, refining the surface to a deep, mirror-like shine.
- All-In-One (AIO) Products: These are jacks-of-all-trades, combining a light abrasive, a finishing polish, and a wax or sealant. They're fantastic for a quick enhancement or very light swirls, but they won't match the corrective power of a dedicated two-step approach.
Polishing Pads
Pads are your connection to the paint. Manufacturers typically color-code them to show how aggressive they are, but the exact system can vary by brand. In general, they break down like this:
- Cutting Pads (Foam or Microfiber): The firmest pads in the lineup. You’ll pair these with a compound for the initial defect removal stage.
- Polishing Pads (Foam): These have a softer foam structure and are used with polishes to refine the finish and boost gloss.
- Finishing Pads (Foam): The softest of them all. These have no cutting ability and are used only to apply a final layer of wax or sealant.
The golden rule is to always find the least aggressive combination that gets the job done. Before going all-in, start with a polish and a polishing pad on a small, inconspicuous test spot. If that works, great! If not, then you can step up to a compound and cutting pad.
To see how all these pieces fit together into a complete arsenal, take a look at our comprehensive car detailing supplies list. It’ll help you build out your kit so you’re ready for anything.
Your Step-by-Step Guide to Paint Correction
Alright, you've got your gear ready to go. Now for the fun part: actually getting those nasty swirls out of your paint. This is where a little bit of patience and the right technique will completely transform that hazy, tired-looking finish into something with deep, jaw-dropping gloss.
We'll tackle this in three main stages. First, we have to get the paint surgically clean. Then comes the actual correction work. And finally, we'll lock in that shine with a tough layer of protection.
Phase 1: Meticulous Preparation
Let's get one thing straight: you can't get a flawless finish on dirty paint. In fact, the prep work is probably the most critical part of this whole process. Skip it, and you’ll just be grinding leftover dirt into your clear coat, making things worse.
The first job is a proper, safe wash. This means using the two-bucket method we talked about earlier. One bucket for your soapy water, one for clean rinse water, and a grit guard in each. It’s a simple setup that makes a world of difference by preventing you from dragging dirt all over the car.
Start with a good pre-rinse to knock off all the loose grime. Then, grab your microfiber wash mitt and work panel by panel, always from the top down. Dunk that mitt in your clean rinse water often before grabbing more soap. This keeps the filth in the bucket and off your paint.
Unlocking a Truly Clean Surface with Decontamination
Even after a thorough wash and dry, your paint isn't truly clean. I guarantee it's covered in bonded contaminants—tiny bits of industrial fallout, brake dust, and sap that have dug into the clear coat.
You can feel them yourself. Just put your hand inside a plastic sandwich bag and lightly run your fingertips over the paint. Feels gritty, right?
That's where a clay bar saves the day. A clay treatment literally grabs and pulls these embedded particles out, leaving the surface perfectly smooth. This is a non-negotiable step. Trying to polish a contaminated surface is a recipe for disaster, as you'll just be grinding those particles around.
Working in a cool, shaded spot, flatten a piece of detailing clay into a small patty. Spray a generous amount of clay lubricant on a small 2x2 foot section. Now, just glide the clay back and forth over the area with very light pressure. You’ll actually feel and hear it working. Once it glides silently and smoothly, you're done with that spot. Wipe the lube residue away with a clean microfiber and move on.
If you're new to this, we've got you covered. Check out our easy step-by-step guide on how to clay bar a car to really nail this crucial technique.
Phase 2: The Art of Correction
Now for the main event. With your paint perfectly clean and smooth, it's time to erase those swirls. Whether you’re working by hand or with a machine, the fundamental idea is the same: use the least aggressive method necessary to get the results you want.

This image sums up your arsenal perfectly. The polisher brings the power, the pad serves as the medium, and the polish itself contains the micro-abrasives that do the leveling.
The Golden Rule of Paint Correction
Always start with a test spot. Pick an inconspicuous 2x2 foot area, like the trunk lid. Begin with your gentlest combo—maybe a finishing polish on a soft foam pad. Work the area, wipe it clean, and hit it with a strong light. If the swirls are gone, fantastic! You've found your process. If they're still there, step up to a slightly more aggressive pad or polish and test again.
To give you a clearer picture, here’s a quick overview of the entire workflow.
Paint Correction Workflow Summary
This table breaks down the entire swirl removal process, from initial cleaning to the final protective layer, so you know exactly what to expect.
| Phase | Objective | Key Tools & Products |
|---|---|---|
| 1. Preparation | Remove all loose and bonded contaminants for a perfectly clean surface. | SwiftJet Foam Gun, Two buckets with grit guards, pH-neutral car shampoo, microfiber wash mitt, clay bar, clay lubricant. |
| 2. Correction | Level the clear coat by abrading away a microscopic layer to remove swirls and scratches. | Dual-action (DA) polisher, cutting/polishing pads, compound and polish liquids, IPA (isopropyl alcohol) spray for wipe-downs. |
| 3. Protection | Apply a durable layer to shield the corrected paint from UV rays and contaminants, while enhancing gloss. | Wax, paint sealant, or ceramic coating; microfiber applicator pads, plush microfiber towels for buffing. |
Following these phases in order is the key to achieving that showroom shine you're after.
Machine Polishing Technique
Using a dual-action (DA) polisher is, without a doubt, the fastest and most effective way to get pro-level results. Its motion is much safer than an old-school rotary, and it delivers consistency you just can't match by hand.
- Prime Your Pad: Start with 3-4 pea-sized drops of polish on your pad. On the very first panel, dab the pad on the paint in a few spots before turning the machine on—this keeps polish from flying everywhere.
- Spread the Product: Set the polisher to a low speed (like 1-2) and make one quick pass over your 2x2 foot section to get an even layer.
- Work the Polish: Crank the speed up to a medium setting (4-5 is a good starting point). Move the polisher slowly across the paint in an overlapping crosshatch pattern—a few passes side-to-side, then a few up-and-down. Just use enough pressure to keep the pad from stalling. Let the machine do the heavy lifting.
- Wipe and Inspect: Once the polish starts to look clear or oily (meaning the abrasives have broken down), turn the machine off before lifting it from the paint. Wipe the residue away with a clean microfiber towel and check your work with an inspection light. If it looks good, move on. If not, do another pass.
Hand Polishing Technique
No machine? No problem. You can still make a huge difference by hand, it just requires more elbow grease. The secret here is maintaining consistent and even pressure.
- Apply to an Applicator: Put a few small drops of compound or polish onto a foam or microfiber hand applicator.
- Work in Small Sections: Stick to those manageable 2x2 foot areas. Trying to tackle a whole hood at once will just exhaust you and lead to poor results.
- Use Consistent Motions: Apply firm pressure and work the product in either overlapping circular motions or straight-line motions. The goal is to create a uniform finish.
- Wipe and Check: After a minute or two of solid work, wipe the area clean and inspect it. Don't be surprised if it takes a few passes to get the level of correction you're looking for.
Phase 3: Final Protection
You just spent hours making your paint look perfect. The absolute last thing you want is for all that hard work to go to waste. Applying a durable layer of protection is the final, crucial step. It shields the paint from the elements, makes washing easier, and adds that last bit of "wow" factor to the gloss.
Here are your main options:
- Waxes: A good carnauba wax gives an incredible, warm glow, but it’s not the most durable. Expect it to last a few months at best.
- Paint Sealants: These are synthetic polymers that are all about slickness and durability. A sealant will typically give you 4-6 months of solid protection and a sharp, reflective shine.
- Ceramic Coatings: This is the king of protection. A ceramic coating creates a semi-permanent, glass-like shell on your paint that can last for years. It offers unmatched resistance to chemicals, UV rays, and light scratches.
No matter which you choose, the application is similar. Apply a thin, even layer to each panel using a clean applicator. Let it cure according to the manufacturer's directions, then gently buff off the residue with a fresh, high-quality microfiber towel. Now stand back and admire that stunning, protected finish.
Common Paint Polishing Mistakes to Avoid
https://www.youtube.com/embed/QEY-hyXkJKg
When you're learning how to get swirls out of car paint, knowing what not to do is just as critical as following the right steps. The line between a stunning, mirror-like finish and a frustrating mess is often a few simple, avoidable slip-ups. I've seen them all over the years, and thankfully, they're easy to sidestep once you know what to look for.
One of the most common blunders is trying to work on a hot panel or out in direct sunlight. Car care products just aren't designed for that kind of environment. You want the surface to be cool to the touch, which usually means working in a garage or at least in the shade.
If the paint is warm, your polish will dry out almost the second it touches the car. This creates a gummy, stubborn residue that’s a nightmare to wipe off. More importantly, it stops the abrasives in the polish from breaking down properly, which means you won't get the correction you're looking for and might even introduce new hazing. Before you start, always do a quick "touch test." If the panel feels even slightly warm, give it time to cool down.
Using Too Much Product or Pressure
It’s a natural instinct to think that more is better, but when it comes to polish, that’s just not the case. Slathering your pad with compound is a recipe for a bad time. It creates a greasy film, makes buffing off the residue a real workout, and can even hinder the process by cushioning the abrasives and preventing them from cutting effectively. All you need is 3-4 pea-sized drops on your pad for each small section you're working on.
The same goes for pressure. Don't try to muscle the machine into the paint. If you lean too hard on a dual-action (DA) polisher, you can actually stop the pad from rotating, which means you're not correcting anything. With a more aggressive rotary polisher, too much pressure builds up a ton of heat in a hurry—enough to burn right through your clear coat and cause permanent damage. Let the tool and the product do the heavy lifting.
Key Takeaway: Think finesse, not force. Your job is simply to guide the machine and let it work its magic. Light, even pressure is all you need to get a flawless result without risking your paint.
Starting Too Aggressively
This is a classic rookie mistake. Grabbing your most aggressive cutting compound and a heavy-duty pad might seem like a shortcut, but it can create more problems than it solves. Always, always start with the least aggressive combination you think might work. Remember, your car’s clear coat is incredibly thin, and the goal is to preserve as much of it as possible.
This is where the test spot becomes your best friend.
- Start Small: Pick a small, out-of-the-way area and try a light polish on a soft finishing pad.
- Check Your Work: After a few passes, wipe the area clean with a good microfiber towel and inspect it with a bright light. Did it work?
- Step Up Only if Necessary: If you still see swirls, then you can move to a slightly stronger polish or a medium pad.
This methodical approach ensures you only remove the absolute minimum amount of clear coat required to get the job done. Jumping in with an aggressive combo not only removes precious clear coat but can also leave behind its own set of defects, like hazy buffer trails or holograms, which you'll just have to polish out all over again. Work smarter, not harder.
Keeping Your Paint Swirl-Free After Correction
You just spent hours, maybe even a full weekend, bringing your car’s paint back to a brilliant, flawless shine. It looks incredible. Now, how do you keep it that way? The last thing you want is to wash your car a few times only to see those ugly swirls creeping back in.
Preventing new damage is every bit as important as the correction work itself. It all boils down to changing a few key habits, particularly around how you wash and dry your vehicle.

The number one culprit for creating swirl marks is, without a doubt, a bad wash routine. Moving from a quick, aggressive scrub-down to a more deliberate and gentle cleansing process is the secret to preserving that deep gloss for the long haul.
Adopt Safer Washing Habits
Your weekly wash is the most common time that new scratches are introduced. Ditching old, damaging habits for a safer process is the single biggest step you can take to protect your paint. These small adjustments pay off in a big way.
The cornerstone of any safe wash is the two-bucket method. By having one bucket for your car shampoo and a separate one with clean water to rinse your wash mitt, you stop yourself from dragging abrasive grit right back across the paint. You can get the full rundown on the https://www.swiftjetusa.com/blogs/news/two-bucket-wash-method in our guide.
Just as crucial are the materials that touch your car. Throw out any old sponges, stiff brushes, or crusty cotton towels. Your new best friends are plush, high-quality microfiber wash mitts and dedicated drying towels. Microfiber is engineered to pull dirt particles into its fibers, lifting them safely away from the paint instead of grinding them against it.
Pro Tip: When it's time to dry, let the towel do the work. A good microfiber drying towel is incredibly absorbent. Just lay it flat on a panel and gently drag it toward you, or pat the area dry. There’s absolutely no need to apply pressure.
Choose the Right Paint Protection
After all that polishing, your paint looks perfect, but it's also completely bare. Applying a layer of protection is like giving your car a shield. This sacrificial layer takes the hit from UV rays, bird droppings, and minor abrasions so your clear coat doesn't have to.
You’ve got a few great options, each offering a different mix of looks, longevity, and ease of use.
- Carnauba Wax: This is the classic choice for a deep, warm glow that makes paint look wet. It’s a favorite for show cars, but it’s the least durable, usually lasting only a couple of months.
- Paint Sealant: A synthetic polymer that bonds to the paint, creating a slick, glassy barrier. Sealants offer a sharp, highly reflective shine and solid protection for 4-6 months.
- Ceramic Coating: For the ultimate in long-term defense, nothing beats a ceramic coating. It creates a hard, semi-permanent layer on your paint that can last for years, providing superior resistance to chemicals and light scratches.
To really nail the finish, even small details matter, like knowing the best time to wash for a streak-free shine to avoid pesky water spots from the sun.
No matter what you choose, regular reapplication is essential. Think of it like sunscreen for your car—it wears off and needs to be topped up to keep protecting effectively. This simple maintenance is the final piece of the puzzle to keep your car looking like it just rolled out of the detail bay.
Answering Your Top Swirl Removal Questions
Even with the best guide in hand, it's completely normal to have a few questions buzzing around your head before you take a polisher to your car's paint for the first time. I get it. To help clear things up, I’ve pulled together some of the most common questions I hear from people just starting out.
Think of this as the final chat before you get to work—a little extra insight to give you the confidence to get that flawless, mirror-like finish you're after.
Are Swirl Marks Permanent?
Thankfully, no. The vast majority of swirl marks are not permanent damage. They're just incredibly fine scratches sitting in the very top layer of your car's finish, the clear coat.
Because these scratches are so shallow, a good polish effectively smooths out that surface, making them disappear without harming the underlying paint. That said, if you keep using bad wash methods, those light swirls can deepen over time, making the job tougher. A good rule of thumb: if a scratch is deep enough to catch your fingernail, you're looking at a more serious problem beyond typical swirl marks.
How Long Does This Actually Take?
This is a classic "it depends" situation, but I can give you a realistic idea. The time it takes for a full paint correction really hinges on a few things:
- Vehicle Size: A compact car is a much different beast than a full-size SUV or truck.
- The Damage: Light hazing might be fixed with a quick one-step polish. A car covered in deep, ugly swirls will need a more intensive compounding step first, followed by polishing.
- Your Experience: A seasoned pro can fly through a job, but if this is your first time, you’ll be slower—and that’s okay.
For a first-timer, I'd block out a whole weekend. A professional might knock out a simple one-step correction in 4-6 hours, but a more involved two-step job can easily take 8-12 hours, sometimes even longer.
My Best Advice: Don't rush it. Seriously. Rushing is the fastest way to get a blotchy, disappointing result. Patience is the secret ingredient to getting that jaw-dropping finish.
Can I Just Use Toothpaste or Something From the Kitchen?
Please don't. I know the internet is full of "hacks" suggesting you use things like toothpaste or baking soda, but it's a terrible idea for your car's paint. These household products are not designed for automotive clear coats.
Their abrasive qualities are completely uncontrolled, and they often just create a dull, hazy mess that's worse than the original swirls. Stick with products made specifically for cars. Detailing brands spend a fortune on R&D to create compounds and polishes that work predictably, breaking down to create a truly clear finish without causing more harm.
What's This Going to Cost Me?
The cost really depends on whether you do it yourself or hire a pro.
Going the DIY route involves an upfront investment. You can expect to spend somewhere between $150 and $300 to get set up with a decent dual-action polisher, a few pads, compound, polish, and quality microfiber towels. It feels like a lot at first, but you'll own those tools for years.
If you hire a professional, prices for a basic one-step polish on a regular sedan usually start around $300-$500. For more intense multi-stage correction jobs, or for larger vehicles, that price can easily shoot past $1,000.
Ready to start your paint correction journey with the right prep tools? The SwiftJet foam gun ensures your car is perfectly clean before you polish, minimizing the risk of adding new scratches. Get professional-level pre-wash results at home and start your project with the perfect canvas. Discover the SwiftJet Foam Gun today!