
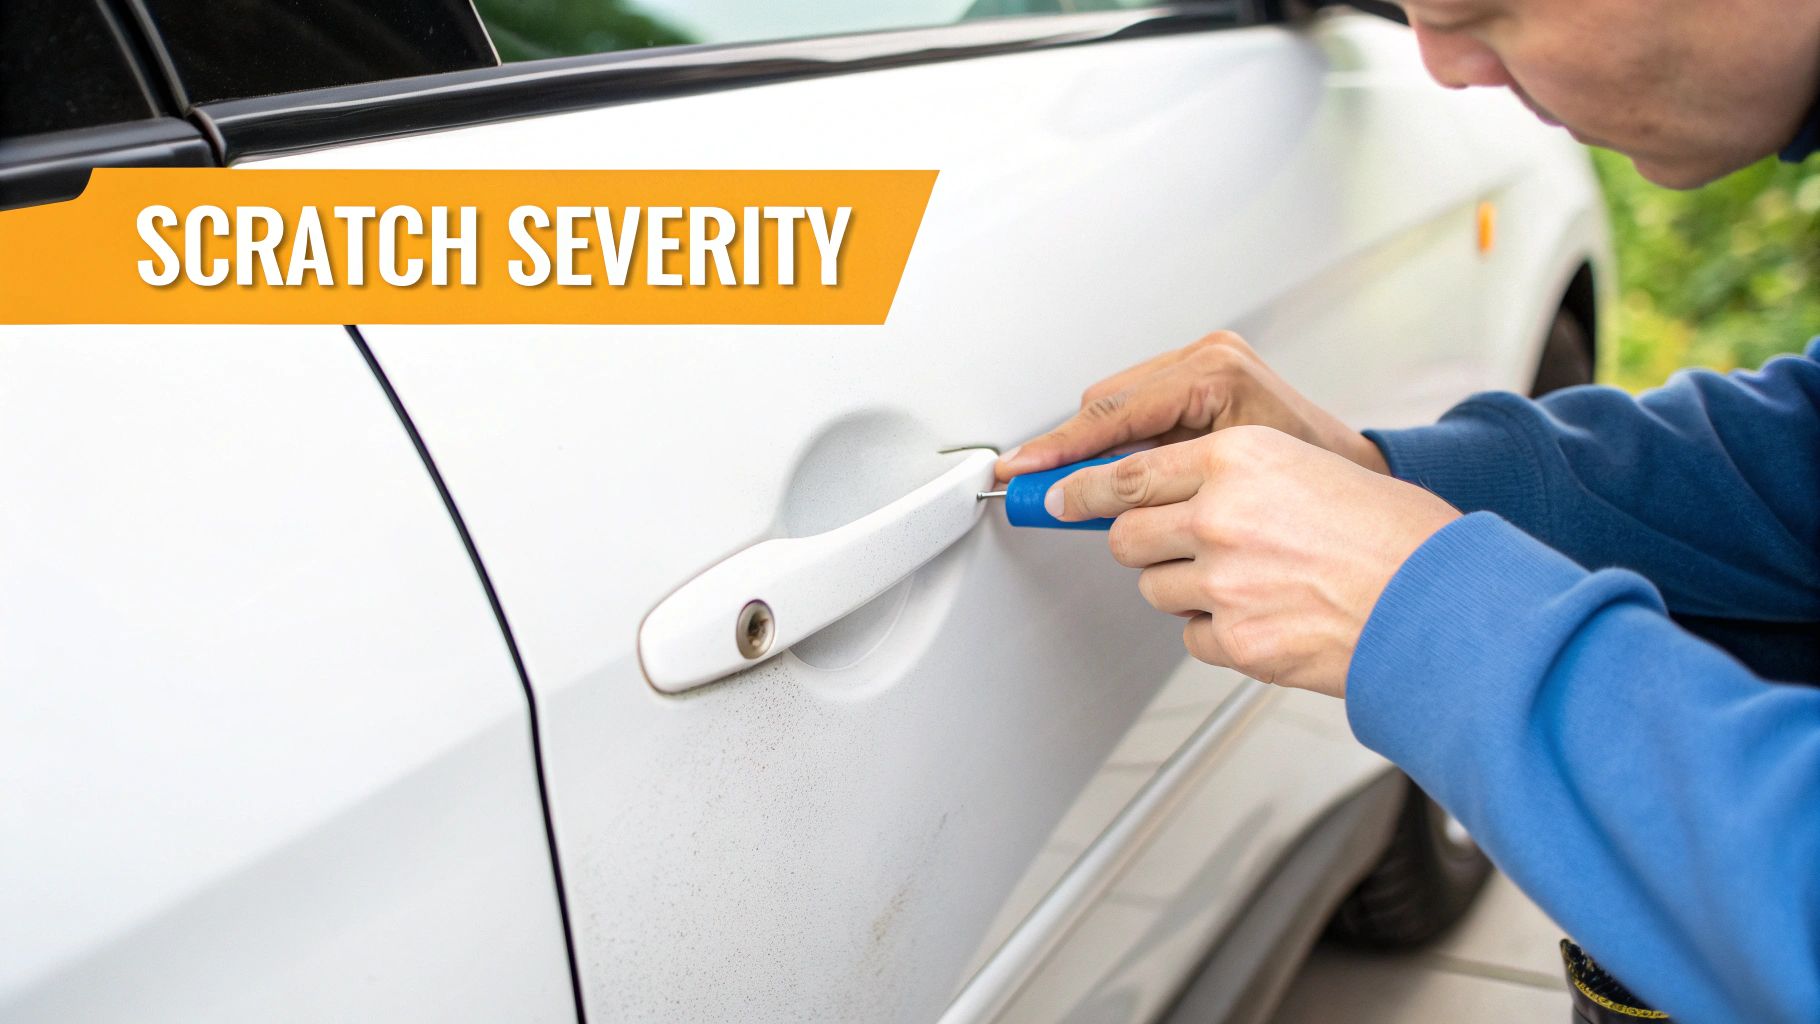
Before you even think about grabbing a bottle of polish or a piece of sandpaper, the very first thing you need to do is figure out what you're dealing with. The most common mistake people make is misjudging how deep a scratch really is, and that can turn a simple fix into a much bigger problem.
Think of your car's paint like layers: you've got the clear coat on top, then the base coat (the color), the primer, and finally, the metal panel itself. The layer where the scratch stops dictates your entire game plan.
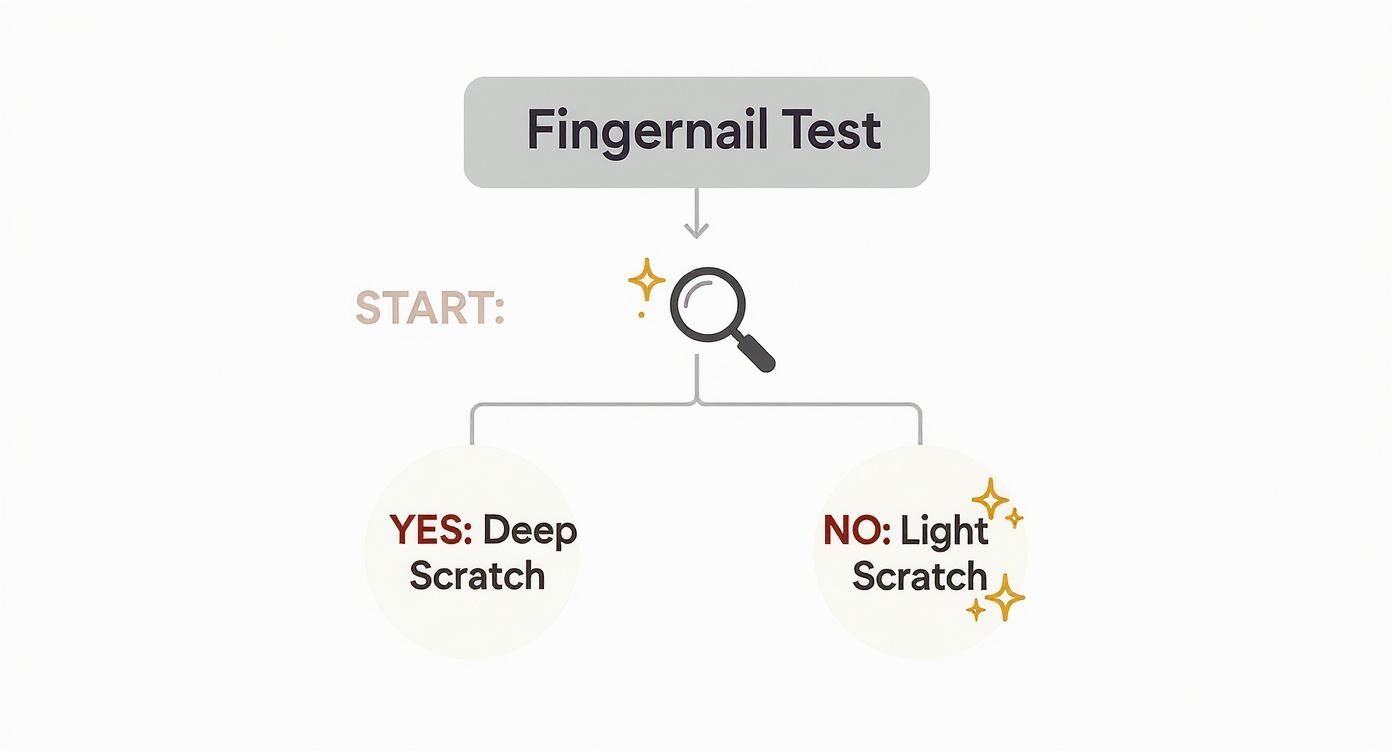
Run the Fingernail Test
This is the oldest trick in the book because it works. Gently run your fingernail across the scratch.
- If your nail glides right over it without catching, you're in luck. That's a light surface scratch, probably just in the clear coat. A good polish will likely take care of it.
- If your nail catches in the groove, the scratch has cut through the clear coat. This is a deeper issue that's going to need more work than just a simple polish.
Getting this right from the start saves you time, money, and the frustration of making things worse. You don't want to attack a light scuff with an aggressive compound, as you could dull the surrounding paint and create a bigger eyesore. The goal is always to use the least aggressive method needed to get the job done right.
What the Different Scratch Depths Look Like
To really nail the diagnosis, you need to know what you're seeing. Each layer of your paint has a distinct look when it's been damaged.
- Clear Coat Scratches: This is your top protective layer. Scratches here are the most common and look like fine lines or swirl marks that are most visible in direct sunlight. They haven't broken through to the color itself.
- Base Coat Scratches: This is the actual color of your car. Once a scratch hits this layer, you'll see a distinct, duller line of color. It's clearly past the glossy clear coat.
- Primer Scratches: The primer is the foundation for your paint, usually a flat grey, white, or black. If you see a different color peeking through your car's paint, you're down to the primer.
- Deep Scratches to the Metal: This is the most serious type of scratch. You'll see the shiny, bare metal of the car's body panel. These need to be fixed immediately to prevent rust from taking hold.
It's no surprise that more people are tackling these jobs themselves. The global car scratch remover market was valued at around US$ 2.33 billion in 2025 and is expected to hit US$ 3.97 billion by 2032. You can read more about the growth in DIY car care to see just how common it's become.
Scratch Severity Assessment Guide
Here’s a quick reference table to help you identify the scratch and decide on the best course of action. The fingernail test is your best friend here.
| Scratch Depth | Visual Cues | Fingernail Test Result | Recommended Action |
|---|---|---|---|
| Light | Faint white lines, swirls; often disappear when wet | Nail glides over it | Polishing or light compounding |
| Moderate | Visible color difference, dull line in the paint | Nail catches slightly | Heavy compounding, maybe wet-sanding |
| Deep | A different color (grey/white) is visible | Nail catches easily | Touch-up paint, wet-sanding, professional help |
| Down to the Metal | Shiny silver or dull grey metal is exposed | Nail catches deeply | Immediate repair needed; primer, paint, professional help |
This guide should give you the confidence to assess the damage accurately. Once you know exactly what you're up against, you can choose the right tools and techniques to make that scratch disappear for good.
Gathering Your Essential Scratch Removal Tools
Let's be honest—the difference between a flawless repair and a costly mess often comes down to having the right gear. Trying to tackle a scratch without the proper tools is a recipe for disaster. What you'll need in your arsenal depends entirely on how bad the damage is, but a few items are absolutely essential for any job.
Before you even think about touching the scratch, make sure you've got the basics ready. These supplies are all about working clean and safe, protecting the rest of your car from accidental damage.
- Microfiber Towels: You can never have too many. Grab a stack of clean, plush towels for washing, wiping off polish, and final buffing. A word of warning: never use old rags or paper towels. They'll just create more fine scratches.
- Painter's Tape: An absolute must-have. Use it to carefully mask off any plastic trim, badges, or panel edges you don't want to hit with the polisher. This little bit of prep saves a ton of headaches.
- Car Wash Soap and Buckets: Every good repair starts with a proper wash. You need a pH-neutral soap and two buckets to make sure you’re not grinding more dirt into the paint while you clean.
Tackling Light Scuffs and Swirls
For those frustratingly common, light scratches that are just in the clear coat, you can get some amazing results with just a few products. This is the perfect starting point for any DIYer.
The magic here happens with a quality polishing compound and the right applicator. The compound is filled with tiny abrasives that gently smooth out the clear coat, making the scratch disappear. While you can do this by hand, an orbital polisher will get the job done much faster and give you a far more consistent finish.
If you're building out your detailing kit, our guide on the https://www.swiftjetusa.com/blogs/news/the-ultimate-2025-car-detailing-supplies-list-12-essentials is a great place to see what the pros keep stocked.
Upgrading for Moderate Scratches
When you can feel a scratch with your fingernail, it’s a sign that a simple polish isn't going to cut it. This means the damage is deeper in the clear coat, and you’ll need a bit more muscle to level the surface properly.
A dual-action (DA) polisher is your best friend for moderate scratch removal. It's significantly safer for beginners than a rotary polisher because its orbital and rotating motion generates less heat, drastically reducing the risk of burning through the paint.
For these more stubborn marks, you'll want to step up to a cutting compound, which packs a bigger abrasive punch than a polish. You’ll also need a set of foam or microfiber pads, ranging from more aggressive cutting pads to softer finishing pads, to pair with your DA polisher.
Equipping Yourself for Deep Gouges
Alright, this is where things get serious. A deep scratch that shows the white primer or, even worse, bare metal requires a more methodical approach and the right toolkit. This is a true test of patience, blending sanding and painting for a seamless fix.
Here's what you'll need to pull it off:
- Automotive Sandpaper: We're talking about ultra-fine grits, usually between 3000 and 5000 grit. You’ll be wet-sanding, which means using water to lubricate the paper and prevent creating even deeper sanding marks. Make sure you get some high-quality sanding discs for a consistent finish.
- Color-Matched Touch-Up Paint: This is non-negotiable. Use your car’s paint code to get an exact match from your dealership or a trusted online supplier. It typically comes in a pen or a small bottle with a brush.
- Primer and Clear Coat: If the scratch is down to bare metal, you have to apply a thin layer of primer first to give the paint something to stick to. You’ll also need an automotive clear coat to fill the repaired area and protect your work.
By gathering the right tools before you start, you're setting yourself up for a repair you can be proud of, no matter how deep the scratch.
Fixing Light Scratches and Swirl Marks
This is where you can get some incredibly satisfying results right in your own garage. We're talking about those fine lines, spiderwebs, and swirl marks that seem to pop up out of nowhere, especially under direct sunlight. They're the most common paint defects out there, and the good news is, you can absolutely fix them yourself.
These imperfections are almost always just in the top layer of paint—the clear coat. That makes them the perfect candidate for a DIY repair with a little patience and the right stuff.
But before you even think about touching the paint with a polish, the surface needs to be squeaky clean. I don't mean just a quick rinse. Any dirt or grit left on the surface will get ground right into your paint as you polish, making things way worse. A proper wash, ideally with a foam gun to lift the dirt away, followed by a clay bar treatment, is a must. The clay bar pulls out all the nasty, embedded gunk that a wash can't, leaving you with a perfectly smooth canvas.
The Gentle Approach: Polishing by Hand
For a few light scuffs or a small patch of swirls, polishing by hand is a great way to go. It gives you maximum control, which is fantastic if you're a bit nervous about taking a power tool to your car's finish.
Start with a few pea-sized drops of a quality polishing compound on a microfiber or foam applicator pad. Place the pad right on the scratch and use firm, even pressure to work the polish in. I like to use overlapping circular motions. You’ll see the polish go from hazy to clear—that’s it "breaking down," which means the tiny abrasives are doing their job leveling out the clear coat.
Once the polish is clear, grab a clean, plush microfiber towel and wipe away the residue. Check your work in good light. You might need another pass, but always start with the least aggressive method first. You can always do more, but you can't undo taking too much off.
A quick tip from experience: Don't skip the clay bar. A car that feels clean after a wash can still be covered in tiny particles of industrial fallout or rail dust. The clay bar is the only way to be sure you aren't just dragging that grit across your paint and making more scratches.
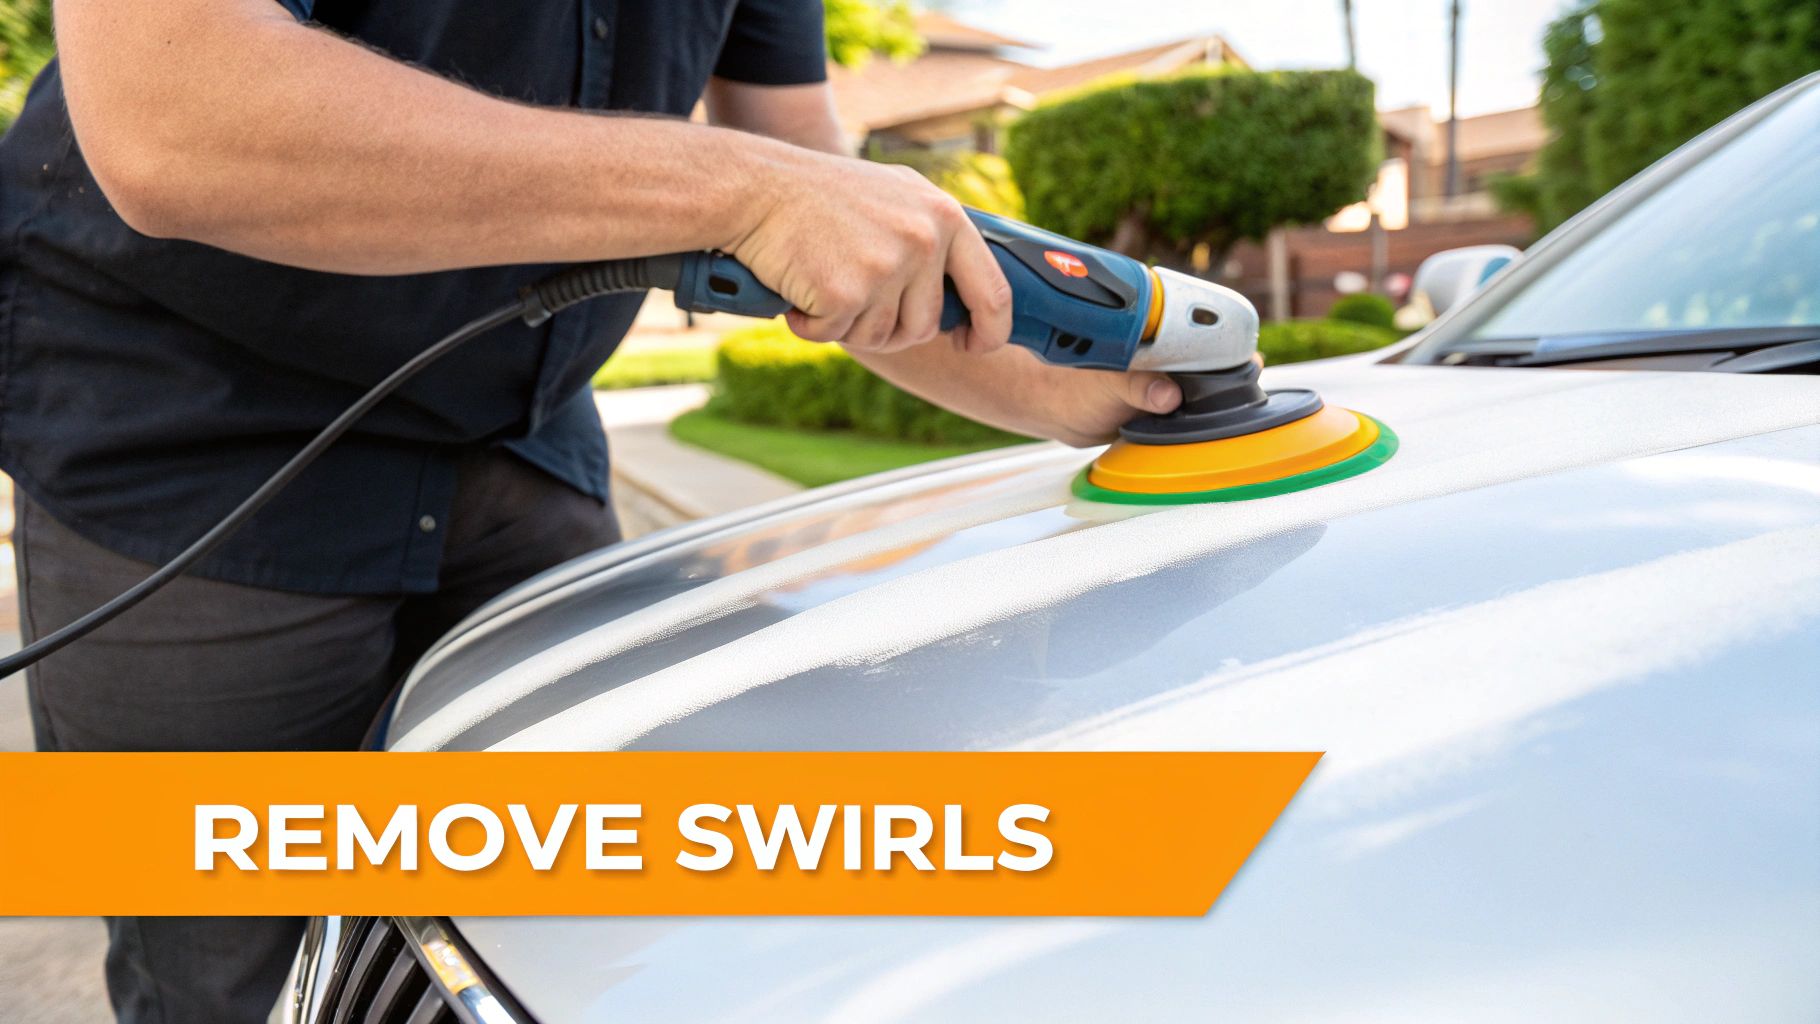
Stepping It Up: Using a Dual-Action Polisher
If you're looking at a whole hood full of swirl marks, polishing by hand will have your arms burning. This is where a dual-action (DA) polisher becomes your best friend. A DA is much safer for beginners than a pro-style rotary buffer. Its head oscillates and rotates, which generates less heat and dramatically cuts down the risk of burning through the paint.
First, attach a soft finishing pad to your polisher and dab 3-4 small drops of polish on it. Place the machine flat against the paint before you turn it on—this simple trick keeps polish from slinging all over your garage.
Start on a low speed, like a 2 or 3, and spread the polish over a small 2x2 foot section. Once it's spread, bump the speed up to a 4 or 5 and work the area in a cross-hatch pattern: a few passes up and down, then a few passes side to side. Use light, consistent pressure and just guide the machine.
Just like with hand polishing, watch for the polish to break down and turn translucent. That's your cue that the abrasives have done their work. Turn the machine off while it’s still flat on the panel, then lift it away. A quick wipe with a fresh microfiber towel will reveal a glossy, scratch-free finish. Getting rid of these defects is one of the most rewarding parts of detailing, and you can dive deeper into how to remove swirl marks from car paint with our complete guide.
Don't Forget to Protect Your Work
Okay, the scratches are gone and the paint is gleaming. You're not quite done yet. Polishing, by its nature, removes a microscopic layer of clear coat, and that includes any wax or sealant you had on there. Your freshly perfected paint is now totally exposed.
The final, critical step is adding protection. A high-quality carnauba wax will give you a deep, warm glow, while a synthetic paint sealant will offer tougher, longer-lasting durability. This new layer will shield your hard work from UV rays and grime, and it's what really locks in that incredible shine.
Repairing Scratches That Reach The Paint
So, you've run your fingernail over the scratch, and it catches. That little test tells you everything you need to know: the damage has sliced through the clear coat. A simple polish won't touch this kind of defect. To fix it, we need to get a bit more assertive with a process called wet sanding and compounding.
It sounds intense, I know. But for a patient DIYer, it's completely achievable. The idea is to carefully level the clear coat around the scratch until the scratch itself disappears. It’s a multi-stage repair that first removes the damaged material and then meticulously refines the surface back to a perfect, high-gloss shine.
Preparing For Precise Abrasive Work
Precision is the name of the game here. Grab some painter's tape and mask off a tight boundary around the scratch, about an inch on either side. This is a crucial step; it keeps your work contained and prevents you from accidentally sanding a wider area than needed.
Next, you'll need high-grit automotive sandpaper, usually something in the 2000 to 3000-grit range. Don't use it dry. Cut a small piece and let it soak in a bucket of water with a single drop of car shampoo for at least an hour. This soaking makes the paper flexible and helps it glide smoothly, with the soap acting as a lubricant.
The Art Of Gentle Wet Sanding
Wrap that soaked sandpaper around a small, firm sanding block. I have to insist on this—using a block is non-negotiable. It distributes pressure evenly, preventing your fingers from digging in and creating uneven low spots in the clear coat.
Lightly mist the taped-off area with a spray bottle of water to keep things lubricated. Now, begin sanding with light, straight-line motions, always moving with the grain of the scratch. The goal is to let the sandpaper do the work, not muscle. After just a few gentle passes, wipe the area dry with a microfiber towel to check your progress.
Heads up: The area you're sanding will look dull, hazy, and honestly, pretty awful. This is completely normal and exactly what you want to see. You're creating thousands of tiny, uniform scratches to level the paint. The real magic comes next.
Keep up this cycle of light sanding and inspecting until the original scratch is gone. You’ll know you're done when the entire taped-off section has a consistent, matte appearance. Once you hit that point, remove the tape and clean the area thoroughly.
Restoring Clarity With Compounding
It's time to bring back the shine. For this, you’ll need a dual-action (DA) polisher, a cutting compound, and a foam or microfiber cutting pad. A cutting compound has more aggressive abrasives than a polish, and it’s specifically designed to remove the sanding marks you just created.
Apply four pea-sized drops of compound to the pad. With the polisher still off, place it on the paint and spread the product over the hazy area on a low speed. Then, bump the speed to a medium setting (usually 4-5 on most machines) and work in a slow, overlapping cross-hatch pattern. As the compound breaks down, you’ll see those sanding marks vanish and clarity start to return.
For really stubborn scratches, pros often rely on specialized abrasives like 3M Roloc sanding and surface conditioning discs for maximum efficiency.
Refining The Finish With Polish
After wiping away the compound residue, the area will look much better, but you'll probably see some light hazing or micro-marring left over from the aggressive compounding. This is where a finishing polish saves the day.
Switch to a softer finishing pad on your polisher and apply your polish. Use the same technique—slow, overlapping passes with light pressure—to refine the surface. This final step removes any lingering haze and restores that deep, liquid gloss, seamlessly blending your repair with the surrounding paint.
For a deeper dive into technique, check out our guide on how to polish car paint. It's packed with tips for getting that mirror-like finish.
Once the repair is invisible, all that’s left is to apply a layer of your favorite wax or sealant to protect your hard work. You’ve just taken a noticeable eyesore and made it disappear.
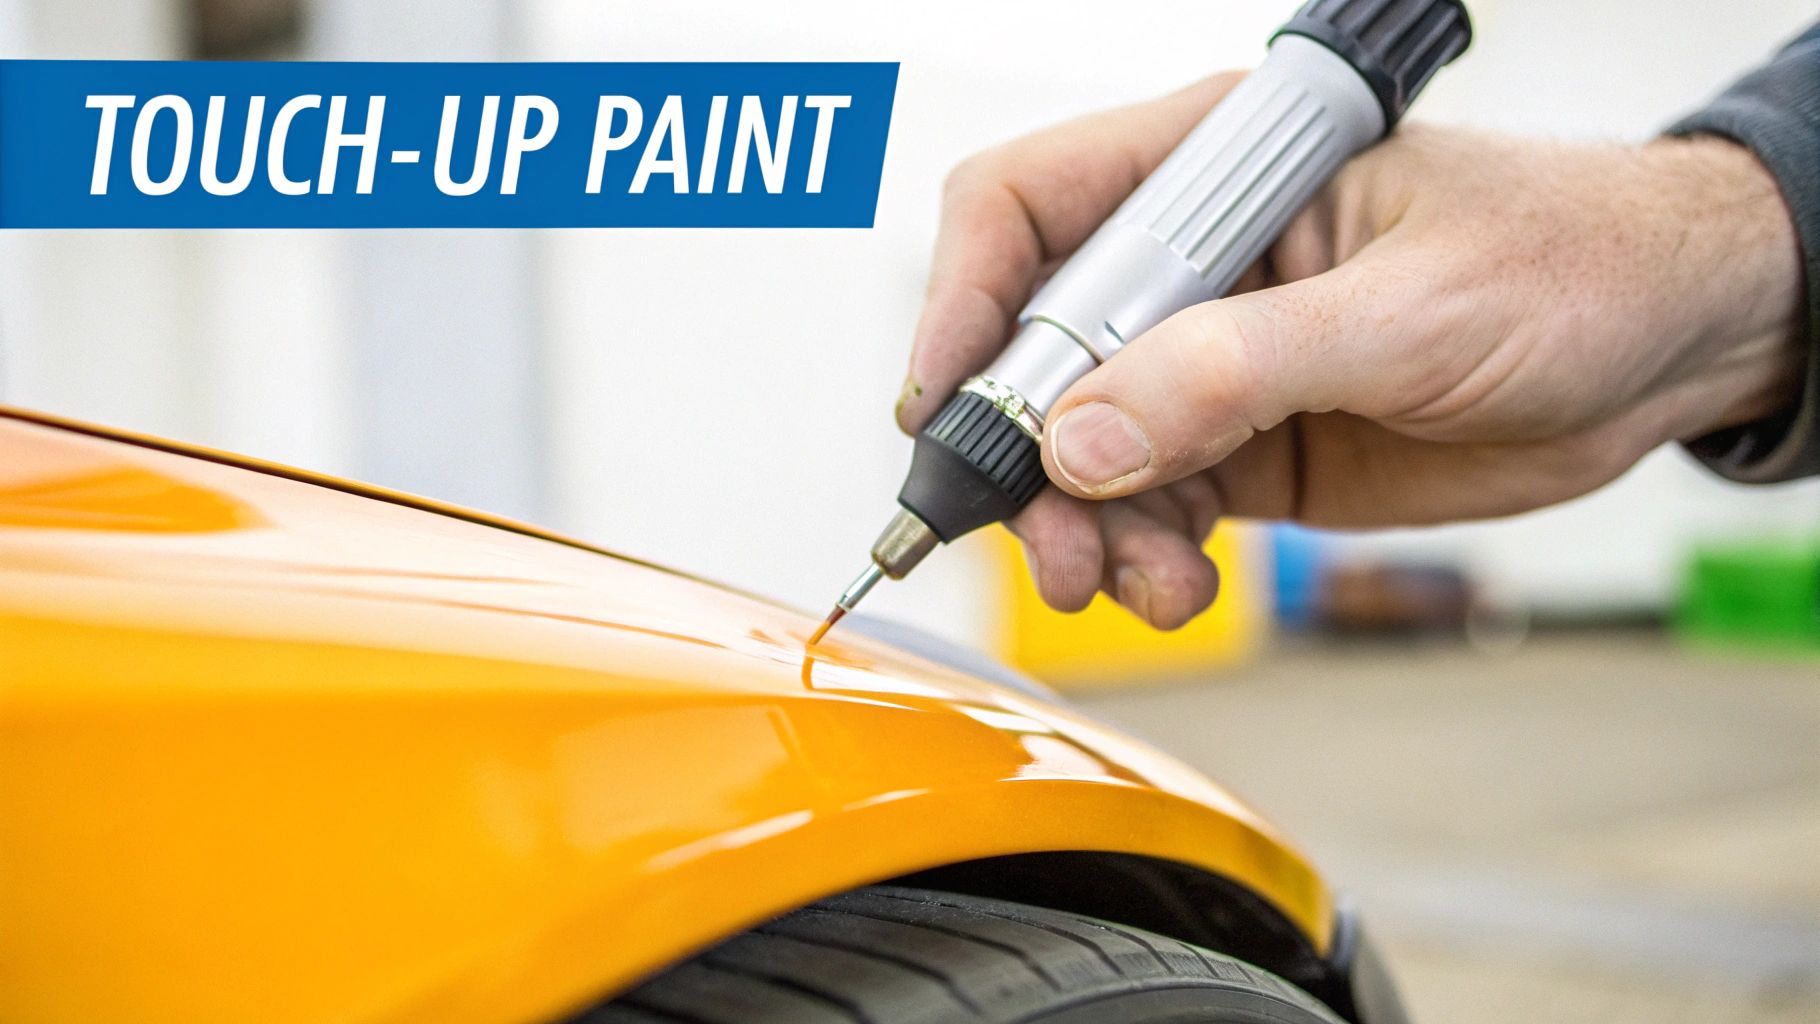
How to Use Touch-Up Paint on Deep Gouges
When a scratch cuts so deep that you see the light-colored primer or, worse, the bare metal underneath, you've got more than a simple cosmetic problem. That's a direct line to rust, and it needs to be addressed properly.
This is where touch-up paint comes in. Forget what you know about polishing; this is a more surgical repair. We’re going to rebuild the layers of paint from the metal up, filling the gouge until the repair is seamless. It takes a steady hand and some patience, but the results can be astonishingly good.
This kind of hands-on repair is becoming more common. In fact, over 55% of vehicle owners in the U.S. now prefer to tackle their own car maintenance to save a bit of cash. This DIY spirit has made touch-up pens and comprehensive kits incredibly popular. If you're curious about the numbers behind this trend, you can dig into the full research on DIY auto trends and see how the market is shifting.
Meticulous Preparation and Cleaning
A successful touch-up job is built on a flawlessly clean foundation. If you leave even a microscopic trace of wax, grease, or road grime in that scratch, the new paint simply won't stick. The repair will fail, and you'll be doing it all over again.
Start by wiping the scratch and the area immediately around it with a wax and grease remover or isopropyl alcohol on a fresh microfiber towel. To get deep inside the gouge itself, you'll need a more precise tool. A paint prep pen or a small swab dipped in your cleaning solvent works wonders for getting into those tight crevices and ensuring every last contaminant is gone.
Building Up the Layers with Precision
The golden rule here is patience. You absolutely cannot rush this. The goal is to build up several whisper-thin layers of paint, letting each one dry properly. If you just glob on a thick coat, you'll end up with a gummy mess that never fully cures and looks terrible.
Here's how to do it right:
- Prime the Bare Metal: If you can see shiny metal, you must start with primer. It’s not optional. Using a very fine-tipped applicator (a toothpick works great in a pinch), dab a tiny amount of automotive primer just inside the scratch. Let it dry completely based on the product’s instructions.
- Apply the Color-Matched Base Coat: Make sure you have the right paint code for your car—this is critical for a perfect match. Apply a very thin layer of the base coat, taking care to stay inside the lines of the scratch. The paint shrinks as it dries, which is exactly why multiple thin coats are necessary.
- Give It Time to Cure: Wait at least 30 minutes between each thin coat. You’re slowly building up the color until it's almost flush with the original paint, sitting just below where the clear coat would be.
My personal pro-tip is to make a day of it. I’ll apply one thin layer in the morning, another around lunchtime, and a final one in the evening. This guarantees each layer is fully flashed off, leading to a much stronger and more durable repair.
Applying the Clear Coat
After your last base coat has had a full 24 hours to cure, it's time for the final protective layer: the clear coat. This is what fills the last bit of depth in the scratch, provides that glossy finish, and protects the new paint from UV rays.
Using the same precise technique, apply the clear coat. This time, you actually want to fill the scratch so that a small, controlled "blob" of clear coat sits just above the surrounding paint surface. This might feel wrong, but it's intentional. We'll be sanding this excess material down later to get a perfectly level finish.
Now, walk away. Let that clear coat cure for at least 48-72 hours. It needs to be rock-hard before you can even think about touching it with sandpaper.
Leveling and Polishing for an Invisible Finish
Once the touch-up paint is fully cured and sitting slightly proud of the surface, it's time for the magic. This is where we level the repair and make it blend in perfectly.
- Wet Sanding: Grab a small piece of 3000-grit sandpaper and wrap it around a small, firm block—a pencil eraser is perfect for this. Gently wet sand the raised blob of clear coat using light pressure and straight-line motions. Your goal is to stop the moment the repair feels completely smooth and level with the surrounding paint.
- Compounding: The sanded area will look dull and hazy. That’s normal. Use a cutting compound, either with a machine polisher or by hand, to remove those fine sanding scratches and restore the paint's clarity.
- Final Polish: Follow up with a finishing polish to eliminate any last traces of haze from the compound. This is what brings back that deep, wet-looking shine.
After polishing, the repair should be virtually invisible. The very last step is to apply a good coat of wax or sealant to the area to protect your hard work.
Got Questions About Car Scratch Repair? We've Got Answers
Even with a perfect game plan, a few questions are bound to pop up when you're working on your car's paint. Getting the right answers is the difference between a quick fix and a costly mistake. Let’s clear up some of the most common questions we get from fellow car enthusiasts.
Does Toothpaste Actually Work on Scratches?
This is one of those internet "hacks" that just won't die. The short answer? No. Please, do not put toothpaste on your car's paint.
While toothpaste is an abrasive, it’s a crude and uncontrolled one. It will almost certainly dull your clear coat and can leave behind a hazy mess of tiny new scratches that are a bigger headache to fix than the original mark. Proper automotive polishes use specialized diminishing abrasives that break down as you work them, refining the surface to a mirror shine. Toothpaste just grinds away, leaving you with a damaged, cloudy finish.
Polishing Compound vs. Rubbing Compound: What’s the Deal?
Knowing when to reach for a polish versus a compound is crucial for getting good results. The easiest way to think about it is like sandpaper grits—one is for heavy cutting, the other for fine finishing.
- Rubbing Compound: This is the more aggressive product. It's designed to level out more serious defects, like moderate scratches, heavy oxidation, or the marks left behind from wet sanding.
- Polishing Compound: This is a much finer abrasive. Its job is to remove light swirl marks and haze, essentially refining the paint to restore that deep gloss and clarity.
The golden rule of paint correction is to always start with the least aggressive method. Try a polish first. If that doesn't cut it, you can move up to a rubbing compound. Just remember, you’ll always need to follow up with a polish to remove the micro-marring that the more aggressive compound leaves behind.
How Long Should I Wait to Wax After a Repair?
This is a critical question, and getting it wrong can undo all your hard work. The answer really depends on the type of repair you just did.
If you simply used a compound or polish to buff out a surface scratch, you’re good to go. You can apply your favorite wax or paint sealant right away.
But, if you used touch-up paint—primer, base coat, and clear coat—you have to be patient. That fresh paint needs to "gas out," which is just the process of all the solvents evaporating so it can fully cure and harden. Most paint manufacturers recommend waiting a minimum of 30 days before you seal or wax over a fresh touch-up. Waxing it too soon traps those solvents, which can cause the paint to bubble, soften, or fail completely.
When Is It Time to Call a Professional?
Knowing your limits is the smartest thing a DIYer can do. While fixing a minor scratch is incredibly rewarding, some jobs are just better left to a professional body shop. It’s time to call in the pros if:
- The scratch is long and deep, like a key mark that runs the length of a door.
- You can clearly see bare metal along the scratch.
- The panel isn't just scratched but is also dented, creased, or bent.
Trying to tackle major damage without professional equipment and experience can easily make the problem worse, leading to a much more expensive repair bill down the road.
Before you tackle any scratch, you need a perfectly clean surface. The SwiftJet Car Wash Foam Gun turns any garden hose into a foam cannon, covering your car in thick, dirt-lifting suds for a safer, scratch-free wash. Start your next project like a pro and get amazing results at home. Find out more at https://swiftjetusa.com.