
That sinking feeling when you spot a fine mist of paint where it shouldn't be... it's a frustrating moment for any car owner. But before you reach for any compounds or clays, the first and most critical step is to figure out exactly what you're up against. A proper assessment is the key to getting this right without accidentally damaging your car's finish.
Sizing Up the Damage and Figuring Out the Paint
Before you can tackle the problem, you need a clear picture of the overspray's extent and type. I've seen it a hundred times: someone jumps straight to an aggressive removal method and ends up with scratches or a dull haze in their clear coat. Don't be that person.
Take a few minutes to look over your entire vehicle in good light. Don't just scan the hood and roof; check the glass, the plastic trim, chrome bits—everywhere. Overspray gets carried by the wind and settles everywhere.
The Old-School "Baggie Test"
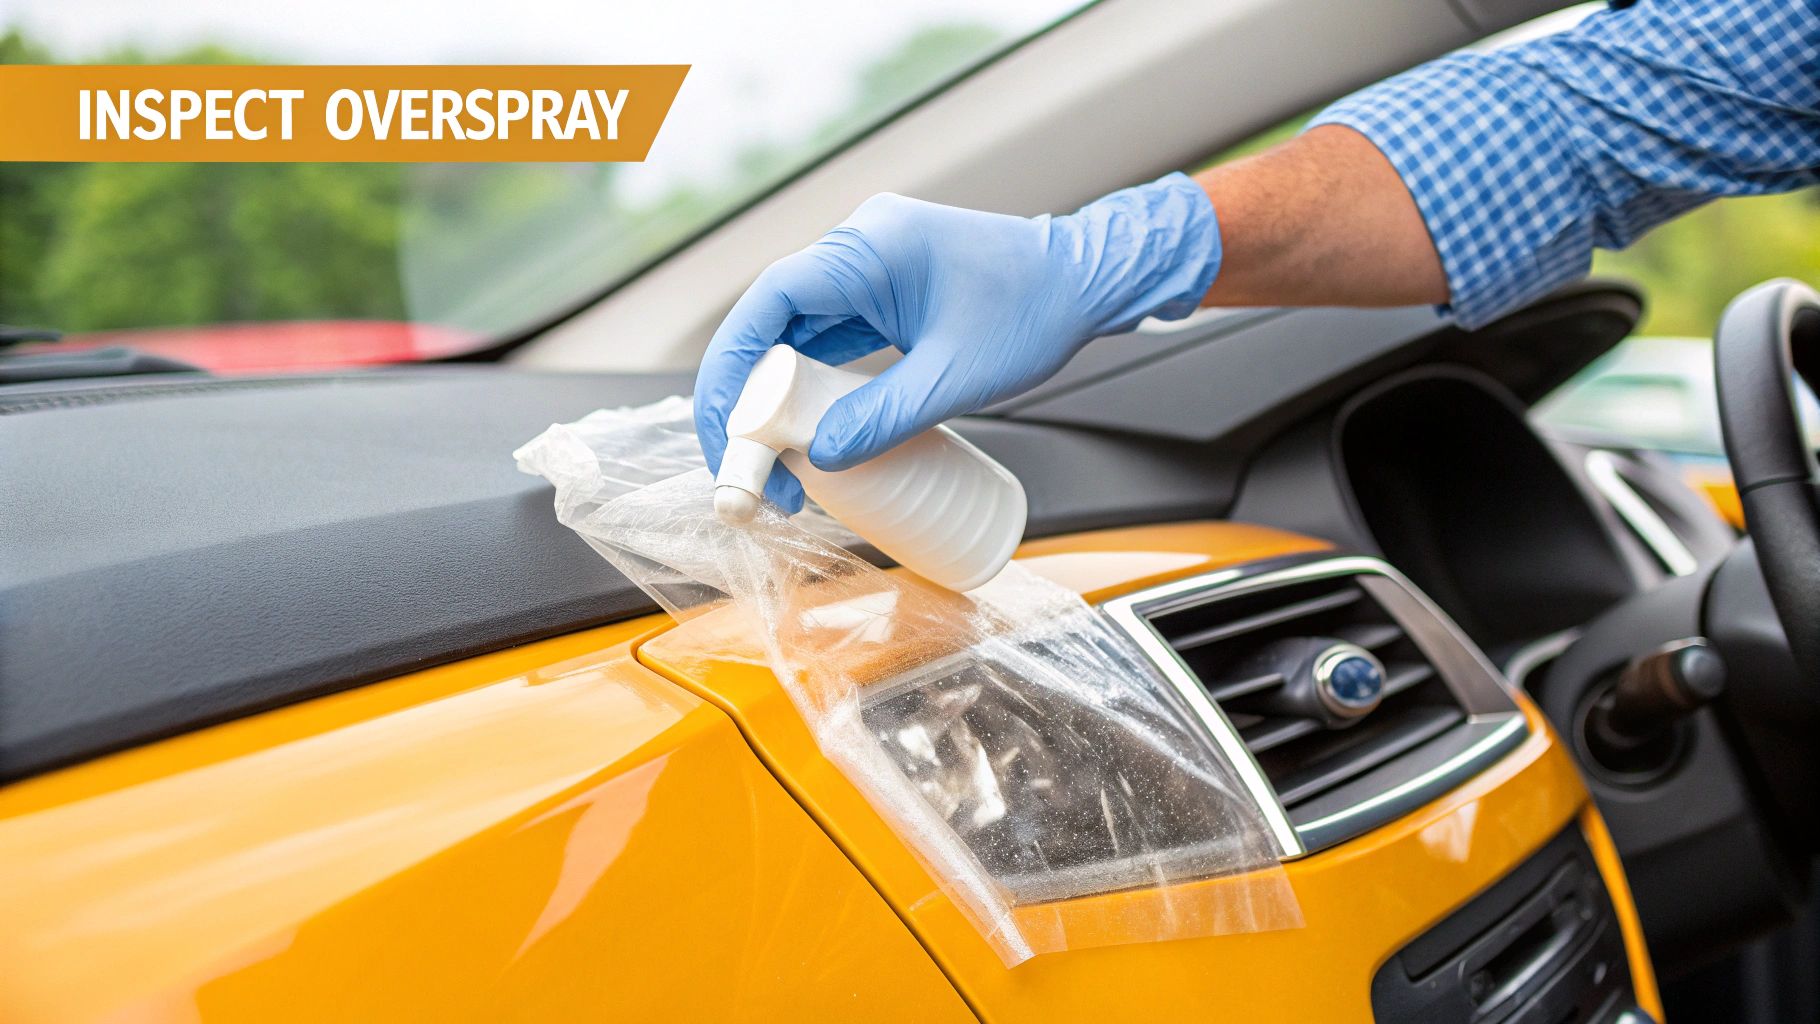
Sometimes, the finest overspray particles are almost invisible. This is where a classic detailer's trick comes in handy: the "baggie test." It's simple. Grab a thin plastic sandwich bag, put your hand inside, and lightly glide your fingertips across the car’s paint.
That thin layer of plastic acts like a microphone for your sense of touch. It dramatically amplifies any surface roughness, making even the slightest contaminants feel like sandpaper. This is the best way to confirm that what you're dealing with is actually bonded overspray.
What Kind of Paint Are We Dealing With?
Now, play detective. Where did this come from? Did a neighbor have their house painted? Did you drive through a construction zone where they were painting bridges or road lines? The source often tells you the paint type, which is a huge clue for your removal strategy.
- Water-Based Latex: This is your typical house paint. It's relatively soft and usually the easiest to remove.
- Automotive Enamel or Urethane: If it's from another car or industrial equipment, this paint is designed to be tough. You're going to need a bit more muscle to get it off safely.
Remember, your car’s finish is a tough system of base color and a protective clear coat on top. The entire challenge is removing the unwanted gunk without harming that clear coat. Different types of overspray demand different approaches, as you can see in any good guide to removing overspray from a car.
Key Takeaway: Always, and I mean always, start with the least aggressive method first. Using a product that’s too weak is a waste of time, but one that’s too strong can inflict more damage than the overspray you started with.
Getting Your Gear Together for Overspray Removal
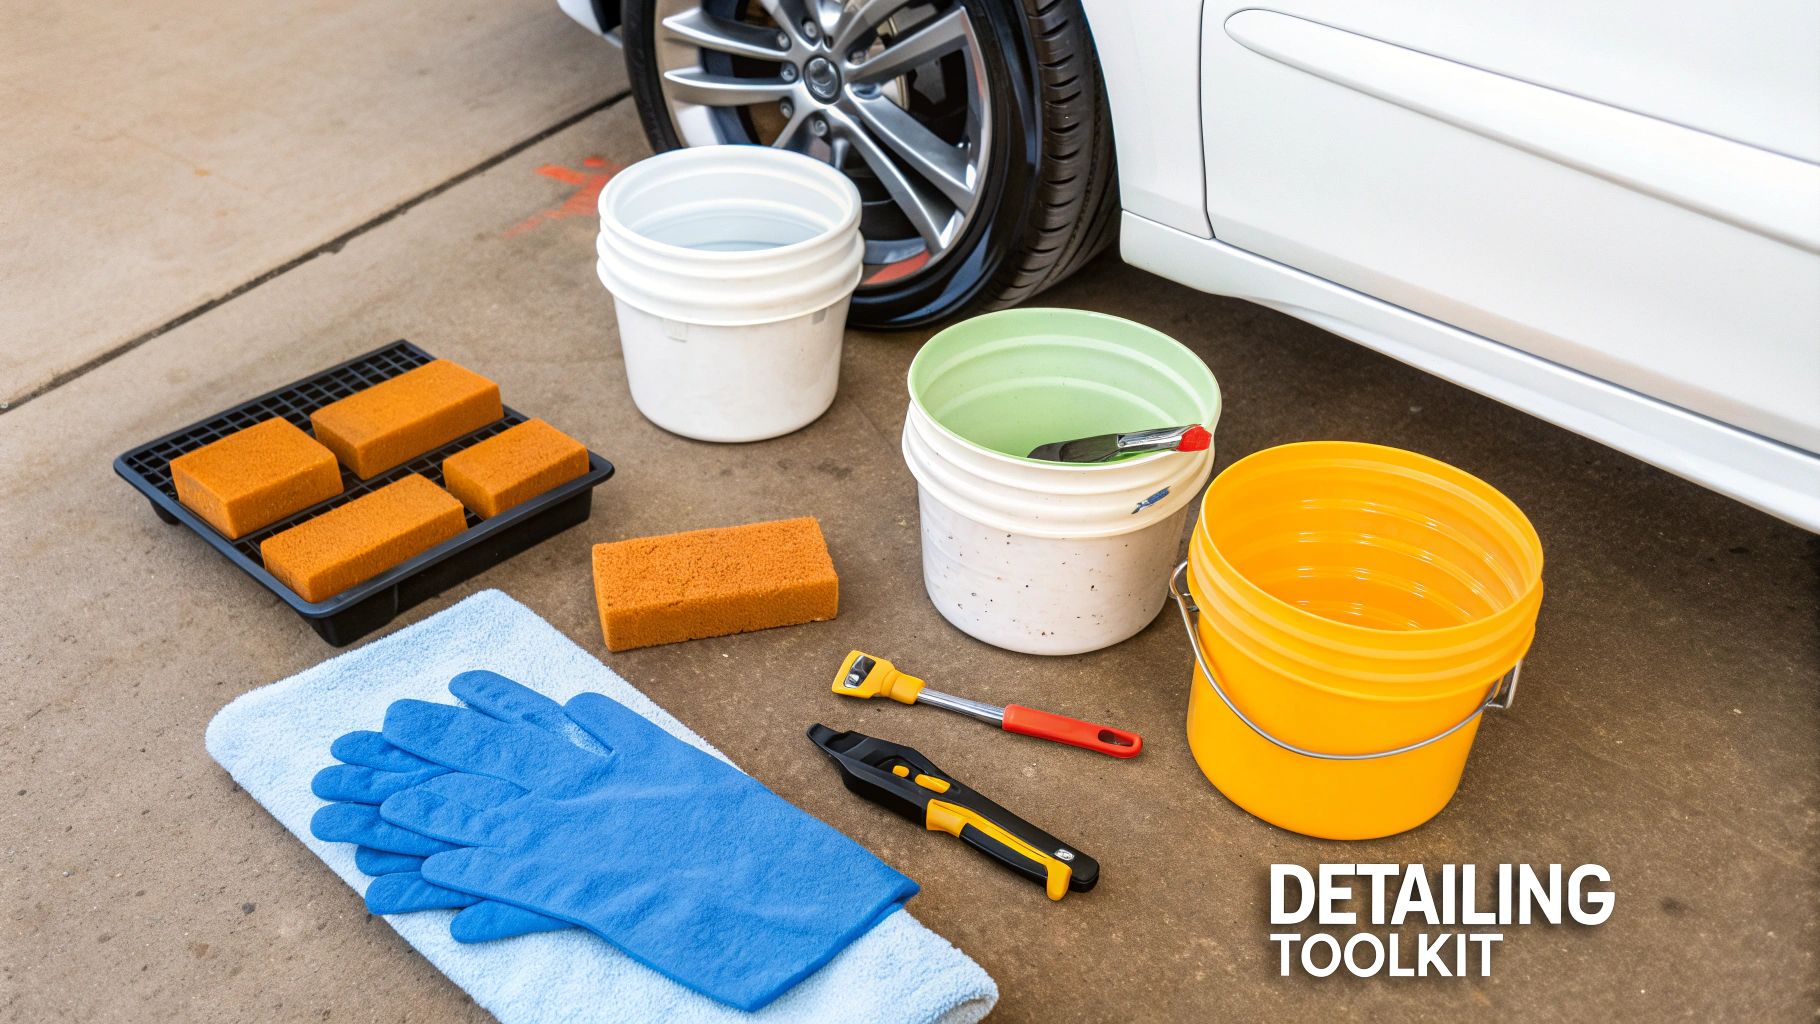
Walking into a detailing project with the right gear can be the difference between a frustrating afternoon and a truly satisfying, scratch-free finish. Before you get started, let’s make sure your toolkit is ready.
The star of the show for most overspray jobs is the humble detailing clay bar. But they aren't all created equal. They come in different grades, and picking the right one is crucial. A fine-grade bar is your go-to for light overspray, whereas a medium or heavy-duty bar has the muscle for more stubborn, baked-on particles. My rule of thumb? Always start with the least aggressive option first. You can always step it up if you need to.
Of course, a clay bar is useless without a high-quality clay lubricant. Seriously, don't even think about using plain water. It just doesn't provide enough slip, and you risk marring your paint. The lubricant creates an ultra-slick surface that lets the clay glide effortlessly, safely plucking the contaminants away.
Assembling Your Supporting Tools
Beyond the clay and lube, a few other items are absolutely non-negotiable if you want to tackle overspray removal like a pro. Having these on hand will stop you from taking shortcuts you'll regret later.
- Two-Bucket Wash Setup: This is Detailer 101. One bucket holds your car shampoo, the other is just for rinsing your wash mitt. This simple technique keeps the grit you remove from getting dragged right back across your paint.
- A Stack of Microfiber Towels: You can never have too many good ones. Keep separate towels for washing, drying, and buffing off residue. Cross-contamination is your enemy here.
- Specialized Removers: For really tough cases, a dedicated iron remover or a paint-safe solvent can be a lifesaver. Sometimes, a clay bar just can’t lift everything, and these products can dissolve the contaminants chemically.
For a complete checklist of the essentials every car owner should have in their garage, take a look at our comprehensive car detailing supplies list. Being prepared makes jobs like this one go so much smoother.
Mastering the Clay Bar for a Flawless Finish
When you’re dealing with paint overspray, a good detailing clay bar is usually your best friend. Don't think of it as a scrubber—it's more like a super-specialized magnet. It’s designed to gently grab onto and shear off contaminants bonded to your paint, all without digging into your clear coat.
The process itself isn't complicated, but it does demand a bit of patience and a careful hand. First things first: the car has to be spotless. A proper two-bucket wash is non-negotiable here. You need to get all the loose dirt and grit off the surface so you're not just grinding it into the paint with the clay.
The Claying Process Explained
With the car washed and bone dry, you're ready to start. Grab your clay bar and break off a manageable chunk—about a third of the bar is a good starting point. Work it in your hands for a minute to warm it up, making it soft and pliable. Then, flatten it out into a small patty that fits comfortably in your palm.
Now for the most critical part of the whole process: lubrication. You’ll need a dedicated clay lubricant. Spray it generously over a small working area, maybe a 2x2 foot section to start. Seriously, don't be shy with the lube. You want to create a slick, slippery barrier between the clay and the paint. You can’t really use too much.
Gently glide the flattened clay across the lubricated surface. Stick to straight-line motions, going back and forth horizontally and then vertically. Try to avoid circles, as that's an easy way to create swirl marks. As you work, you’ll actually feel the clay grabbing the gritty overspray particles. It’ll start rough, but as the contaminants are lifted away, you'll feel the surface become incredibly smooth.
Pro Tips for Perfect Results
Getting great results is all about the little details. These are the tricks of the trade that separate a decent job from a truly professional one.
- Check Your Work: After finishing a small section, take a look at the clay. You'll see all the little specs of paint and gunk it has pulled off.
- Fold and Knead: Once the surface of your clay patty looks dirty, just fold it in on itself to expose a fresh, clean side. Using a contaminated piece just drags that junk right back across your paintwork.
- Know When to Toss It: If you've folded the clay multiple times and can't find a clean surface anymore, it's done. Toss that piece and grab a new one. And if you ever drop a piece on the ground? It's toast. Throw it away immediately.
The most common mistake I see is people skimping on lubricant or trying to clay too large of an area at once. This causes the clay to grab and skip across the paint, which is a surefire recipe for marring the finish. Keep it wet, keep your movements light, and take your time.
This chart gives you a quick visual on how different clay grades stack up for a job like this.
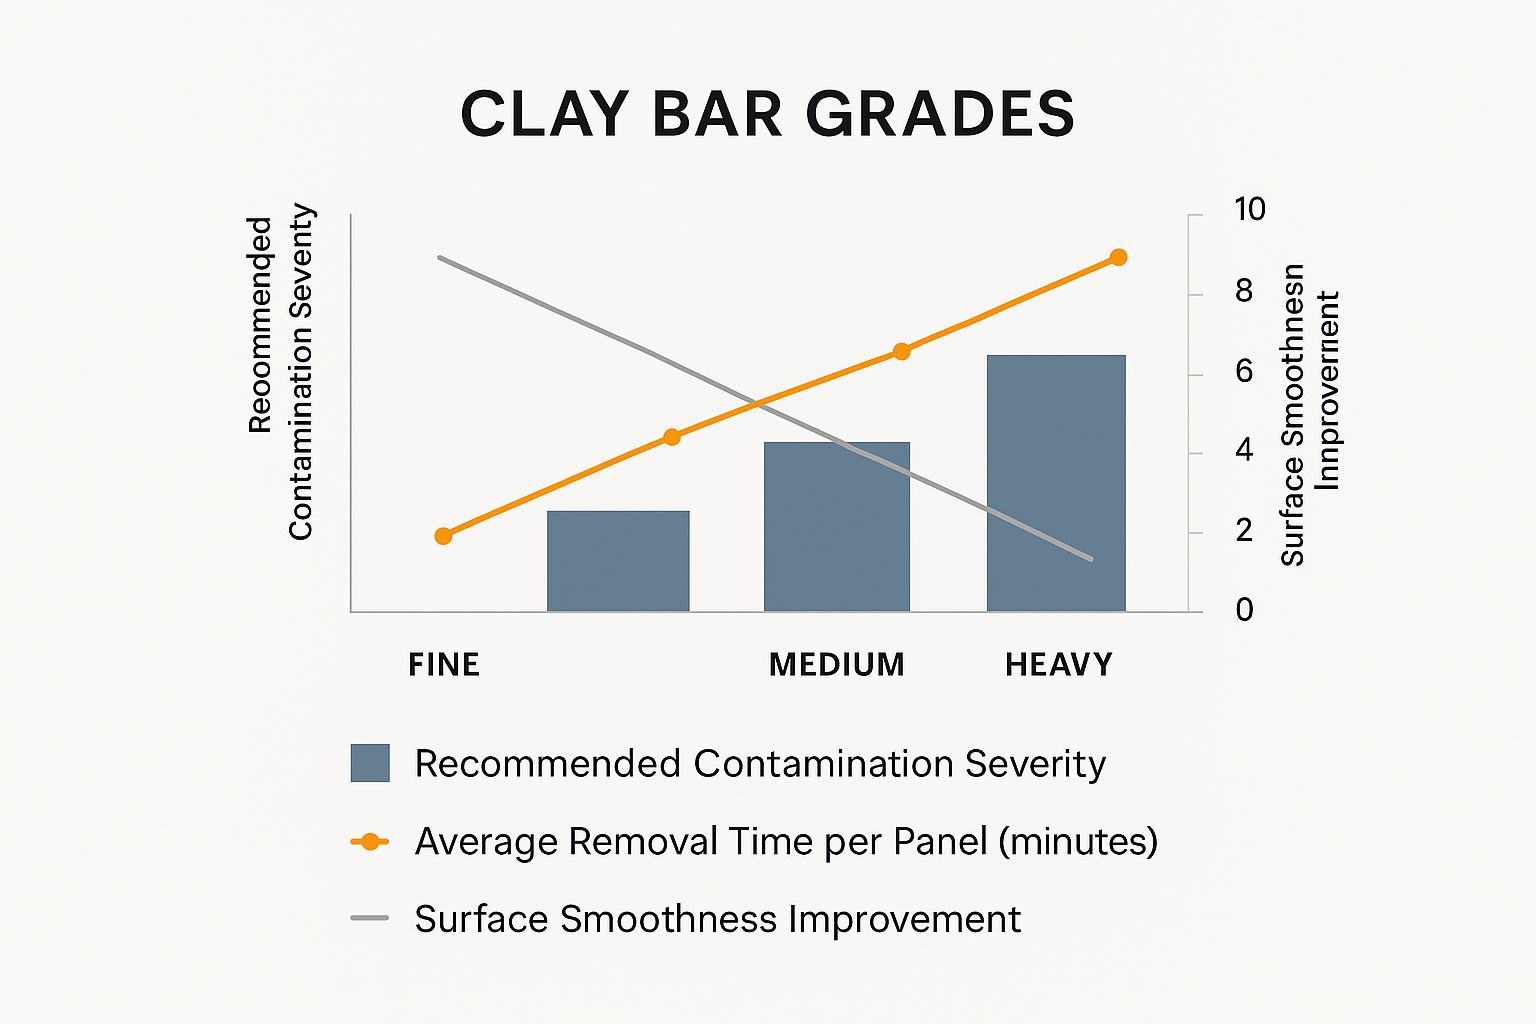
As you can see, a heavy-grade clay will cut through severe contamination faster, but a fine-grade bar is what will get you that ultimate glass-like smoothness.
After you finish a section, give it a quick wipe with a clean, plush microfiber towel to remove any lube residue. Go ahead and feel it—the difference is night and day. If you want to dive deeper into the technique, our guide at https://www.swiftjetusa.com/blogs/news/how-to-clay-bar-car-easy-step-by-step-guide has even more detail.
While this focuses on overspray, the skills you learn here apply to other paint correction tasks, too. For instance, this guide on how to fix oxidized paint and restore your car's shine covers similar decontamination principles for tackling a different kind of paint problem.
What About Stubborn Overspray on Tricky Surfaces?
A clay bar is a miracle worker on clear-coated paint and glass, but its effectiveness ends when you hit the more sensitive or textured parts of your car. In fact, trying to use a clay bar on porous, unpainted plastic trim or rubber seals can turn a small problem into a big one—you risk embedding clay into the material or even causing discoloration.
When you get to these tricky spots, you have to switch up your game plan.
Textured Trim and Rubber Seals Need a Different Approach
Textured black plastic, the kind you see on bumpers, mirror housings, and window trim, is a magnet for overspray. The little divots in the texture grab onto paint specks and won't let go. Instead of trying to scrub them off, we need to dissolve them.
Here's the method I've used successfully for years:
- Choose a Gentle Solvent: A dedicated wax and grease remover is ideal, but believe it or not, WD-40 can also work wonders here. The most important thing is to test your chosen product on a small, hidden spot first to make sure it doesn't stain or soften the plastic.
- Agitate, Don't Annihilate: Apply the solvent to a microfiber towel or a soft-bristled detailing brush. Gently work the area in small circles to break down the paint. An old toothbrush can work in a pinch if you have one.
- Clean Up and Protect: After the overspray is gone, you have to remove any solvent residue. A quick wipe-down with a good all-purpose cleaner does the trick. To finish the job right, apply a quality trim restorer to bring back that deep, rich black and add a layer of protection.
The mantra for these surfaces is dissolve, don't abrade. Getting too aggressive or using a harsh tool will permanently scuff that textured finish, leaving you with a much bigger problem than a few specks of paint.
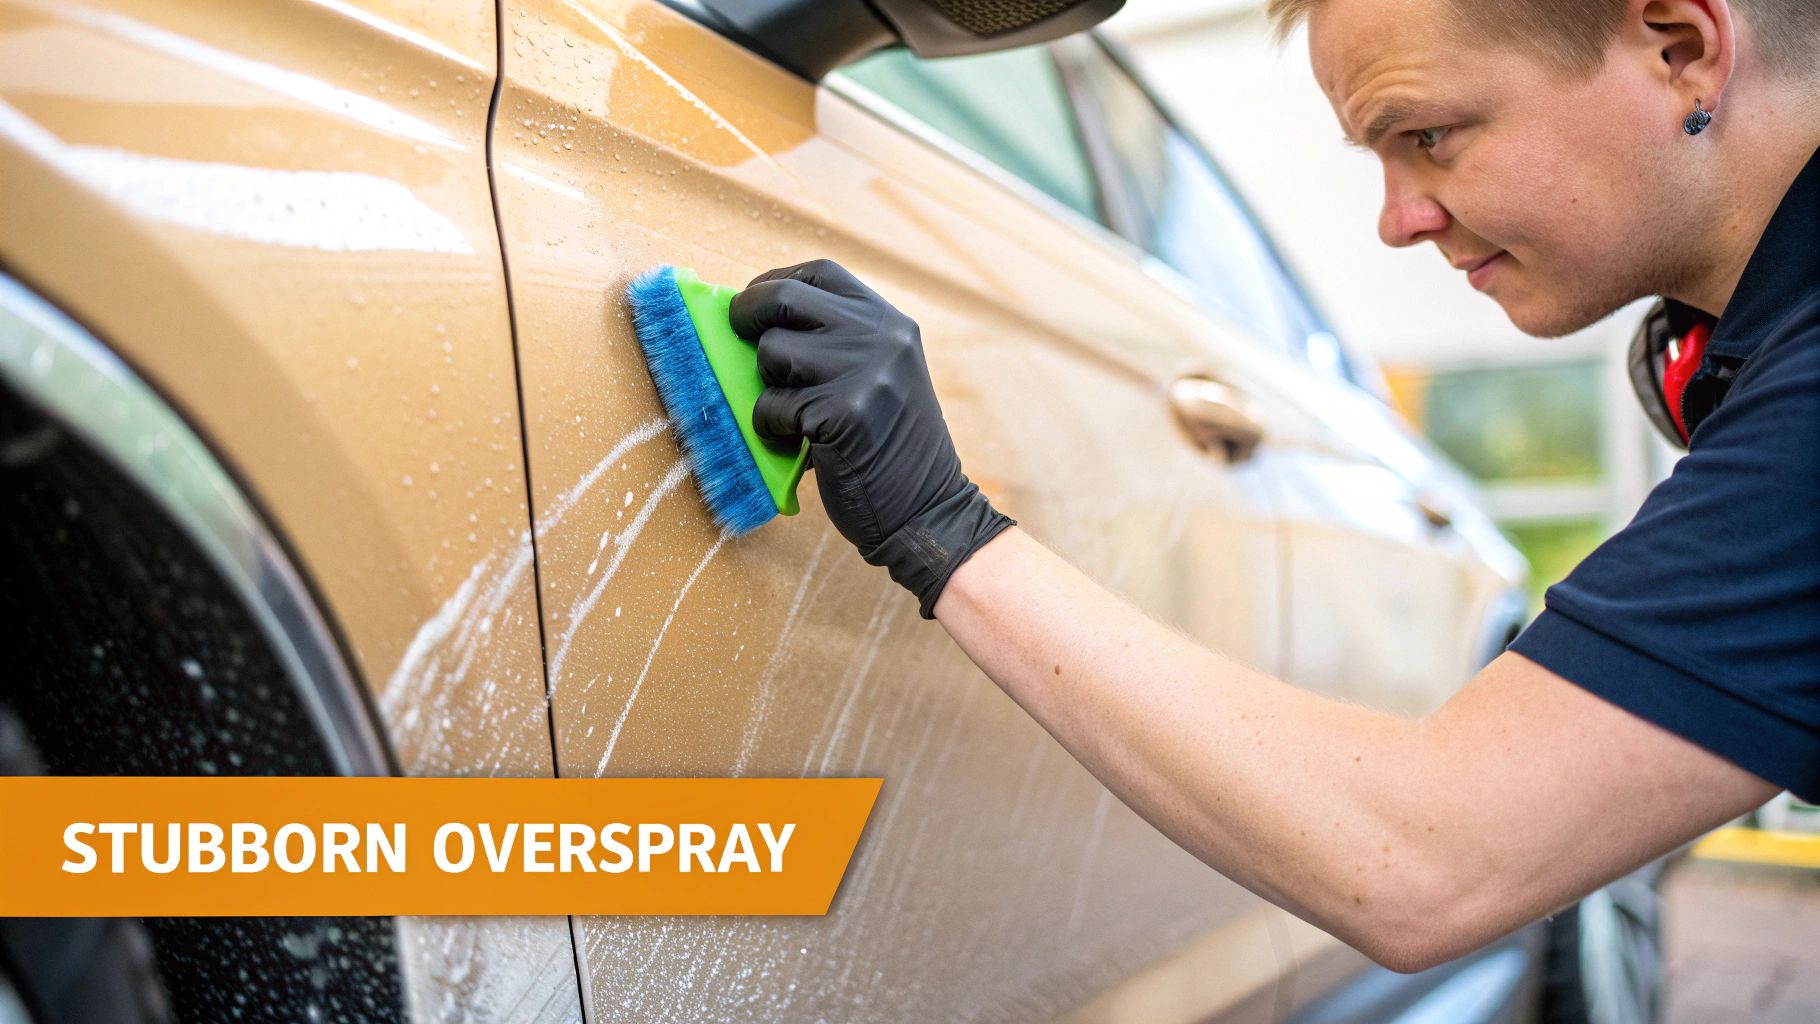
When the Clay Bar Just Isn't Cutting It
So, you've clayed the entire car, but a few stubborn specks of paint are still clinging to the clear coat. What now? This usually means you're dealing with a tougher type of paint, like an enamel or urethane, that has bonded more aggressively. Before you panic, there's another step.
It’s time to reach for a light polishing compound.
A fine-cut polish or finishing compound is the next level up. These products contain extremely mild abrasives that are designed to remove a microscopic layer of clear coat—and the embedded overspray along with it. This is a basic form of paint correction.
You don't need a machine for this. Just apply a small amount to a microfiber applicator pad and work it in, one small section at a time, using firm, consistent pressure. Overlap your circular motions to ensure even coverage. Once you're done, buff the residue off with a clean, plush towel.
This technique will safely eliminate those last few stubborn spots, leaving you with a perfectly smooth, glossy surface that's prepped and ready for a fresh coat of wax or sealant.
Overspray Removal Methods by Car Surface
Not every part of your car can be treated the same way. What works for your paint might damage your plastic trim. This table breaks down the best approach for each surface.
| Surface Type | Primary Method | Secondary Method (If Needed) | Key Precaution |
|---|---|---|---|
| Clear-Coated Paint | Clay Bar with Lubricant | Fine-Cut Polish (by hand) | Always use plenty of lubricant with the clay bar. |
| Glass/Windows | Clay Bar with Lubricant | #0000 Steel Wool (with lubricant) | Never use steel wool on tinted windows. |
| Textured Plastic Trim | Solvent (e.g., Wax & Grease Remover) | Gentle Agitation with a Soft Brush | Test the solvent on an inconspicuous spot first. |
| Rubber Seals | Solvent with a Microfiber Towel | N/A | Avoid harsh chemicals that can dry out the rubber. |
| Chrome | Clay Bar with Lubricant | Chrome Polish | Avoid abrasive compounds that can scratch chrome. |
Think of this as your cheat sheet. Following these guidelines ensures you're using the right tool for the job every time, protecting your vehicle's finish while getting rid of that annoying overspray.
Protecting Your Paint After Overspray Removal
Getting that last bit of overspray off your paint is a fantastic feeling, but don't park the car just yet. The claying process is incredibly effective, but it's also aggressive—it takes everything off the surface, including any wax or sealant you had on there. Your paint is clean, but it's also completely vulnerable.
This last part of the job is all about bringing back that essential layer of protection.
Rebuilding Your Car's Defenses
You absolutely have to apply a quality car wax or a longer-lasting paint sealant. This isn't just about making it look good; it’s about safeguarding all the effort you just put in.
A fresh coat of protection does two critical things:
- It restores that deep, glossy shine and slick-to-the-touch feel.
- More importantly, it creates a barrier against future environmental fallout, from bird droppings to, yes, more overspray.
A well-protected finish is your first line of defense. The slick surface created by wax or sealant makes it harder for future contaminants, including new overspray, to bond to your paint.
The demand for these products is massive for a reason. The global paint remover market, which covers products for issues like overspray, was valued at USD 1.0 billion in 2023. A big part of that growth comes from the automotive restoration and detailing world. You can read more about the paint remover industry's growth on openpr.com.
For a complete breakdown of your options for long-term care, our guide on the best way to protect car paint is the perfect next step.
Still Have a Few Questions?
Even after walking through the process, you might still have a couple of questions rattling around. It's completely normal. Let's tackle some of the most common things people ask when they're staring down a car covered in paint overspray.
Is It Safe to Grab Acetone or Lacquer Thinner from the Garage?
I get why you'd ask, but please, step away from the harsh chemicals. While things like acetone and lacquer thinner are fantastic paint strippers, that’s exactly the problem—they will strip or melt the clear coat right off your car.
Think of it this way: your car's clear coat is a delicate, protective layer. Hitting it with an aggressive solvent is like using sandpaper on glass. You'll end up with a dull, hazy, or even permanently damaged finish that's a much bigger headache than a little overspray. Always stick with products made specifically for automotive paint.
What's the Cost to Have a Pro Handle This?
Maybe the job looks too big, or you're just not feeling up to the task. That's perfectly fine. Calling in a professional detailer is a smart move, especially if the overspray is heavy.
So, what should you expect to pay? The cost for professional paint overspray removal can run anywhere from $150 to over $500. The final price tag really depends on how bad the situation is. A few speckles on your windshield will be on the lower end, while a full-body coating on a large SUV will creep toward that higher number. For a deeper dive into what detailers charge, you can find some great insights on professional removal costs over at autodetailguide.com.
My two cents: If you run your hand over the paint and it feels like sandpaper, or if more than half the car is covered, do yourself a favor and at least get a quote from a local pro. It might save you a weekend of frustration and prevent any costly slip-ups.
At the end of the day, it doesn't matter if you do it yourself or bring in an expert. The goal is the same: getting your car’s finish back to being smooth, clean, and glossy.
For an effortless wash that prepares your car for any detailing project, trust SwiftJet. Our high-performance foam gun turns a simple garden hose into a professional-grade cleaning tool, laying down thick foam that lifts dirt and grime safely. Get your SwiftJet Car Wash Foam Gun today at https://swiftjetusa.com.