
Think a clean engine is just for show cars? Think again. Learning how to clean under your car hood is one of the smartest maintenance moves you can make. It really boils down to four key actions: prepping the area, protecting sensitive electronics, cleaning gently, and drying everything thoroughly.
Why a Clean Engine Bay Is Not Just for Show Cars
Forget the idea that only car enthusiasts should be popping the hood for a deep clean. A pristine engine bay is a powerful tool for every car owner. It turns proactive maintenance from a chore into a genuinely empowering part of owning your vehicle, and the benefits go way beyond just looking good.
A clean engine is your best friend for spotting trouble early. That small oil seep or tiny coolant drip that would normally vanish into layers of grime? It sticks out like a sore thumb on a clean surface. This early warning can mean the difference between a quick, cheap fix and a major repair bill down the road.
Proactive Maintenance and Value Preservation
Keeping the engine bay free of dirt, leaves, and that oily sludge does more than just help you spot leaks. It’s a major contributor to the overall health of your vehicle.
- Stops Corrosion in its Tracks: Road salt, dirt, and trapped moisture are a recipe for rust on metal parts, hose clamps, and electrical connections. A good cleaning washes those corrosive culprits away.
- Makes Inspections a Breeze: When you need to check your oil, top off washer fluid, or just have a look around, you won't have to fight through a layer of filth. This makes those quick, routine checks far more pleasant.
- Helps Your Engine Breathe: While it's not the primary cooling system, a thick blanket of greasy grime can absolutely trap heat. A clean engine dissipates heat more efficiently, just like it was designed to.
A clean engine bay sends a powerful message. Whether you're planning a trade-in or a private sale, a tidy engine compartment immediately signals to a potential buyer that the car has been well cared for. That perception can directly boost its resale value.
Before you start, gathering the right supplies is half the battle. You don't need a professional workshop, just a few key items to do the job safely and effectively.
Your Essential Engine Bay Cleaning Toolkit
| Tool/Supply | Purpose | Pro Tip |
|---|---|---|
| Degreaser | Breaks down stubborn oil and grease buildup. | Choose a citrus-based or engine-specific formula that's safe for rubber and plastics. |
| Detailing Brushes | Agitates dirt in tight corners and on textured surfaces. | An old toothbrush works in a pinch, but a set of boar's hair brushes is a great investment. |
| Plastic Bags & Tape | Protects sensitive electrical components from water. | Sandwich bags and painter's tape are perfect. Double-bag the alternator and fuse box. |
| Low-Pressure Water Source | Gently rinses away soap and grime without forcing water where it shouldn't go. | A garden hose with a spray nozzle or a foam gun like a SwiftJet is ideal. Avoid high-pressure washers. |
| Microfiber Towels | Dries surfaces without leaving lint or scratching plastics. | Have a few on hand. A leaf blower or compressed air can speed up drying significantly. |
Having these items ready to go will make the entire process smoother and give you much better results.
A Growing Trend in Car Care
Engine bay detailing isn't just for the pros anymore. With modern cars getting more complex and the car care market booming—it's now valued at over USD 13 billion—owners are getting smarter about maintenance. This trend isn't just about flashy products; it's about a more informed approach to ownership. Our guide on the top car washer spray gun picks for a perfect clean can help you find the right tools for this and other jobs.
A clean engine bay is a cornerstone of good vehicle health. To learn more about keeping your car in prime condition, check out these other essential car maintenance practices.
Setting Up for a Safe and Successful Clean
Before you even think about spraying a single drop of water, the prep work you do is what separates a fantastic engine bay detail from a costly, frustrating mistake. Getting this part right is everything.
The number one, non-negotiable rule? Always work on a cool engine. Seriously, don't even try to clean a hot or even slightly warm engine. Hot metal parts will make your cleaning chemicals evaporate on contact, leaving nasty spots and potentially damaging sensitive components. Just pop the hood and give it time to cool down completely.
Once you can comfortably touch the engine block, the next safety check is disconnecting the battery. You don't need to pull the whole thing out—just loosen the negative terminal. It's usually black and marked with a minus (-) sign. A quick turn of the wrench, slide the cable off the post, and tuck it away so it can't accidentally reconnect. This little step eliminates any risk of electrical shorts while you’re working with water.
Shielding Your Engine’s Sensitive Side
With the power off, it’s time to play defense. You need to protect your engine's vulnerable electronics from water. This is where a little bit of careful work now saves you a massive headache later. All you really need are some plastic sandwich bags, maybe a grocery bag or two, and some painter's tape.
Go through your engine bay and focus on covering these critical areas:
- The Alternator: This is your top priority. It absolutely hates water. Wrap it securely in a plastic bag and use painter’s tape to seal it up tight.
- Air Intake: If you have an exposed, open-element air filter (like a cold air intake), this needs to be completely covered. The last thing you want is water getting sucked into your engine.
- Fuse Boxes and ECU: Find the main fuse box and your car's brain, the Engine Control Unit (ECU). Wrap them up in plastic to keep them dry.
- Exposed Wiring and Coil Packs: Take a look around for any obvious electrical connectors, plugs, or wiring harnesses that look exposed. A little bit of plastic and tape here goes a long way.
This might feel a bit tedious, but trust me, it’s the most important part of the whole process. Skipping this is the rookie mistake that often leads to a trip to the mechanic.
Here's a sobering thought: research shows that while about 60% of car owners try their hand at cleaning under the hood, only a small portion—maybe 20-30%—actually do it right. Many just blast away with a pressure washer or skip protecting the electronics, which can lead to completely avoidable repair bills. If you want to dive deeper, you can explore more data on car care trends to see why these precautions matter so much.
Taking an extra 15-20 minutes to let things cool, disconnect the battery, and cover up the sensitive parts is what makes this a safe, effective, and even enjoyable job. It turns a task that can feel intimidating into a satisfying piece of routine maintenance. Now, you’re ready to get to the fun part—the actual cleaning.
Degreasing and Rinsing Without Causing Damage
This is where the real transformation happens. Once your engine is cool to the touch and you've covered all the sensitive bits, it's time to tackle the years of baked-on grime. The secret here is a gentle but firm approach. This is definitely not the time to break out a high-pressure washer—that's the fastest way to force water into electrical connections and create some major headaches.
Your best friend for this job is a quality, engine-safe degreaser. I always look for formulas that are tough on oil but specifically designed to be safe for the rubber hoses and plastic parts that are everywhere in a modern engine bay.
Applying the Degreaser
Here’s a pro tip that makes a huge difference: start applying the degreaser from the lower areas of the engine bay and work your way up. It might seem backward, but this simple technique prevents the cleaner from dripping down onto dirty spots, which creates ugly streaks that are a pain to get rid of later.

Lay down a liberal, even coat over all the grimy surfaces. Don't be shy; you want to get solid coverage on the engine block, valve cover, and all the surrounding plastics. Let the degreaser sit and work its magic for about 3 to 5 minutes. This "dwell time" is critical—it gives the chemicals a chance to penetrate and break down the molecular bonds in the oil and grease, making it way easier to lift off.
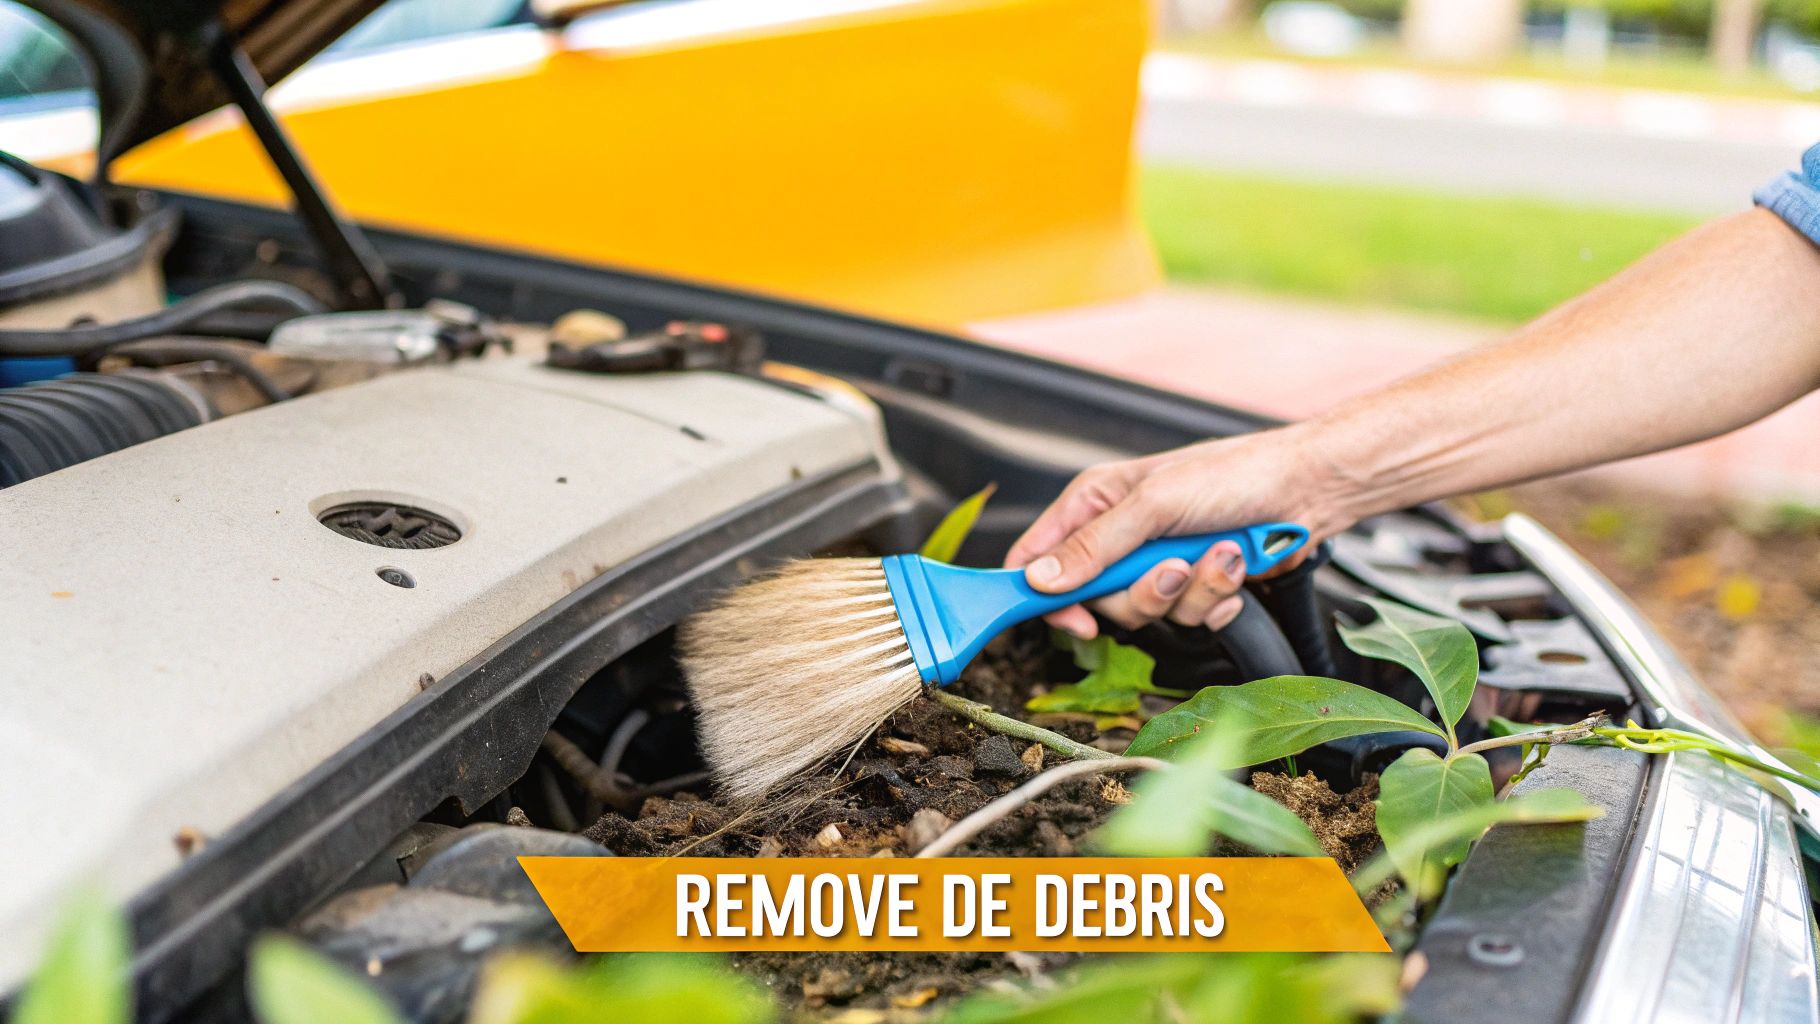
Agitation Is Key
While the degreaser is soaking, it's time to get a little hands-on. Using a variety of soft-bristled detailing brushes is what separates a decent job from a great one. A long-handled brush is perfect for reaching deep into the bay, while smaller, more intricate brushes (an old toothbrush works great in a pinch!) are perfect for getting into tight spots around bolts, sensors, and textured plastic covers.
Gently scrub all the surfaces you sprayed. The goal isn't brute force; it's simply to agitate the loosened grime. You'll see the dirt and grease start to lift away, turning into a soupy, dirty mess. Pay extra attention to the areas where buildup is the heaviest.
The combination of a quality chemical and light mechanical scrubbing is what delivers professional-level results. Just spraying and rinsing will always leave a thin film of dirt behind. This two-pronged attack ensures every nook and cranny gets truly clean.
For a really thick, clinging application that maximizes that all-important dwell time, a foam gun like the SwiftJet can be a game-changer. The foam sticks to vertical surfaces much better than a liquid spray.
The Gentle Rinse
With everything scrubbed, it's time to wash it all away. Grab a standard garden hose with a gentle spray nozzle—think "shower" or "mist" setting. Again, never use a high-pressure jet stream.
Start rinsing from the top down. Let gravity do the work, pulling all the dirt and degreaser down and out of the engine bay. Be methodical and thorough, making sure you get all the cleaner off. Take extra care to guide the water flow away from the alternator, air intake, and any other areas you protected earlier. A gentle, steady stream is all you need to reveal a remarkably clean engine.
The Final Steps for a Long-Lasting Finish
You've done the hard work and washed away all that built-up grime. It's tempting to pop the hood shut and call it a day, but don't stop now. The next two steps—drying and dressing—are what really make the difference between a decent job and a professional-level detail. This is how you lock in that clean look and protect your engine bay for the long haul.
Properly drying everything is non-negotiable. If you skip this, you’re not just left with ugly water spots all over the plastic and metal bits. You're also risking trapping moisture in sensitive electrical connectors, which can cause some real headaches down the road. The goal here is simple: get every last drop of water out, especially from those hidden nooks and crannies.
Achieving a Perfectly Dry Engine Bay
The fastest and most thorough way to get things dry is with forced air. You don't need fancy equipment for this; a regular leaf blower or even the blower setting on a shop-vac will work wonders.
I like to start at one side of the engine bay and work my way across, making sure I hit every surface. It’s a fantastic touchless method for blasting water out of tricky spots, including:
- Connector Plugs: Forcing out any moisture that snuck into the electrical harnesses.
- Bolt Heads: This helps prevent rust from forming in those little pockets.
- Alternator Fins: You went through the trouble of protecting it, so make sure it stays completely dry.
- Tight Crevices: It reaches places a towel simply can't.
Once you’ve given the whole bay a good blast of air, follow up with a clean, dry microfiber towel. This final wipe-down will sop up any lingering droplets and get the surfaces ready for the last, and most satisfying, step. After you're done, you can go ahead and carefully remove all the plastic bags and painter’s tape you applied earlier.
Applying Plastic and Rubber Protectant
With everything perfectly dry, it’s time for the magic touch that brings back that deep, factory-fresh look. A good quality plastic and rubber protectant (often just called a "dressing") does more than just add shine. It actually nourishes the materials, which helps stop them from getting brittle and cracking over time.
For a clean, non-greasy result, always apply the dressing to a microfiber applicator or towel first—never spray it directly onto the engine components. This gives you way more control and prevents messy overspray. Gently wipe the product onto all the plastic covers, hoses, and rubber seals.
The aim is a rich, satin finish, not a wet, oily disaster. A quality dressing creates a dry, anti-static barrier that actually repels dust and dirt, which will make your next cleanup a whole lot easier.
The way we approach cleaning under the hood has certainly evolved. Decades ago, it was a much less refined process. But as cars got packed with more sensitive electronics, safety became a huge concern. Today, professional services—especially in North America, which holds 45% of the market share—use integrated methods to avoid water damage.
Think of this final protective layer like applying wax to your car's paint. On that note, protecting your vehicle's exterior is just as important. We cover this topic in our guide on how to protect car paint from the sun. By taking the time for these last few steps, you ensure the impressive results of your hard work truly last.
Common Mistakes That Can Wreck Your Engine Bay
You can have all the right tools and the best intentions, but one small misstep can quickly turn a satisfying cleaning session into a call for a tow truck. I’ve seen it happen. Knowing what not to do is just as critical as following the right steps.
Let's walk through the most common blunders so you can avoid them entirely.
The Number One Sin: Cleaning a Hot Engine
Spraying cold water onto a hot engine is the absolute fastest way to do serious, expensive damage. It’s a classic mistake. When that cold liquid hits a scorching hot exhaust manifold or the engine block itself, it can cause thermal shock.
This isn't just a minor issue; that rapid contraction of the hot metal can literally crack it. A cracked block or manifold is a catastrophic failure.
The Fix: This one is simple. Just be patient. Always make sure the engine is completely cool to the touch. If you've just been for a drive, pop the hood and let it sit for at least an hour. Seriously, go grab a coffee. It's not worth the risk.
Putting Down the Pressure Washer
I get it, the temptation to blast away caked-on grime with a pressure washer is strong. But a modern engine bay is a minefield of sensitive electronics, and high pressure is your enemy here.
That powerful jet of water is an expert at finding its way past the seals and protective covers you so carefully put in place. It's just not worth it.
A pressure washer can lead to:
- Fried Electronics: Forcing water into your alternator, ECU, or fuse box is a recipe for instant shorts and permanent damage.
- Damaged Connections: The force can be strong enough to unplug or break the delicate clips on sensors, triggering a check engine light and causing all sorts of running problems.
- Engine Misfires: Water driven deep into spark plug wells is a common cause of misfires and a car that won't start after you've "cleaned" it.
The whole point of learning how to clean under a car hood is to be methodical and gentle. A regular garden hose with a decent spray nozzle, or even better, a foam gun like the SwiftJet, gives you all the cleaning power you need without risking thousands in repairs.
The Danger of Cutting Corners
Rushing the job is another frequent mistake. People get excited to see the results and start skipping crucial prep work or, just as bad, they don't finish the job properly.
Forgetting to wrap that alternator or leaving the battery hooked up is just asking for electrical gremlins. And on the back end, closing the hood on a wet engine bay lets water pool in connectors, leading to corrosion and mysterious issues down the road.
A few extra minutes spent covering components and thoroughly drying everything isn't just a suggestion—it's cheap insurance against easily avoidable headaches. By sidestepping these common mistakes, you’re making sure your hard work pays off with a pristine engine bay, not a hefty repair bill.
Your Engine Bay Cleaning Questions Answered

Even with a solid plan, it’s completely normal to have a few "what if" questions before you start. I get it. The goal is to feel confident, not nervous, when you pop the hood. Let's tackle some of the most common things people ask me about cleaning an engine bay.
Is It Actually Safe to Spray Water in My Engine Bay?
Yes, it is—but with a big asterisk. You have to do the prep work we talked about earlier. Think about it: your car is built to drive through rain and splash through puddles, so the engine bay is definitely water-resistant. The problem isn't water itself; it's high-pressure water.
The key to doing this safely is thoroughly covering sensitive components. Wrap up that alternator, air intake, and fuse box with plastic. Once they're protected, rinsing with a gentle, low-pressure stream from a garden hose is perfectly fine. The real trouble starts when you blast water at high velocity into connections and crevices that aren't designed for it. Protect the electronics, use a gentle rinse, and you'll be golden.
How Often Should I Clean Under My Car Hood?
Honestly, this really boils down to how and where you drive. If you're like most people, sticking to city streets and highways, a good cleaning once or twice a year is plenty to keep things from getting out of hand.
But, you’ll want to clean it more often in specific situations:
- Dusty or Rural Areas: Living on a dirt or gravel road? You'll be amazed how fast the dust collects. Plan on a cleaning every 3 to 4 months.
- Winter Climates: Road salt is the enemy of metal and rubber. It's incredibly corrosive. I always recommend a thorough engine bay wash as soon as the winter season wraps up.
- Off-Roading: If you take your truck or SUV through the mud, you should really clean the engine bay after every single trip. Caked-on mud traps heat and moisture, which is a bad combination.
A good rule of thumb? Just pop the hood when you check your oil. If it looks dirty, it probably is.
Don't Panic If Your Car Won't Start
In the rare chance your car doesn't fire up right after cleaning, don't sweat it. It's almost always a bit of moisture that found its way into an electrical connection. First, double-check that the battery terminals are reconnected securely. If they are, just open the hood and let everything air dry for a few hours. A leaf blower can make this go a lot faster. Once that moisture evaporates, it should start right up.
Can I Use Household Cleaners Like Dish Soap?
I’m going to give that a hard no. It's really tempting to grab the dish soap, but you should avoid household cleaners at all costs. While they’re great at cutting grease on your pans, they're way too harsh for the plastics and rubber hoses in your engine bay. Over time, they can make them brittle and lead to cracking.
Worse yet, many soaps leave behind a sticky residue. Instead of a clean engine, you get a surface that actually attracts more dirt and dust, making your hard work pointless. Always stick with a dedicated automotive engine degreaser. These are formulated to be tough on grime but safe for the complex mix of materials under your hood. It’s a non-negotiable part of learning how to clean under a car hood the right way.
For a clean that’s both powerful and safe on all your engine bay's surfaces, give it the professional treatment it deserves. The SwiftJet foam gun attaches to any standard garden hose, laying down a thick, clinging foam that lifts away grime without the need for a damaging pressure washer.
Discover the SwiftJet difference and get a flawless clean every time at SwiftJetUSA.com