
The secret to cleaning your car without water comes down to two key things: a quality waterless car wash spray and a whole stack of plush microfiber towels. The process is surprisingly simple. You just spray a small section of your car, gently wipe the grime away in one direction with a fresh towel, then grab another clean towel to buff it dry. What you're left with is a brilliant shine, no hose or bucket required.
This isn't just wiping dirt around; the method relies on advanced polymers in the spray that safely lift dirt right off the paint's surface, which is crucial for preventing scratches.
Why Ditch the Hose for a Waterless Wash
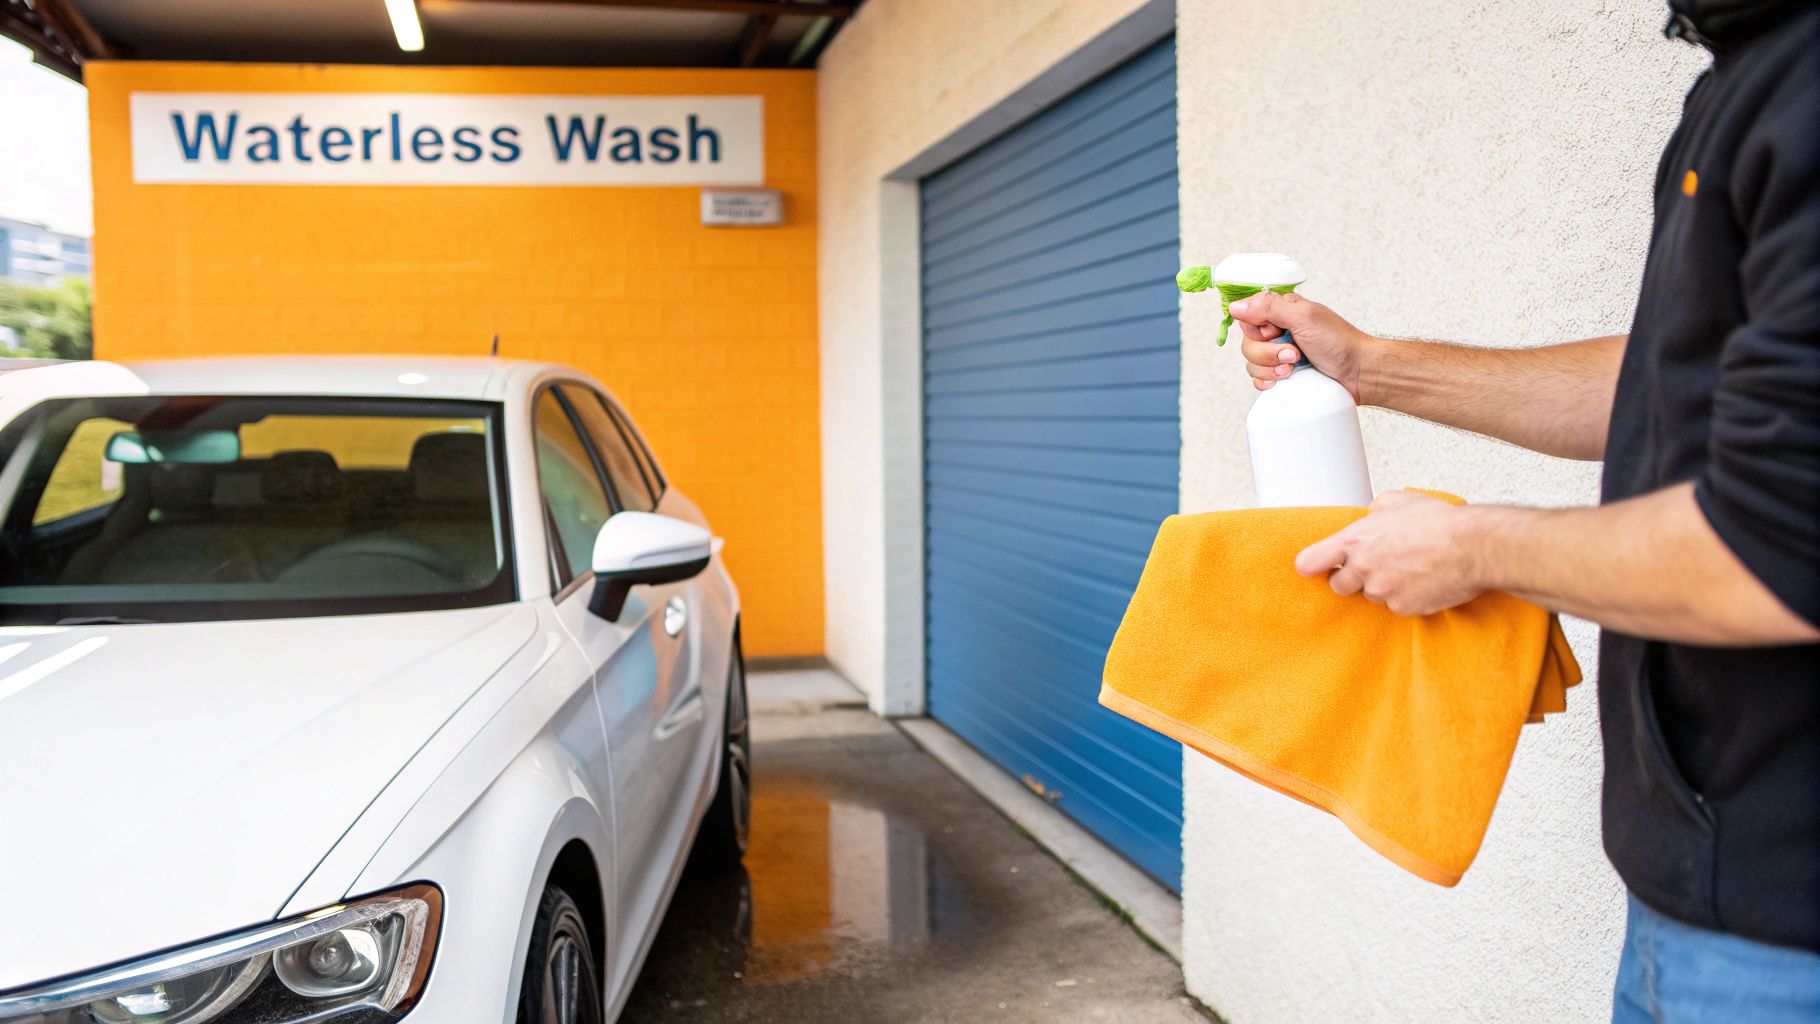
More and more car owners are finally stepping away from the old-school bucket-and-hose routine, and for some pretty solid reasons. Switching to a waterless method isn't just about saving water—it's a smarter, more efficient way to keep your car looking its best. Best of all, it lets you wash your car just about anywhere, whether you're in an apartment parking garage or dealing with local water restrictions.
The magic is in the chemistry. Today's waterless wash formulas are packed with high-lubricity polymers that do two jobs at once:
- Encapsulate Dirt: The spray instantly wraps around dust, dirt, and grime, lifting it away from the paint.
- Create a Barrier: It leaves a slick, protective layer between those contaminants and your car’s clear coat.
This whole process dramatically cuts down on the friction that causes those dreaded swirl marks and fine scratches—a common headache with improper traditional washing.
The Rise of Eco-Friendly Car Care
While the convenience is a huge plus, the environmental benefits are just as powerful. Think about it: a standard car wash can easily guzzle 40 to over 100 gallons of water. A waterless wash? It uses none, other than the bit that's already in the spray bottle. This is all part of a bigger shift toward making smarter, more sustainable choices.
The global car care products market is booming at USD 11.2 billion, and it's no surprise that the car cleaning segment—including waterless solutions—is leading the charge with a 31.7% market share. This growth is largely fueled by the demand for effective cleaning options in water-scarce areas.
A Quick Look: Waterless Wash vs Traditional Wash At a Glance
To see how these methods stack up, here's a quick comparison. It breaks down the key differences so you can see why so many are making the switch.
| Feature | Waterless Car Wash | Traditional Car Wash |
|---|---|---|
| Water Usage | Less than 16 oz (in the bottle) | 40-100+ gallons |
| Time Required | 15-30 minutes | 1-2 hours (including setup/cleanup) |
| Location | Anywhere (garage, parking spot) | Requires driveway, hose access |
| Equipment | Spray bottle, microfiber towels | Buckets, hose, mitts, nozzles, soap |
| Best For | Light to moderate dirt, dust, upkeep | Heavy mud, salt, thick grime |
| Scratch Risk | Low (with proper technique) | High (if using dirty water/mitts) |
Ultimately, a waterless wash offers incredible convenience and efficiency for routine maintenance, while a traditional wash still has its place for tackling the really tough jobs.
Beyond Convenience: A Superior Shine
This is about more than just getting the dirt off. Many of the best waterless products also mix in waxing agents, like carnauba or synthetic polymers. This means every time you clean, you're also laying down a fresh layer of protection.
It’s a simple step that boosts the gloss and helps repel future dirt and rain. Your car doesn't just get clean—it gets a "just-waxed" look in a fraction of the time. Embracing these kinds of methods is a great way to practice a more sustainable lifestyle, much like learning how to travel sustainably to reduce your environmental footprint.
Gathering Your Waterless Detailing Arsenal
If you want to pull off a flawless, scratch-free finish without dragging out the hose, it all comes down to having the right gear. This isn’t about just grabbing any old spray bottle and a rag from the garage. It's about building a smart toolkit where every single item has a job to do—specifically, protecting your car's paint. A little prep work here is the difference between a head-turning shine and a clear coat full of new swirl marks.
Your most important investment, without a doubt, is a big stack of high-quality microfiber towels. Don't even think about using old t-shirts, bath towels, or paper towels. Their fibers are too coarse and will just drag grit across the paint, causing a web of fine scratches. I’d suggest having at least 10 to 15 clean towels on hand, even for a standard-sized sedan. You’ll go through them faster than you think.
Selecting the Right Microfiber Towels
When you're shopping for towels, look for the GSM rating, which stands for "grams per square meter." You want something plush, typically 350 GSM or higher. A higher GSM means a thicker, softer pile that can safely pull dirt particles up and away from the surface. Think of it this way: the deep fibers give dirt a place to hide, rather than being ground into your paint.
- Plush, High-Pile Towels: These are your workhorses for the initial wipe-down. Their long, soft fibers are perfect for trapping loose dirt and grime.
- Lower-Pile Waffle Weave Towels: Save these for glass, mirrors, and chrome. They are designed to absorb moisture and leave a perfectly streak-free finish.
Pro Tip: The first thing you should do with new microfiber towels is cut off the tags. That stiff little tag can easily put a scratch in your car’s paint, completely defeating the purpose of your careful work.
Choosing Your Waterless Wash Spray
Next up is the magic potion: the waterless wash formula. These aren't just fancy spray bottles of water. They are specifically engineered with special lubricants and polymers that surround and encapsulate dirt particles, lifting them off the paint so you can wipe them away safely. You’ve generally got two options here.
Ready-to-Use (RTU) Sprays: If you're just getting started or simply want maximum convenience, this is the way to go. You just grab the bottle, spray it on, and wipe. The formula is already mixed and ready for action, taking all the guesswork out of it.
Concentrates: For those of us who wash our cars like this regularly, concentrates are the much smarter, more economical choice. You simply dilute the solution with distilled water based on the bottle's instructions. A single bottle of concentrate can make gallons of usable spray, which really brings down the cost of each wash.
Essential Extras for a Complete Clean
While the towels and spray are the main event, a few other tools can take your results from "good" to "looks-like-it-was-just-professionally-detailed." Building a full kit means you're ready for every nook and cranny. If you want to see what the pros keep in their bags, check out this comprehensive car detailing supplies list.
Here’s what else should be in your toolkit:
- Soft Detailing Brushes: Absolutely essential for getting into tight spots like grilles, emblems, and around trim where a towel just can't reach.
- A Dedicated Wheel Cleaner: Brake dust is nasty stuff—it’s corrosive and gritty. You need a pH-neutral, paint-safe wheel cleaner to dissolve it without harming the finish on your rims.
- Spray Wax or Sealant: After you've cleaned a section, why not protect it? A quick spritz of spray wax adds a beautiful gloss and a slick protective layer, which will make your next wash even easier.
With this setup, you’re not just wiping down your car. You’re performing a proper maintenance detail that keeps it looking great and preserves its value.
The Scratch-Free Waterless Cleaning Technique
Alright, you’ve got your supplies. Now comes the part that separates a great waterless wash from a scratchy mess: the technique. The whole secret is about finesse, not force. You need to let the product and your towels do the heavy lifting, safely scooping up the dirt without dragging it across your car's paint.
First things first, take a quick walk around your car. A light coating of dust from the past few days? Perfect. That's exactly what this method is designed for. But if you're looking at caked-on mud or a thick layer of road salt from a winter storm, stop. A waterless wash isn't the right tool for that job, and pushing forward will almost certainly cause scratches.
Master the Spray, Lift, and Wipe Method
The entire process boils down to one simple idea: encapsulate, lift, and remove. Whatever you do, never wipe a dry, dusty panel.
Start by generously misting a small section of the car, no bigger than 2x2 feet. You want the surface to be visibly wet. This gives the polymers in the spray a chance to surround each speck of dirt, lubricating the panel and lifting the grime away from the paint.
Let the solution sit for just a moment—maybe 10-15 seconds. You'll practically see it start to dissolve the dirt. That little pause is crucial.
Now, grab one of your plush microfiber towels and fold it into fourths. This gives you eight clean surfaces to work with from a single towel. Gently, with almost no pressure, glide the towel across the wet panel in one straight line. No circles, no frantic back-and-forth scrubbing. That just grinds the dirt you just lifted right back into the paint.
The infographic below shows this simple three-step flow perfectly.
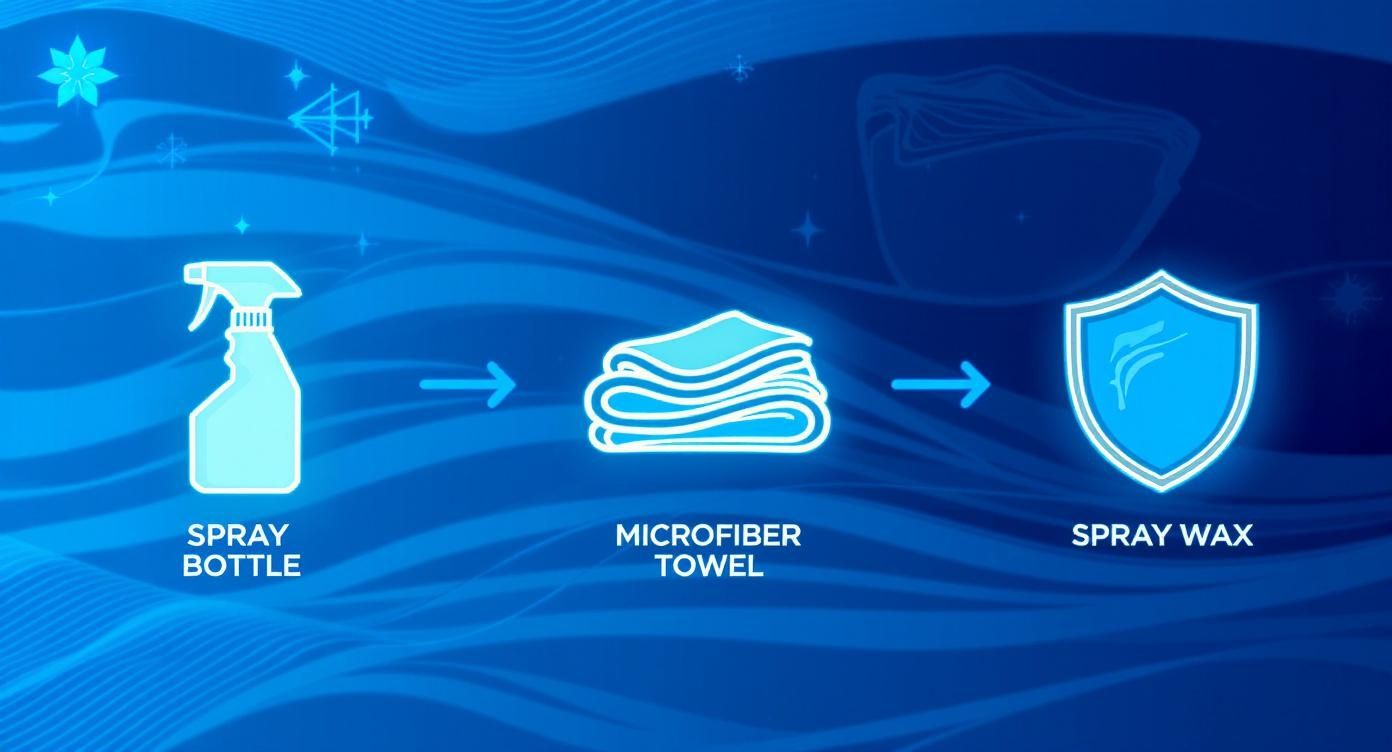
This spray, wipe, and buff process is your ticket to a fantastic shine without ever turning on a hose.
After that first pass, take a look at your towel. See all that dirt it trapped? Now, flip the towel to a fresh, clean side and do one more gentle pass to catch anything left behind. Immediately follow up with your second, completely dry microfiber towel, and buff the section to a streak-free, glossy finish. That second towel is what really brings out the shine.
Work from the Top Down
Just like with a traditional bucket wash, you have to be strategic. Always start with the roof and work your way down the vehicle. Gravity is your friend here, ensuring that any overspray or loosened dirt runs down onto panels you haven't cleaned yet.
A logical order looks like this:
- Roof, Hood, and Trunk: Hit these large, flat surfaces first. They’re usually the least dirty.
- Upper Side Panels and Windows: Next, move to the doors and glass, still working in small, manageable sections.
- Lower Panels and Bumpers: Save the grimiest parts for last. You’ll absolutely want to be using fresh, clean sides of your towel for these areas.
By tackling the dirtiest parts at the end, you avoid dragging heavy grit from the rockers all over your hood.
The #1 mistake I see people make is being cheap with their towels. The second a side of your towel looks even slightly dirty, flip it. Once all eight sides are soiled, toss it in the laundry pile and grab a new one. This single habit is your best defense against swirl marks.
Perfecting Your Microfiber Towel Technique
Your microfibers are easily the most important tool you have, so using them right is a must. The "fold-in-fourths" trick isn't just about being tidy; it's a built-in safety system for your paint. If you want to really geek out on the details, our guide to microfiber towels for car detailing explains everything from ideal GSM ratings to proper washing methods.
Think about it this way: you're cleaning the driver's side door.
- Pass 1: Use a clean surface (#1) for the top half of the door.
- Pass 2: Flip to a new surface (#2) for the bottom half.
- Pass 3: When you move to the rear door, you're now using a fresh surface (#3).
By the time you make it all the way around the car, it’s not unusual to have gone through 10-15 towels. Don't sweat it. A stack of clean towels is infinitely cheaper than paying a detailer for a paint correction service. This meticulous, towel-flipping discipline is what elevates a quick wipe-down into a professional-level detail.
Tackling Heavy Grime and Tough Contaminants
Let's be real—daily driving throws more than just light dust at your car. You’re up against bird droppings, bug splatter that’s been baked on by the sun, and sticky road tar. These are the messes that make people nervous about waterless washing, worried they'll just smear grime around and scratch the paint.
But a good waterless wash is absolutely up to the task. You just need to tweak your technique. The secret weapon here is patience. Don't just spray and immediately start wiping.
Instead, give the problem area a really generous spray and just let it sit for 30-60 seconds. This "dwell time" is crucial. It gives the product’s polymers a chance to get to work, breaking down the contamination and lifting it away from the surface. Once it's softened, you can gently wipe it away with a fresh microfiber.
Handling Specific Contaminants
Of course, not all gunk is the same. Each type needs a slightly different touch to get it off safely without leaving a mark on your car's clear coat.
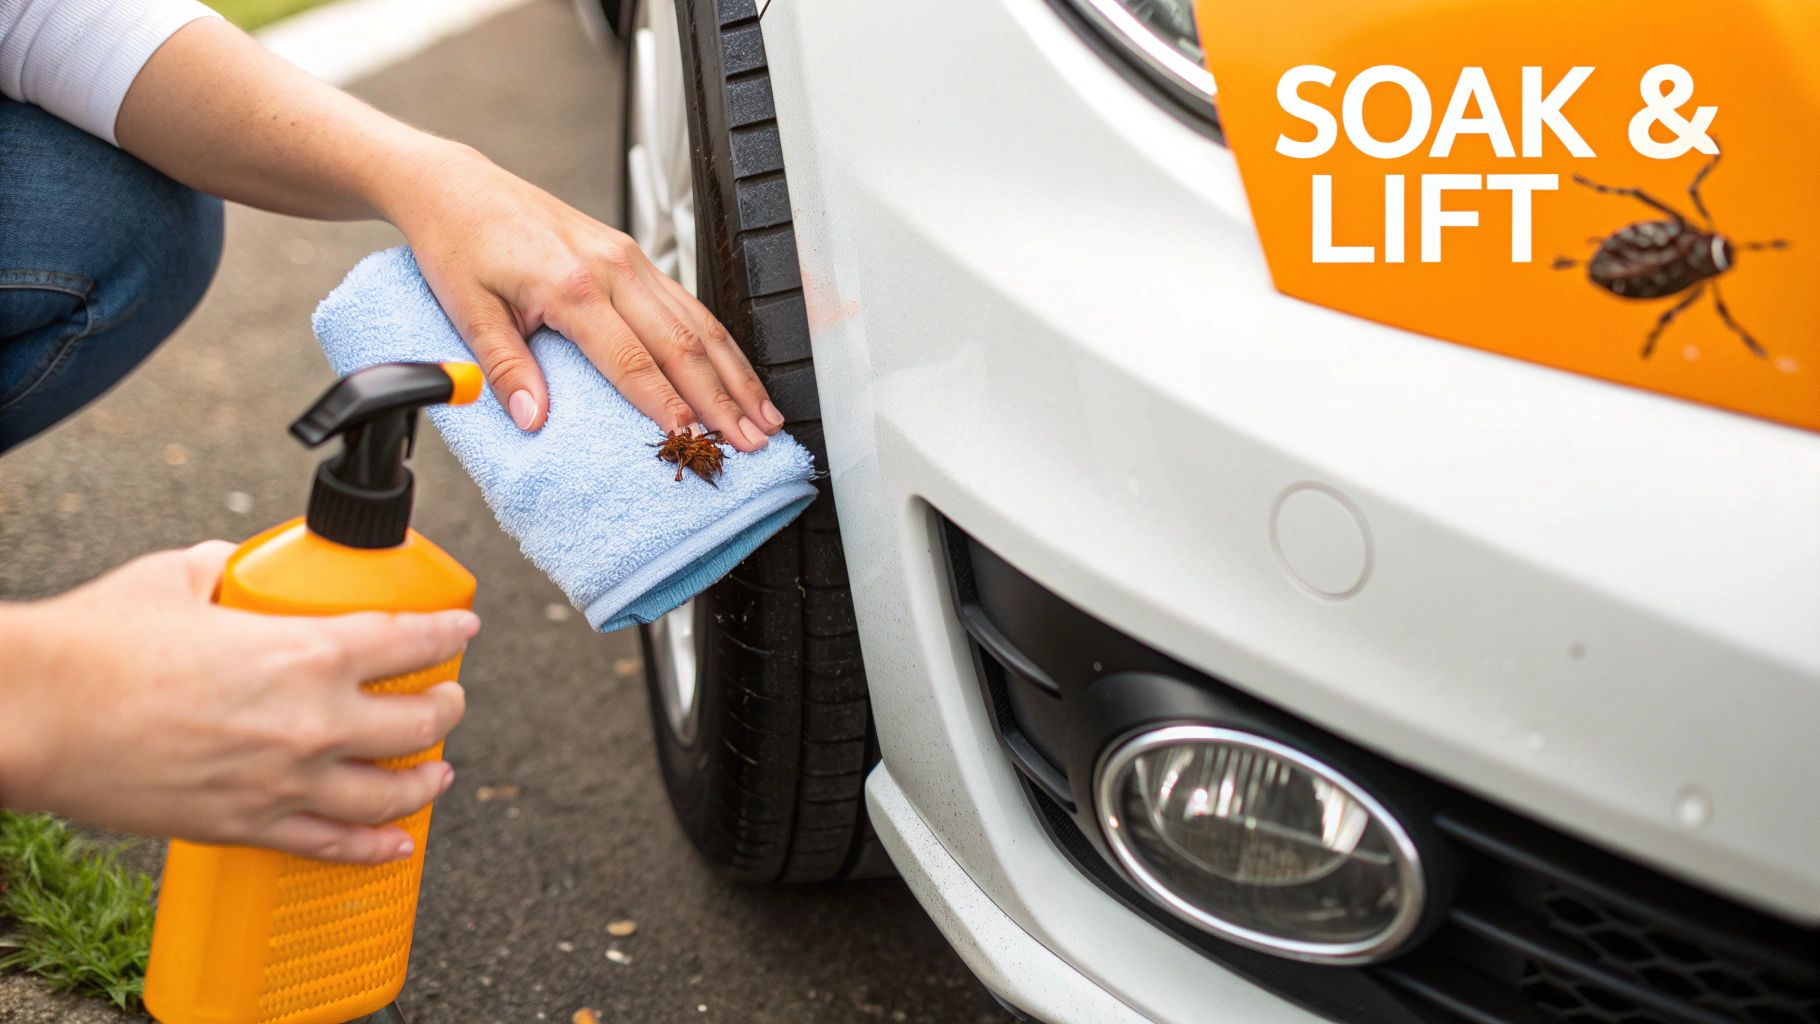
- Bird Droppings: This is priority number one. They're highly acidic and can etch your paint surprisingly fast. Soak the spot completely, then lay a damp microfiber over it for a minute or two to rehydrate the mess. After that, it should lift off with almost no effort.
- Bug Splatter: Just like bird bombs, bug guts are acidic and corrosive. A heavy pre-soak is your best friend here. Let the spray dissolve the dried-on remains before you even think about wiping.
- Road Tar: Tar is a whole different beast—it's oily and incredibly sticky. A quality waterless wash can handle small, fresh spots with a good soak. For anything more substantial, you might need a dedicated tar remover. We have a whole guide on how to remove tar that digs into targeted methods for those stubborn patches.
The biggest mistake I see people make is trying to scrub a stubborn spot. Your first instinct should always be to spray more product and give it more time, not to apply more pressure. Let the chemistry do the heavy lifting for you.
Knowing When to Switch to a Rinseless Wash
There comes a point where a waterless spray just isn't the right tool for the job. If your car is caked in a thick layer of gritty road film after driving through a storm, trying to clean it with just a spray and towel is asking for scratches.
This is where a rinseless wash comes in. It’s the perfect middle ground.
A rinseless wash involves a concentrated solution mixed into a single bucket of water. You'll use a plush wash mitt, soak it in the solution, wash one panel, and then immediately dry it with a dedicated drying towel. There’s no hosing the car down, but it offers way more lubrication than a spray bottle, safely lifting heavier dirt. It’s a fantastic technique for cleaning a properly dirty car without dragging out the hose and pressure washer.
When a Traditional Wash Is Still Your Best Bet
Waterless washing is an amazing tool to have in your detailing arsenal, but it's not a silver bullet. Knowing its limits is just as crucial as perfecting the technique itself. The absolute priority is always to protect your paint, and sometimes, a spray bottle and a stack of towels just won't cut it.
Trying to tackle a heavily soiled car with a waterless wash is asking for trouble. Those slick polymers in the formula are fantastic for lifting light dust and road film, but they're no match for heavy, gritty contaminants. When you try to wipe away thick layers of grit without the flushing action of water, you're essentially dragging sandpaper across your clear coat. That’s how you get swirl marks.
Red Flags for Waterless Washing
There are a few clear-cut situations where you should put the spray bottle down and grab a hose or a bucket for a rinseless wash. Think of these as non-negotiable moments where preserving your paint has to win out over convenience.
- Thick Mud or Grime: Just got back from a muddy trail or drove through a sloppy construction site? That caked-on mud is loaded with abrasives that need to be blasted off, not wiped.
- Heavy Road Salt and Sand: Winter driving covers your car in a corrosive, gritty mess. This stuff needs to be completely flushed from every nook and cranny with plenty of water.
- Seriously Neglected Cars: If a vehicle hasn't seen a wash in months, the grime is often bonded to the surface. A waterless spray simply doesn't have the muscle to lift it safely.
In these scenarios, the sheer volume of dirt overwhelms the lubricant in the spray. You’ll be grinding that grit right into the finish.
My rule of thumb is pretty straightforward: if the dirt is so thick you can’t clearly see the paint underneath, it’s time for a proper wash with water. Your car’s finish will thank you.
For those times when your car is just too dirty for a waterless spray, or if you'd rather leave it to an expert, looking into professional mobile car detailing is a fantastic alternative. A pro has the right gear, like a SwiftJet foam gun, to safely pre-soak and melt away heavy contamination without scratching the paint.
At the end of the day, being a smart car owner means choosing the right tool for the job. It's the key to keeping your vehicle looking its best for years to come.
Your Top Questions About Waterless Washing, Answered
Jumping into a new detailing method always brings up a few questions. I get it. You want to make sure you're doing right by your car's paint. Let's tackle some of the most common concerns I hear about waterless washing so you can get that perfect, swirl-free shine with confidence.
Can a Waterless Wash Actually Prevent Scratches?
Absolutely, but it all comes down to the product and your technique. A good waterless wash isn't just soapy water in a spray bottle. These formulas are packed with high-lubricity polymers that surround and lift dirt particles off the surface. Imagine each piece of grit getting its own little protective cushion.
The secret to keeping your paint flawless is in how you do it:
- Don't be stingy with the spray. You want the panel visibly wet to give those polymers a slick surface to work on. A lubricated panel is a safe panel.
- Only use high-quality microfiber towels. This is non-negotiable. Your old bath towels have no place here.
- Let the towel do the work. Just glide it gently across the surface in one direction. No scrubbing, no circles, and absolutely no pressure.
Now, if your car is caked in mud, a waterless wash is not the right tool for the job. That's a time for a rinseless wash or a full-on traditional wash to safely pre-rinse that heavy contamination away.
Is This Method Cheaper in the Long Run?
It almost always is. You might look at the price of a quality waterless concentrate and a good stack of microfiber towels and think it's more expensive than a jug of car soap, but the per-wash cost tells a different story. A single 16 oz bottle of concentrate can make gallons of usable spray.
Think about it this way: you’re not paying for water, and you're skipping the $10-$20 you’d drop at a drive-thru wash. Over time, especially for regular upkeep, the savings really add up.
Here's a pro tip: Always buy the concentrate. Mixing your own spray costs just pennies on the dollar compared to buying pre-diluted, ready-to-use bottles every single time. It's the most cost-effective way to go.
Can I Clean My Interior Windows with a Waterless Wash Spray?
That's a common shortcut people try, but please don't do it. Waterless wash products are designed for exterior paint. They contain gloss enhancers, waxes, and polymers that will leave a streaky, hazy mess on your interior glass, making it a nightmare to see through.
For the inside of your car, you need a dedicated automotive glass cleaner, preferably one that's ammonia-free. This will give you that invisible, streak-free clarity you're after and won't harm your window tint or any dashboard plastics. Using the wrong cleaner inside is just asking for a headache.
When your car is beyond a light dusting and needs some real firepower, the SwiftJet Car Wash Foam Gun connects to your garden hose to deliver a professional-level clean. It’s perfect for blasting away thick grime before you even touch the paint. Upgrade your car wash routine with SwiftJet today.