
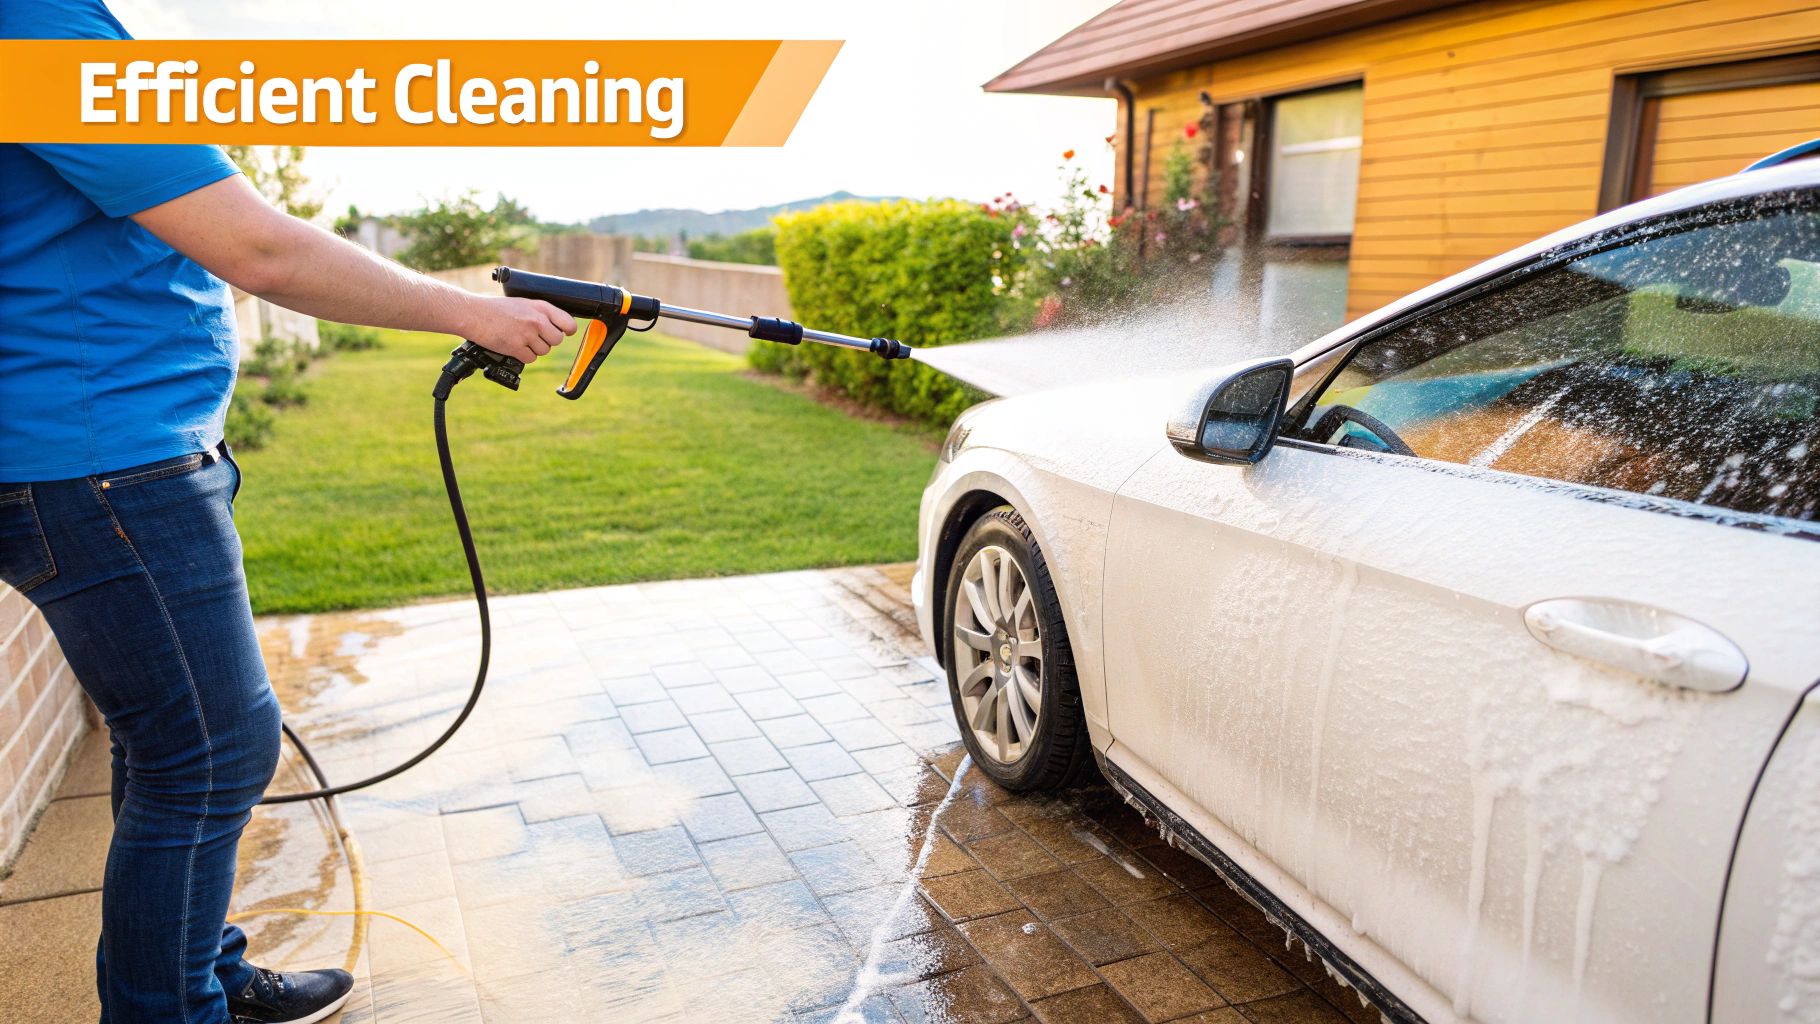
A garden hose foam gun is a pretty straightforward tool, but it completely changes the car washing game. It hooks right up to your garden hose and blankets your vehicle in a thick, rich layer of suds. Think of it as a pre-soak that does the hard work for you, lifting away the nasty dirt and grime before you ever have to touch the paint. This simple step is your best defense against creating those annoying swirl marks and fine scratches.
Why a Foam Gun Will Transform Your Car Wash
If you're still doing the old two-bucket wash with a sponge, you're just making more work for yourself. Honestly, once you use a foam gun, you'll wonder why you waited so long. It makes the entire process faster, safer for your paint, and a whole lot more fun. This isn't just about washing your car quicker; it's about getting a pro-level result right in your own driveway.
The real secret is the foam itself. The gun perfectly mixes your car wash soap with water and air, creating a sudsy blanket that clings to every surface. Instead of just rolling off, this foam "dwells" on the car, giving the cleaning agents time to break down all that baked-on road film, bug guts, and bird droppings. This pre-soak phase is what really elevates your wash.
Less Effort, Better Results
By loosening all that abrasive gunk first, you dramatically reduce the risk of grinding it into your paint when you finally grab your wash mitt. This is the single biggest advantage over a traditional bucket wash, where your mitt can instantly become contaminated with sharp debris that you then drag all over your clear coat.
You don't just have to take my word for it; the popularity of these tools is exploding. The global market for foam guns is growing like crazy, showing a huge shift in what people want for their home car care. In fact, the market is projected to hit around $150 million by 2025, and it's not slowing down. If you're curious about the numbers, you can dive into the full foam gun market analysis.
How Is It Different From Other Wash Methods?
Now, it's important not to confuse a garden hose foam gun with a foam cannon. Foam cannons are the heavy-duty versions that require a powerful pressure washer to run. While they produce ridiculously thick foam, a foam gun is the perfect, accessible alternative for any car enthusiast who doesn't have—or want to invest in—a pressure washer.
The main goal here is simple: Lubricate the paint and lift away as much dirt as possible before you ever have to touch it. A foam gun does this beautifully, making the hand-wash part of the job safer and far more effective.
Foam Gun vs Bucket Wash Quick Comparison
To really see the difference, it helps to put the two methods side-by-side. Here’s a quick look at how a foam gun stacks up against the classic bucket-and-mitt approach.
| Feature | Garden Hose Foam Gun | Traditional Bucket Wash |
|---|---|---|
| Safety | High (pre-soaks to lift dirt, reducing scratch risk) | Low (mitt can trap grit and scratch paint) |
| Efficiency | Fast (covers entire car in minutes) | Slow (requires constant dunking and wringing) |
| Soap Usage | Controlled and consistent application | Inconsistent; soap can get diluted and dirty |
| Effectiveness | Excellent for loosening stubborn grime before contact | Relies entirely on manual scrubbing for cleaning |
As you can see, the foam gun offers clear advantages in the areas that matter most for protecting your vehicle's finish. It's a modern approach that prioritizes safety and efficiency over old-school elbow grease.
How to Select the Right Foam Gun and Soap
The secret to that thick, satisfying foam you see in professional details isn't just one thing. It's the perfect partnership between a quality garden hose foam gun and the right kind of soap. Picking the best gear means looking past the flashy marketing and focusing on durable materials and smart features that deliver a great wash every single time.
A good foam gun makes the entire process easier and far more effective. And no, you don't need a high-powered pressure washer to get the job done—just a reliable garden hose. In fact, the market for flexible garden hoses in the U.S. was valued at around USD 851.2 million in 2023, with standard hoses accounting for nearly 48.6% of that. People stick with what works, which tells you there are plenty of dependable options out there to power your setup.
What to Look for in a Foam Gun
When you're shopping for a foam gun, the first thing I always tell people to check is the fittings. Go for brass connectors over plastic ones, every time. Brass won't corrode, it can handle higher water pressure without cracking, and it gives you a much more secure, leak-free connection to your hose. It's a small detail that makes a world of difference in the long run.
Another absolute must-have is an adjustable dilution dial. This little knob is your ticket to total control over the soap-to-water mix. You can crank it up for a super-thick foam to break down caked-on mud, or dial it back for a lighter, quicker wash when the car is just a bit dusty. This feature alone helps you conserve soap and tailor the wash to exactly what your car needs.
Don't forget about ergonomics, either. You’ll be holding this thing for a while, so look for a model with a comfortable grip and a trigger that's easy to squeeze. Some even have a trigger lock, which is a lifesaver for your hand during bigger jobs like washing an RV or a large truck.
My Two Cents: A wide-mouth reservoir seems like a minor feature, but trust me, it’s a game-changer. It makes pouring in your soap and water so much easier and cleaner, getting you started without the mess and frustration.
Choosing the Right Car Wash Soap
The soap you use is just as crucial as the gun itself. This isn't the place to cut corners—using the wrong kind of soap can actually cause more harm than good.
- Stick to Foaming Soaps: Look for shampoos specifically designed for foam guns. They're formulated to create those thick, stable suds that cling to your car's surface. A regular car wash soap might get the car clean, but you’ll likely end up with a watery, runny mess that doesn't have the same cleaning power.
- A pH-Neutral Formula is a Must: This is non-negotiable. Soaps that are too acidic or alkaline will strip off your car’s wax or sealant, leaving the paint exposed and vulnerable. Always check the bottle for "pH-neutral" to make sure it's safe for your car’s finish.
- Respect the Dilution Ratios: Those instructions on the soap bottle aren't just suggestions; they're the key to perfect foam. If it calls for a 1:10 ratio, that means one part soap for every ten parts water. Following the recommended ratio ensures you get the best performance without wasting expensive soap.
Pairing a durable, adjustable garden hose foam gun with a high-quality, pH-neutral foaming soap is the real foundation for a safe and impressive wash. For an even deeper dive into picking the right tool for the job, have a look at our ultimate guide to choosing an auto foam gun.
Your First Foam Gun Setup and Assembly
So, you've got your new garden hose foam gun. That's the fun part. The even better part? Getting it set up is incredibly straightforward. When you pull everything out of the box, you’ll find just a few pieces: the main body with the handle, the soap reservoir, and the nozzle. It's all designed to click together without any fuss, so you can go from unboxing to foaming in minutes.
A good foam gun usually comes with solid brass fittings, which is what you want for a durable, leak-proof connection to your hose. Here’s a little tip I’ve learned over the years: before you attach the gun to your garden hose, wrap the hose threads with a bit of thread seal tape (plumber's tape). It's a tiny step that costs almost nothing, but it’s fantastic insurance against those annoying drips that kill your water pressure and soak your shoes.
With the gun hooked up to the hose, it's time to mix up the suds.
Prepping the Reservoir for Rich Foam
This is where the real magic happens. Getting that thick, satisfying foam that clings to your car all comes down to how you mix the soap and water. I can't stress this enough: add the water first. If you put the soap in first, you'll just end up with a bottle of bubbles before you even turn the water on. It makes it nearly impossible to get the dilution right.
Fill the reservoir about 80% full with plain water. This leaves you just enough room for the car shampoo. Then, pour in your soap—typically just a few ounces is all you need. Give the bottle a gentle swirl to mix everything together. You don't want to shake it vigorously, or you'll be back to that premature bubble problem.
One of the biggest mistakes I see people make is thinking that more soap equals thicker foam. It's just not true. You'll get the best results—and avoid wasting expensive soap or leaving a film on your paint—by sticking to the dilution ratio the soap manufacturer recommends.
This image perfectly illustrates just how simple the connection is.
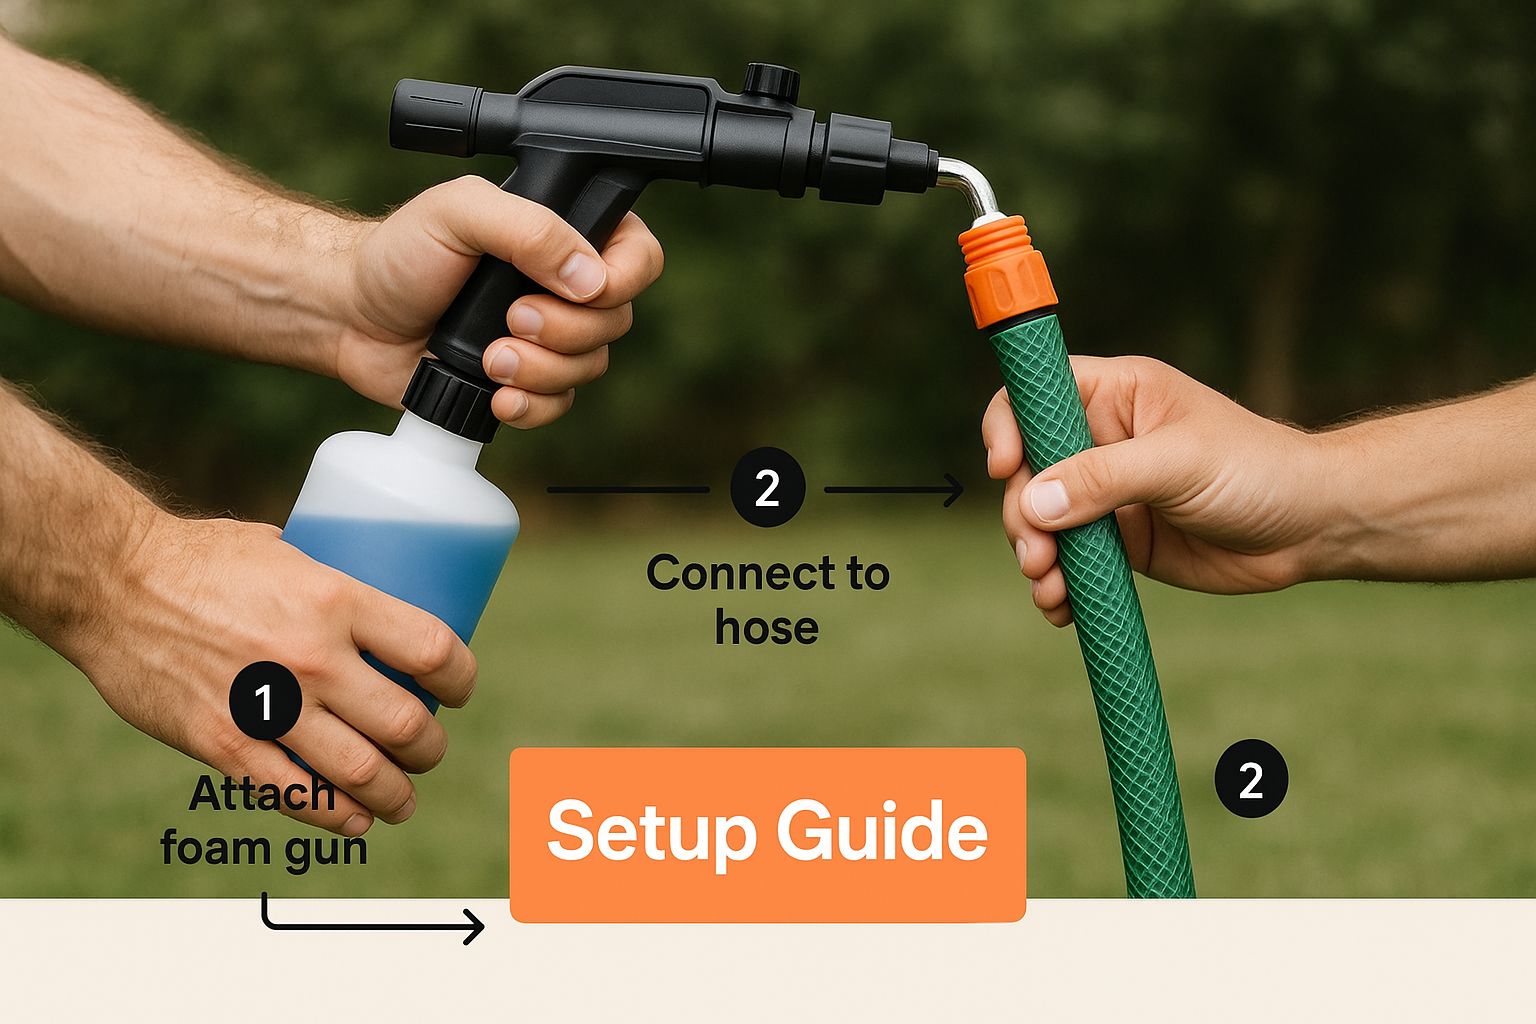
As you can see, everything is designed to be hand-tightened. No tools, no hassle.
Final Checks Before You Spray
Now that the soap solution is mixed and the bottle is screwed on, just give everything a quick once-over. A few seconds here can save you a headache later.
- Hose to Gun: Did the quick-connect fitting give a solid "click"? Give it a light tug to make sure it’s locked in.
- Reservoir to Body: Is the bottle screwed on straight and snug? It shouldn't feel wobbly.
- Nozzle to Body: Make sure the front spray nozzle is attached securely.
These quick checks ensure nothing flies off when you turn on the water—a messy surprise nobody wants. When your garden hose foam gun feels like a single, solid tool in your hand, you're good to go. It's time to turn on the spigot and cover your car in a blanket of grime-fighting foam.
Perfecting Your Foaming Technique
Alright, your garden hose foam gun is hooked up and ready to go. Now for the fun part: laying down a thick, satisfying blanket of suds. But there's a real art to it. Getting the technique right is the difference between a so-so pre-soak and one that actually lifts dirt off your paint safely.
Here’s a trick straight from the pros: always foam the car from the bottom up. I know, it sounds backward. But when you start at the lower panels and work your way up, you stop the dirtiest foam from running down and contaminating the sections you just covered. This simple change gives every inch of your car the maximum time to soak, letting the soap do its job without interference.
Dialing in Your Foam Thickness
That little dilution dial on your foam gun is the key to getting the perfect consistency. You don’t always need shaving-cream-thick foam. In fact, adjusting it for the specific job at hand will save you soap and get you better results.
- For heavy-duty cleaning: If the car is covered in mud or a thick layer of road grime, crank that dial up. You’re looking for a higher soap-to-water ratio to create a dense, rich foam that can really cling and break down all that gunk.
- For a light dusting: Is the car just a little dusty? Turn the dial down. This gives you a wetter, runnier foam that's perfect for a quick and gentle wash without going through a ton of product.
Think of it this way: you wouldn't use a thick, heavy gravy when a light vinaigrette will do. Match the foam to the mess. If you want to dive deeper into getting that perfect coat of suds, check out our foaming car wash top tips for a sparkling finish.
Why "Dwell Time" Matters
Once your car is completely covered in white, the concept of dwell time comes into play. This is simply how long you let the foam sit on the surface to work its magic. During this time, the suds are actively breaking down and lifting dirt particles away from the paint—all before you even think about touching it with a wash mitt. This is where your garden hose foam gun truly shines.
So, how long is long enough? There's no single answer. It really depends on the soap you're using, how hot it is outside, and just how dirty the car is. Your best tool here is your own observation.
The perfect time to rinse is right when you see the foam start to break down and slowly slide off the car, but before it has a chance to dry. Letting foam dry on the paint is a classic mistake that can leave behind stubborn soap scum.
It's interesting to see how foam technology has been adopted globally. In places like Europe, the Middle East, and Africa, there's a huge emphasis on eco-friendly designs that conserve water, driven by regulations. Over in the Asia-Pacific region, a booming car market is fueling massive growth in high-capacity sprayers. You can read more about these global high-pressure foam gun trends to see how things differ around the world.
Ultimately, getting your technique down just takes a bit of practice. Watch how the foam reacts, play with the dial settings, and you'll quickly get a feel for the perfect dwell time. Before you know it, you'll be creating a flawless pre-wash every single time.
Keeping Your Foam Gun in Top Shape for the Long Haul
A reliable garden hose foam gun is one that's been cared for. After laying down that perfect, thick blanket of foam, the absolute last thing you want is for your next wash to start with a sputter of weak, watery suds. It’s a common problem, but thankfully, the fix is simple. Proper maintenance is the single most important factor in making sure your foam gun performs like new, every single time.
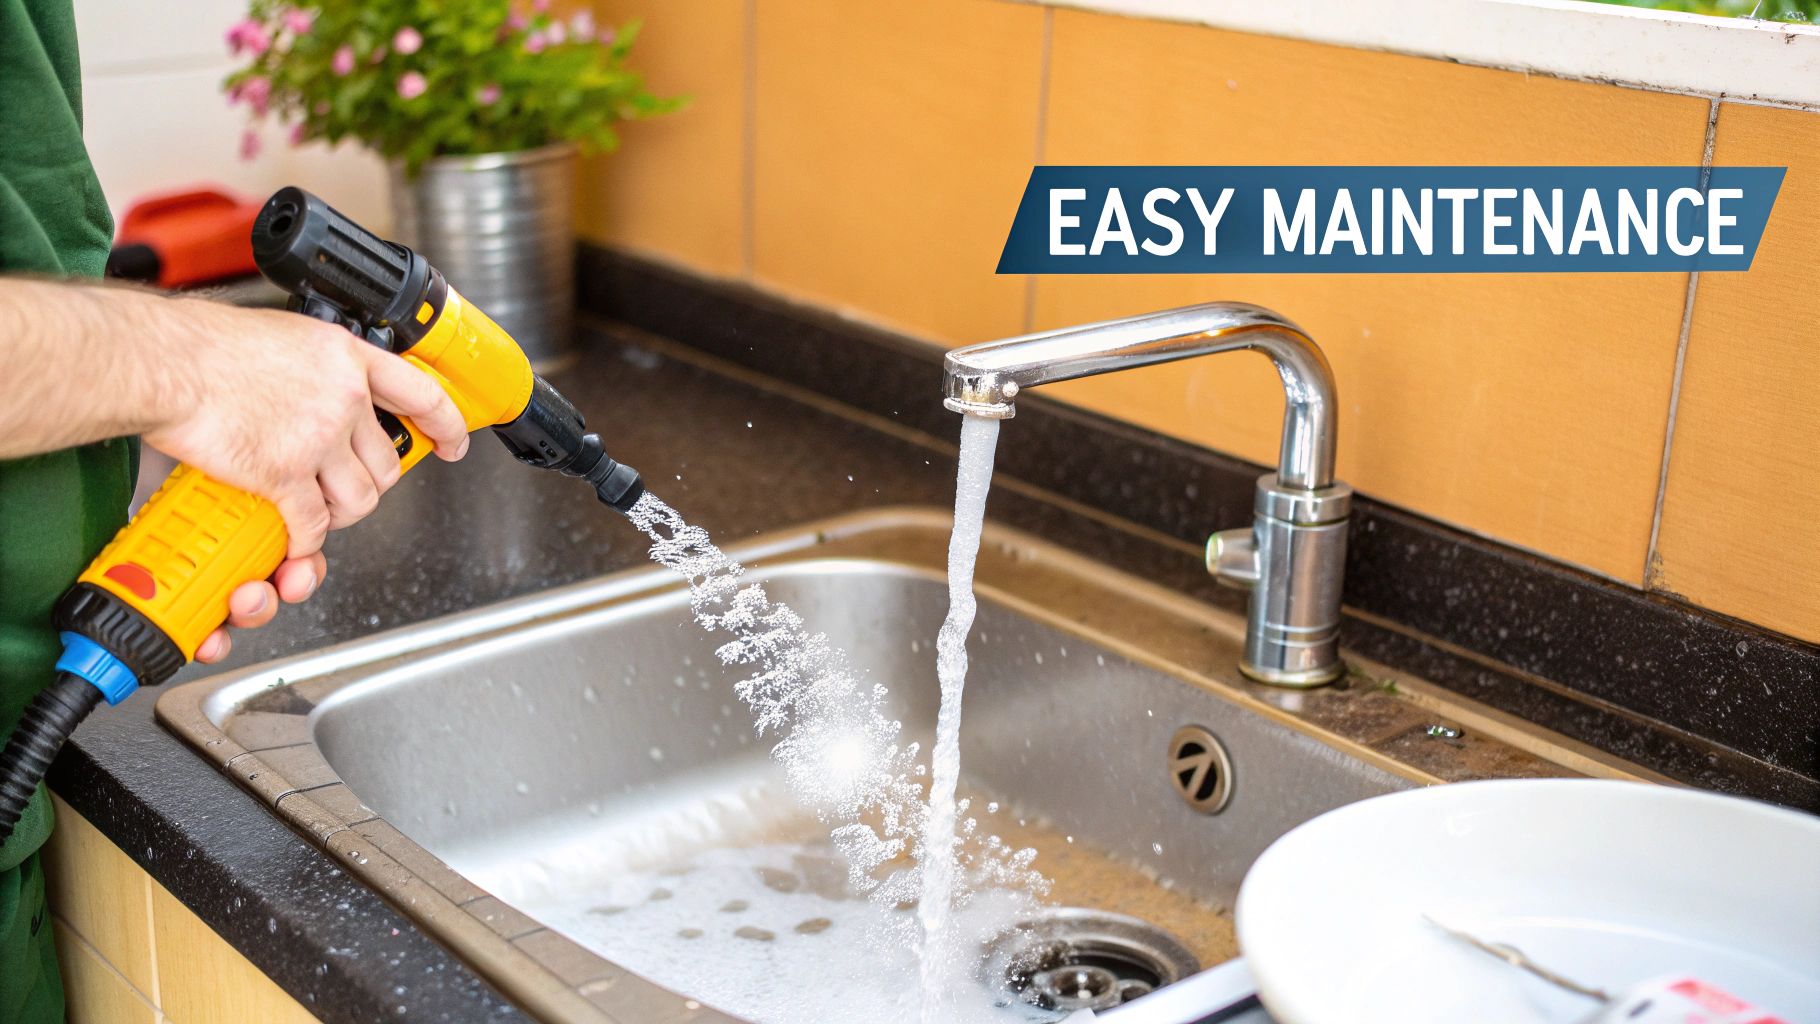
The best habit you can build? Flushing the system after every use. I can't stress this enough. It takes less than two minutes, and it’s your best defense against the performance issues that plague most foam guns. When soap solution is left inside, it dries, hardens, and creates stubborn blockages in the internal parts.
The 30-Second Post-Wash Flush
Once you've finished foaming down your car, unscrew the soap canister. You can either save the leftover soap solution or, as I usually do, dump it out and give the bottle a quick rinse with clean water.
Now, fill that same canister about halfway with plain water. Screw it back onto the foam gun, re-attach your garden hose, and just spray it out for about 30 seconds. That's it. This simple step purges all the lingering soap from the siphon tube, mixing head, and nozzle, ensuring the internal pathways stay wide open for next time.
Pro Tip: Think of it like rinsing a dish right after you eat. If you do it immediately, everything comes right off. If you let it sit overnight, you're in for a real scrubbing session. A quick flush now saves you a massive headache later.
This basic rinse will keep your foam gun in prime condition for months, if not years. But if you do start to notice a drop in foam quality or suspect a clog, it’s time for a slightly deeper clean.
When You Need a Deeper Clean
If your foam isn't as thick as it used to be, the culprit is almost always a minor clog in the mesh filter or the siphon tube. Don't worry—taking these things apart is usually a tool-free job. On most models, you can simply unscrew the nozzle assembly from the main handle.
Once you have it apart, you'll see the key components:
- Siphon Tube: This is the straw that pulls the soap up from the canister. Make sure you can see daylight through it and that it isn't clogged with gunk.
- Mesh Filter: Look inside the part that connects to the canister. You'll likely find a tiny metal screen. This is where undissolved soap powder or other small bits get trapped. Pop it out and rinse it under the tap until it’s perfectly clean.
Reassemble everything once it's clean and dry, and you should be back to producing thick, rich foam. For a closer look at all the parts and how they work, our guide on choosing the best car foam gun has some great diagrams and info.
Smart Storage for a Longer Lifespan
How you store your garden hose foam gun is just as crucial as how you clean it. After that final flush, give it a good shake and let it air dry completely before you put it away. Storing it while it's still wet is an invitation for mildew to grow and can even cause metal parts to corrode over time.
Find a cool, dry spot for it, like a shelf in the garage or a storage cabinet. The absolute worst thing you can do is leave it outside. Constant exposure to UV rays, intense heat, or freezing cold will make the plastic brittle and cause the rubber seals and O-rings to crack. A little bit of care goes a very long way in protecting your tool.
Answering Your Garden Hose Foam Gun Questions
Even the best tools can have a bit of a learning curve. I've heard just about every question you can imagine when it comes to foam guns, so let's tackle some of the most common ones. Getting these sorted out early will save you a ton of headaches down the road.
"Why Am I Getting Watery Suds Instead of Thick Foam?"
This is, without a doubt, the number one question people ask. You see those videos of cars covered in what looks like shaving cream, but yours comes out looking like sad, runny bubbles. What gives?
Nine times out of ten, it’s one of two things. First, let’s talk about your soap. You absolutely need a car shampoo that’s actually made for foaming. These soaps have special surfactants designed to whip up into a thick, clingy foam. Your standard "wash and wax" soap just won't cut it.
The other likely culprit is your home's water pressure. A foam gun isn't a pressure washer, but it does need a decent flow to properly mix the water, air, and soap concentrate. If your water pressure is on the low side, the gun just can't create the agitation needed for that rich foam.
"Can I Just Use Dish Soap in My Foam Gun?"
I get why people ask this—it's cheap and it's right under the sink. But please, for the love of your car's paint, the answer is a hard no.
Household cleaners like dish soap are designed to be aggressive grease-cutters. That's great for last night's lasagna pan, but it's a disaster for your car. It will strip away any wax, sealant, or ceramic coating you have, leaving your clear coat exposed and vulnerable.
Always, and I mean always, use a dedicated, pH-neutral car wash soap. It's formulated to lift dirt without damaging the essential protective layers on your paint.
My Two Cents: Think of it this way: the soap you choose is just as important as the tool you're using. Pouring the wrong chemical into a great tool is a surefire way to cause more harm than good.
"Does This Mean I Can Skip Hand Washing Now?"
Ah, the dream of a completely touch-free wash. While a foam gun gets you incredibly close, it’s not quite a replacement for a good old-fashioned hand wash. Think of it as the most important first step.
The foam's job is to do the heavy lifting. It soaks into the grime, loosens it, and pulls the majority of the abrasive dirt and grit safely off the paint. This makes the next step—the contact wash—infinitely safer.
Here’s how the process should work for a truly perfect, scratch-free finish:
- The Foam Gun: Blasts the car to remove all the loose, heavy crud. This is your pre-wash.
- The Wash Mitt: After rinsing the foam, you gently glide a clean microfiber mitt over the surface to remove any stubborn, bonded road film the foam couldn't lift on its own.
By foaming first, you're not just dragging a gritty sponge across your paint. It’s a team effort, and it’s the secret to keeping your car looking flawless for years.
Ready to see what real foam looks like? The SwiftJet Car Wash Foam Gun hooks up to any standard garden hose and delivers that thick, satisfying foam you've been looking for. Upgrade your car care game today!