
A foam cleaning gun is a game-changing detailing tool. It simply hooks up to your garden hose and mixes car wash soap with water to shoot out a thick, rich foam that clings to your vehicle. This pre-soak is hands-down the safest way to start a car wash.
Why? Because the foam lifts and surrounds all that abrasive grit and dirt before you ever touch the paint with a mitt. This simple step massively cuts down on the risk of creating those dreaded swirl marks and fine scratches.
Why a Foam Gun Belongs in Your Detailing Arsenal
If you've ever spent a sunny afternoon carefully washing your car, only to step back and see a fresh set of hairline scratches gleaming in the sun, you know the frustration. You've just met the biggest downside of the old-school bucket-and-sponge method. The problem isn't your technique; it's the process. You're essentially dragging tiny particles of dirt across your car's clear coat with every wipe.
A foam cleaning gun completely changes the game.
The Power of The Pre-Soak
Blanketing your vehicle in a thick layer of suds isn't just for show. It gives the cleaning agents in your soap crucial "dwell time" to get to work. The foam sticks to the car's surfaces, even the vertical panels, and immediately starts breaking down road grime, bug guts, and bird droppings without you lifting a finger.
The real job of the foam isn't to get the car spotless on its own. It's to make the hands-on wash that follows as safe as possible. A good pre-soak can remove up to 80% of the loose dirt, leaving only the stubborn, bonded-on grime for your wash mitt to gently lift away.
Efficiency and Better Results
This isn't just about playing it safe—it's also about working smarter. You'll find you use a lot less soap concentrate than you would by constantly dunking your mitt into a bucket. Plus, you can see exactly where the foam is, ensuring you get full, even coverage and don't miss any spots.
Let's take a quick look at how this modern approach stacks up against the way most of us learned to wash a car.
Foam Gun Wash vs Traditional Bucket Method
| Feature | Foam Cleaning Gun | Traditional Bucket Wash |
|---|---|---|
| Safety | Lifts dirt before contact, minimizing scratch risk. | Grinds loosened dirt into paint with a wash mitt. |
| Speed | Covers the entire vehicle in minutes. | Requires multiple trips to the bucket, slower process. |
| Efficiency | Uses less soap concentrate; less water waste. | Needs large volumes of water and soap, which get dirty. |
| Effectiveness | Provides a deep pre-clean for better final results. | Limited to surface-level cleaning with each pass. |
| Fun Factor | Let's be honest, it's way more satisfying! | Can feel like a chore. |
Ultimately, using a foam gun leads to a cleaner, shinier, and better-protected finish with less effort.
This growing preference for smarter, safer cleaning tools isn't just a niche trend; it’s a shift we're seeing across the entire car care industry. The global market for these devices is booming, driven by both pro detailers and weekend warriors who demand better results.
Adding a foam gun to your routine goes beyond just making your car look good. It fits right in with other essential car maintenance tips that protect your investment for the long haul.
Now, you might have also heard of a foam cannon, which is a similar tool that connects to a pressure washer. To figure out which one is right for your setup, check out our guide on the differences between a foam gun vs a foam cannon.
Getting Your Foam Gun Dialed In for Perfect Suds
Ever see those videos of detailers covering a car in a thick, shaving-cream-like blanket of foam and wonder how they do it? It’s not magic. It’s all about getting your foam gun set up correctly from the start. Let's walk through getting your SwiftJet foam gun from the box to spraying perfect, dirt-lifting suds. A few minutes of prep here will save you a ton of hassle later.
First things first, let's get a solid, leak-free connection to your garden hose. This is where most people get frustrated, but it's an easy fix. Before you screw anything on, check for the small rubber washer inside the gun's connector. Make sure it's sitting flat. Then, thread the connector onto your hose and tighten it down firmly by hand. You don't need to go crazy with a wrench or pliers—that can actually crack the plastic and cause the very leaks you're trying to prevent.
Mixing the Right Soap-to-Water Ratio
With the gun attached, it's time to talk soap. The secret to incredible foam isn't just dumping in more soap; it's about the right soap and the right ratio. The quality of your foam comes down to the quality of your soap, so choosing one designed for the job is key. If you're curious about what makes a great foaming soap, we’ve put together some good information on the best types of foam car soap and why they work so well.
For the 32-ounce canister on your SwiftJet, I’ve found the sweet spot is usually 3-4 ounces of a good quality foaming shampoo. Fill the rest of the canister with water. Here’s a little tip: don't shake it like a cocktail. That just creates a foamy mess inside the canister and can actually make the gun sputter. Instead, just give it a gentle swirl to get the soap and water mixed.
Pro Tip: Your water makes a difference! If you live in an area with "hard" water (lots of minerals), it can fight against the soap's sudsing agents. You might need to add an extra half-ounce of soap to get that really thick, clingy foam.
The whole point of this process is to wash your car safely by lifting the grit off the paint before you ever touch it with a mitt. This is how it works.
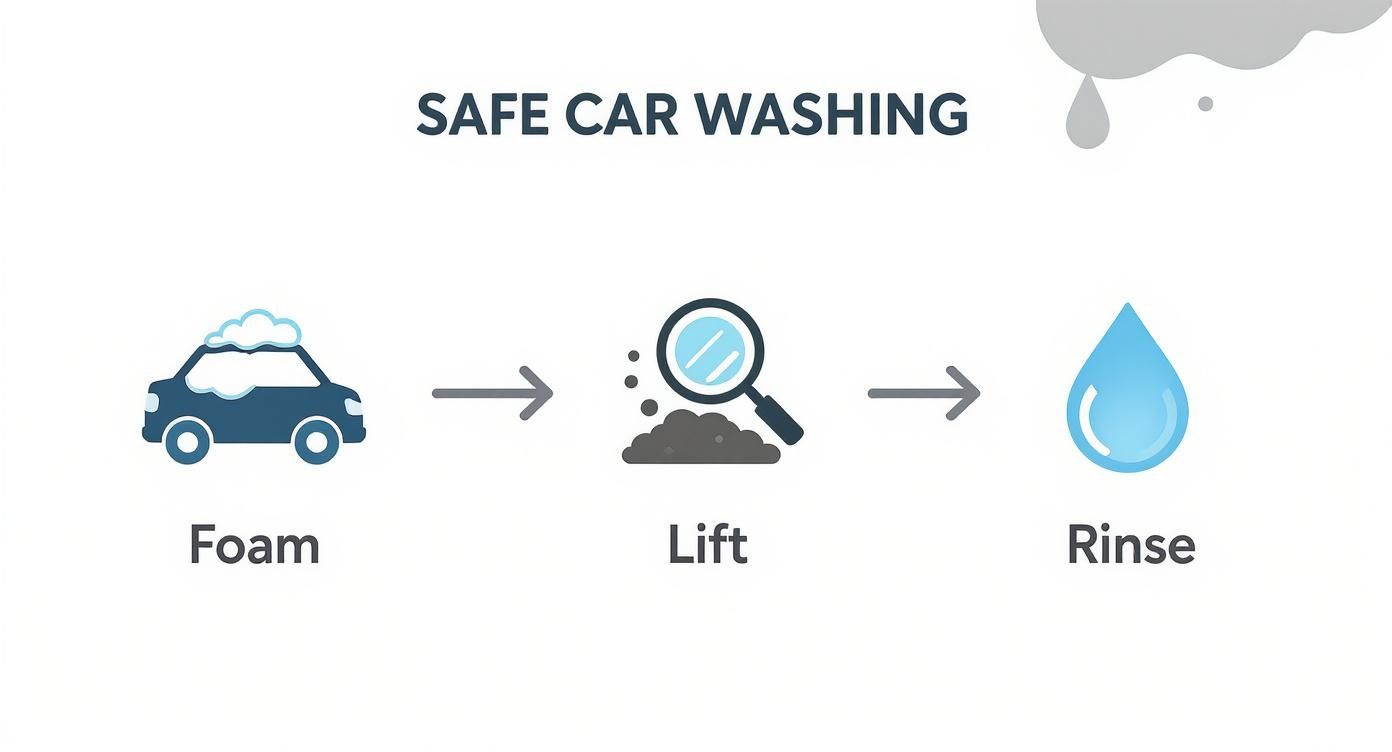
As you can see, the foam surrounds and encapsulates the dirt particles. When you rinse, the foam and the dirt just slide right off, which is a massive step in preventing those annoying swirl marks and fine scratches.
Mastering the Adjustment Dial
The final piece of the puzzle is that little dial on top of the gun. This is your foam control, and it's what lets you customize the suds on the fly. It simply controls the ratio of water mixing with the soap solution from the canister.
Here's a quick rundown on how to use it:
- Thickest Foam (-): Turn the dial all the way toward the minus sign. This restricts the water flow, forcing a higher concentration of soap into the stream. The result is that super-thick, clingy foam you want for heavily soiled cars.
- Watery Rinse (+): Dial it all the way to the plus sign. This opens the water flow completely, giving you a very light, soapy rinse. This is perfect for lightly soiled areas like windows or for a quick pre-rinse.
- Finding Your Middle Ground: Most of the time, you'll probably live somewhere in the middle. For regular maintenance washes, you often don't need the absolute thickest foam possible, so you can dial it back a bit to conserve soap.
My advice? Start with the dial set to maximum foam. Spray a section of your car and see how it looks. From there, you can easily adjust it down until you get the perfect consistency for the job at hand. This simple control is what makes a foam gun such an essential and flexible tool in any car-washing arsenal.
Getting Your Foam Technique Down
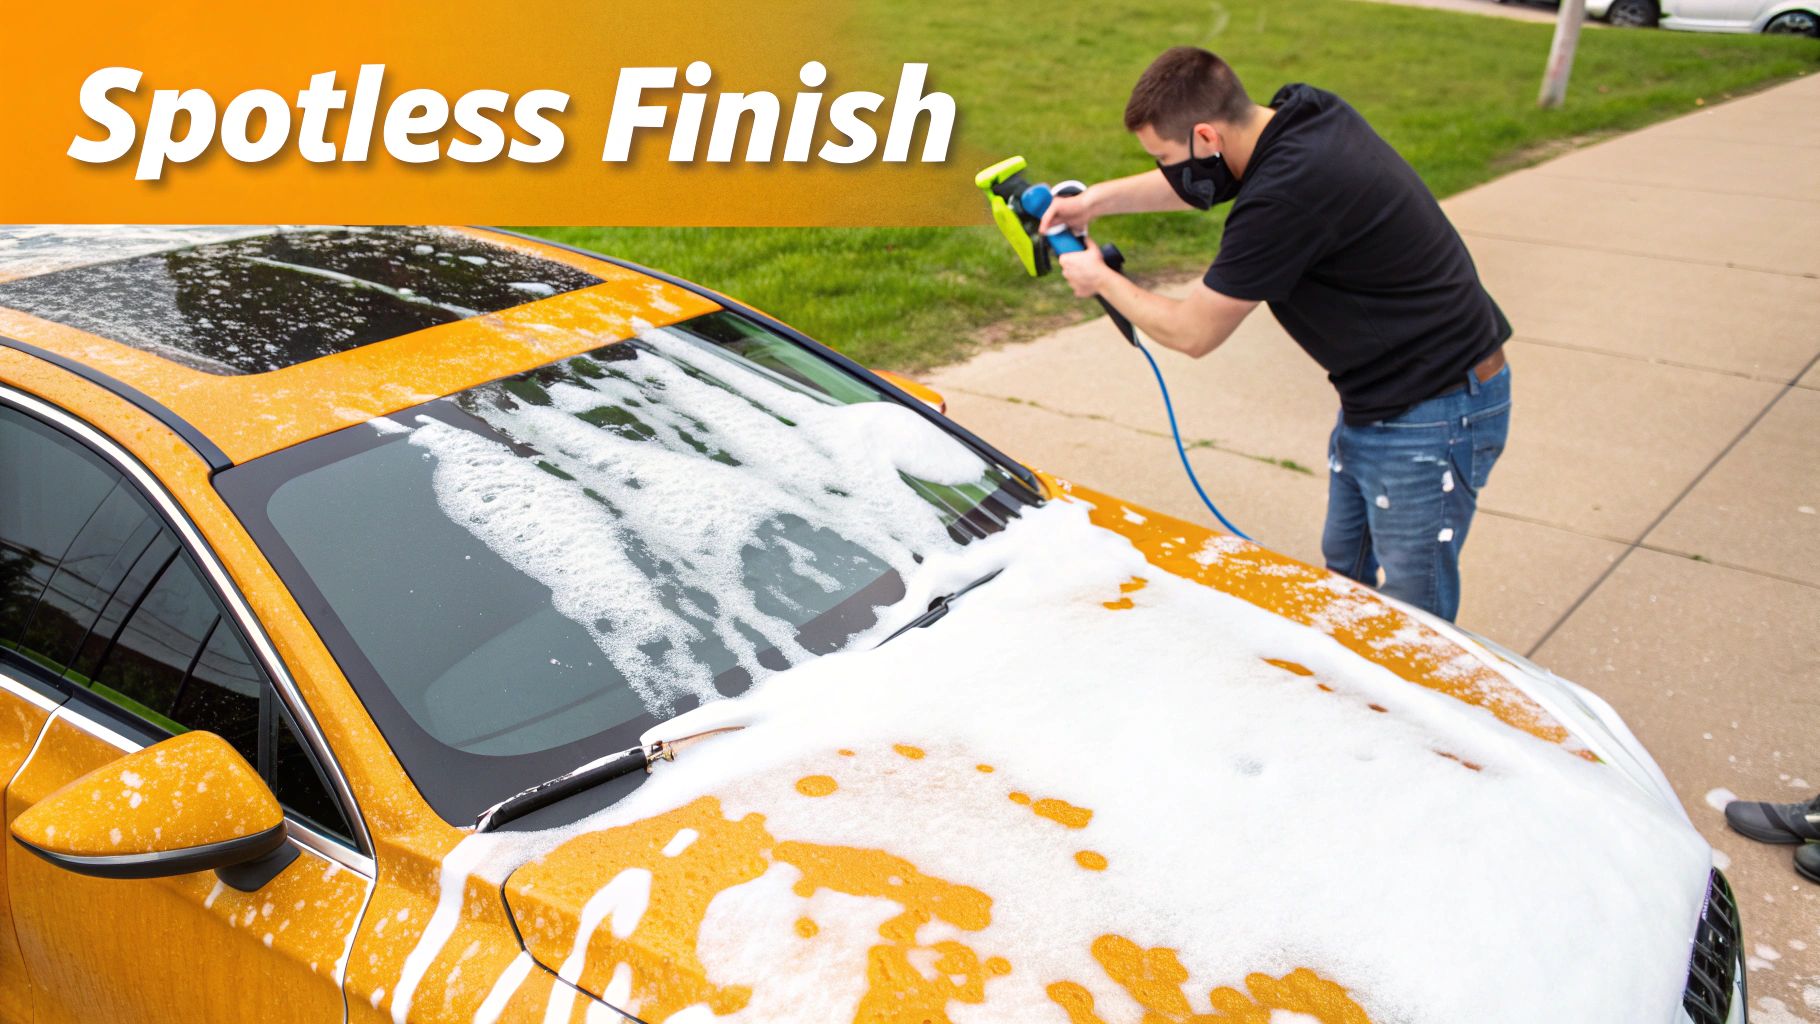
Alright, you've got your SwiftJet dialed in and the soap is mixed. Now for the fun part. Laying down a thick blanket of foam is incredibly satisfying, but there's a bit of a method to the madness if you want to do it right. This isn’t just about making your car look like a giant marshmallow; it's a strategic pre-soak that safely lifts the grit and grime off your paint.
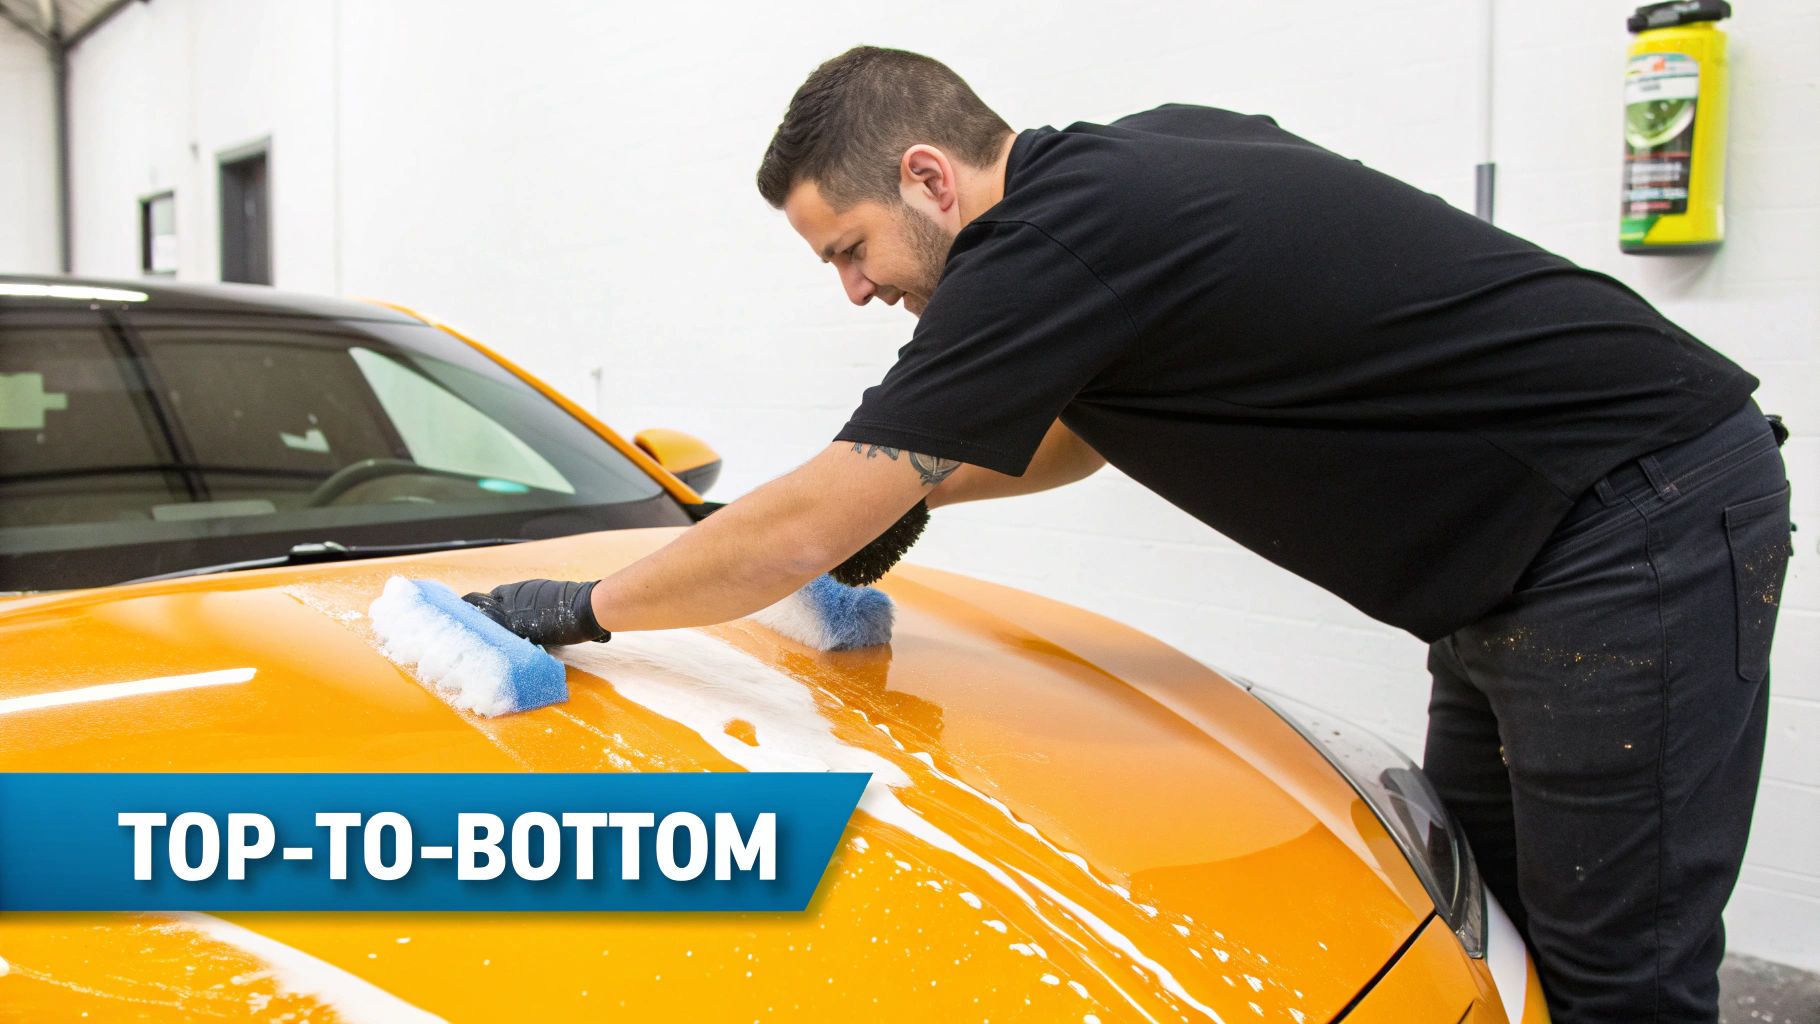
If you take away only one thing from this section, let it be this: work from the top down. It's a simple concept, but it's the foundation of a good wash. Start with the roof, then hit the windows, hood, trunk, and finally the side panels. Gravity is your friend here, pulling the dirty foam down and away from the areas you've just covered, preventing annoying streaks.
The Top-Down Method
Always start by spraying a nice, even coat across the roof. From there, just follow the path of gravity to make sure you get full coverage without wasting a drop of soap.
- Roof first: Get this big, flat surface completely covered.
- Glass and pillars: Next, coat all the windows and the pillars between them.
- Hood and trunk: Move onto the other big horizontal surfaces.
- Doors and fenders: Finish up by working your way around the car, hitting all the vertical panels.
Sticking to this order means dirt is always flowing away from the cleaner surfaces. It's the same reason the pros do it this way. In fact, professional car wash and detailing services account for about 45% of the commercial demand for these foam guns. The thick foam pre-soak is their secret to loosening heavy dirt, which drastically cuts down the risk of scratching the paint. You can dig deeper into this trend from market analysis reports if you're curious.
Let It Dwell (But Not for Too Long)
Once your vehicle is completely covered in a rich lather, step back and let the foam work its magic. This "dwell time" is probably the most important part of the pre-wash. If you rinse it off too quickly, the soap doesn't have a chance to break down all the grime.
You’re looking for a dwell time of around 3 to 5 minutes. You can actually see the foam pulling the dirt and dust off the paint. It’s pretty cool to watch.
Crucial Tip: Whatever you do, don't let the foam dry on the paint. This is especially true if you're washing in direct sun or on a hot day. Dried soap can leave stubborn water spots and residue that are a pain to get off. If you notice it starting to dry in any area, it’s time to rinse.
Adjusting for Your Vehicle’s Shape
Every car, truck, or RV has its own unique curves and crevices, so you’ll need to adapt your technique a bit. For big, flat areas like the side of an RV or the hood of a truck, use long, sweeping motions to get a nice, even coat.
For the trickier spots, you'll want to change things up:
- Grilles, Vents, and Trim: Use short, direct bursts of foam. This helps force the soap into all those little nooks where bugs and road debris love to hide.
- Wheels and Lower Panels: These areas are always the filthiest. Don't be shy here—apply an extra-thick layer of foam to give the soap more time and power to break down all that caked-on brake dust and road tar.
Getting a feel for these little adjustments will take your car wash from a weekend chore to a pro-level detail. It’s how you get those flawless, scratch-free results with your foam gun every single time.
The Final Rinse and Dry for a Spotless Finish
Applying that thick, satisfying foam is only half the battle. The final rinse and drying stages are where you lock in that flawless, head-turning shine. Getting this part right is the difference between a pretty good wash and a professional, spot-free finish.
Just like when you applied the suds, your rinsing strategy should follow the laws of gravity. Start at the top of the vehicle and work your way down, using a gentle spray from your garden hose nozzle.
This systematic approach ensures that you’re always pushing the dirty foam down and away from the clean panels above. It’s a simple trick that prevents any lingering residue from messing up your work. Be sure to hit those tricky spots like panel gaps, mirror housings, and grilles where soap loves to hide. A thorough rinse is non-negotiable.
Winning the War on Water Spots
The true enemy of a perfect finish is the dreaded water spot. These are just mineral deposits left behind as water evaporates, and they can be a real pain to remove, especially if you have hard water or are washing in direct sun.
The key is simple: never let water air-dry on your vehicle's paint. This is the single most important rule of drying. The moment you finish that final rinse, the clock starts ticking.
I see it all the time: people think a quick drive around the block will do the trick. While it might blow some water off the hood, it leaves droplets sitting in crevices and on trim, all but guaranteeing water spots will form. A dedicated drying method is essential.
Choosing Your Drying Method
You have a couple of fantastic options for achieving a perfect, streak-free dry. Each has its own strengths, and a lot of us in the detailing world actually use a combination of both for the best possible finish.
Method 1: The Plush Microfiber Towel
This is the classic, trusted technique for a reason. A high-quality, ultra-plush microfiber drying towel is incredibly absorbent and, most importantly, gentle on your paint.
- Technique: Forget wiping or scrubbing. Just lay the towel flat on a panel and gently pat it or drag it slowly across the surface. This "blotting" method soaks up water with minimal friction, which drastically reduces the risk of inflicting those fine scratches or swirl marks.
- Best For: Large, flat surfaces like the roof, hood, and doors.
- Pro Tip: Always use multiple towels. Keep one for the main painted surfaces and a separate, smaller one for doorjambs, wheels, and lower body panels. This simple step prevents you from dragging grime from the dirtiest parts of your car onto your clean paint.
Method 2: The Detailing Air Blower
For a truly touchless dry, nothing beats a dedicated car dryer or even a leaf blower (with a clean nozzle!). This method is an absolute game-changer for blasting water out of places a towel can’t dream of reaching.
- Technique: Work from the top down, using the stream of air to chase water off the panels and out of tight spots like grilles, around emblems, and from inside the mirror caps.
- Best For: Preventing those annoying drips that always seem to appear just after you've finished drying.
- Why It Works: It physically pushes every last drop of water off the surface, leaving nothing behind to evaporate and cause spots.
By mastering your rinse and adopting a proper drying strategy, you’ll elevate your results from "good" to "showroom quality" and ensure your hard work with the foam cleaning gun truly pays off.
Keeping Your Foam Gun in Prime Condition
Like any good tool in your garage, your foam gun needs a little TLC to keep performing at its best. Taking just a couple of minutes for maintenance after each wash is the secret to getting thick, rich foam every single time. It’s a small investment of time that pays off big in performance and preventing headaches down the road.
If you take away only one thing from this section, let it be this: flush the system with clean water after every single use. This isn't just a suggestion; it's the golden rule. Leftover soap, especially the concentrated stuff, will dry and crystallize inside the delicate internal parts and nozzle, which is the number one cause of weak, watery foam.
The process is simple. Just unscrew the soap canister, give it a quick rinse, fill it with plain water, and screw it back on. Then, just spray for about 30 seconds or so, until you see nothing but clear water coming out of the nozzle. That’s it. You’ve just prevented 90% of common foam gun problems.
Proper Storage and Care
Once you've flushed the system, disconnect the gun from your garden hose. Before you put it away, give it a quick wipe-down with a dry microfiber towel to get rid of any water spots. Where you store it matters more than you might think.
- Store Indoors: Never leave your foam gun sitting outside in the sun or freezing cold. UV rays and extreme temperatures are brutal on plastic parts and rubber O-rings, causing them to become brittle and crack.
- Release Pressure: Give the trigger a final squeeze after the water is off to make sure there's no leftover pressure in the line.
- Inspect Seals: Every now and then, take a quick look at the small rubber washer where your hose connects. If it looks flattened, cracked, or worn out, replace it. This tiny, inexpensive part is usually the culprit behind a pesky leak at the connection point.
Taking good care of these tools is becoming more important as their popularity skyrockets. The market for low-pressure foam guns is booming, projected to hit $250 million by 2025 with an expected 8% CAGR through 2033. This growth is driven by home enthusiasts and detailers who want pro-level results without complicated equipment. You can dive deeper into this expanding market on archivemarketresearch.com.
Quick Fixes for Common Issues
Even with the best care, things can sometimes go sideways. The good news is that most foam gun issues are incredibly simple to fix yourself. Usually, the problem is a minor blockage in the mixing chamber or the nozzle assembly. If you're curious about the nuts and bolts, you can learn all about the mechanics of a car wash foam gun in our detailed guide.
Troubleshooting Tip: If you suddenly get weak, runny foam even though your soap mix is right and the dial is set correctly, a small clog is almost always the cause. There's a tiny mesh screen inside the nozzle that can easily get blocked by soap gunk or mineral buildup from hard water.
Here’s a quick-glance guide for tackling the most common frustrations:
| Issue | Likely Cause | Solution |
|---|---|---|
| Watery Foam | Soap residue clog or incorrect dial setting. | Flush the gun thoroughly. Double-check that the dial is turned to max foam (-). |
| Leaking at Hose | Worn, missing, or improperly seated rubber washer. | Check the washer inside the hose connection. Make sure it’s there and lying flat. Replace if it's damaged. |
| Gun Sputters | Air in the siphon tube or a loose canister. | Make sure the soap canister is screwed on good and tight. Check that the pickup tube is fully submerged in the soap solution. |
Follow this simple advice, and you'll keep your foam gun working like new, delivering that thick, satisfying blanket of foam that makes washing your car so much fun.
Answering Your Top Foam Gun Questions
Even when you think you've got your foam gun technique down pat, questions always pop up. It's the little details that often make the biggest difference in your car wash. I've been there, and I've heard just about every question in the book from fellow detailing nerds. Let's clear up some of the most common ones.
Can I Just Use My Regular Car Soap in a Foam Gun?
You can, but you're not going to like the results. For that thick, satisfying foam that really pulls dirt off the paint, you need a soap built for the job.
Soaps labeled "snow foam" or "high-foam shampoo" are packed with special surfactants. These are the magic ingredients that create a dense, clinging lather that hangs on the side of your car, giving it time to break down all that road grime. If you try using a standard, low-sudsing soap, you’ll just get a watery mess that slides right off. It won't have the "dwell time" to do any real cleaning, which kind of defeats the whole purpose.
Does This Mean I Can Skip Hand Washing Altogether?
That's the dream, isn't it? And sometimes, you can. If your car is just a little dusty and you're doing a quick touch-up, a simple foam-and-rinse job can be enough to bring back the shine. It’s perfect for that weekly maintenance wash.
But for a properly dirty car, you should think of your foam gun as the perfect opening act, not the main event. Its real job is to handle the pre-wash. By lifting off all the loose, gritty stuff before you ever touch the paint with a mitt, you dramatically lower the risk of causing swirls and scratches.
Think of it this way: The foam gun makes your hand wash safer and more effective. It doesn't replace it; it makes it better. For a truly flawless finish, the foam pre-wash is non-negotiable.
What’s the Real Difference Between a Foam Gun and a Foam Cannon?
This is probably the most common question I get, and the answer is simple: power source.
A foam cleaning gun (like the SwiftJet) is built to work with a regular garden hose. It's designed for convenience and uses the water pressure you already have at home. No extra gear needed. This makes it the go-to choice for most DIY detailers who want great results without a huge investment.
A foam cannon, on the other hand, is a different beast entirely. It requires a pressure washer. That high-pressure water flow is what creates the ridiculously thick, shaving-cream-like foam you see in those pro detailing videos. If you don't own a pressure washer (or don't want to lug one out every time you wash your car), a quality foam gun is the way to go.
Help! My Foam Is Watery. How Do I Make It Thicker?
If your foam is looking more like sad, soapy water than a thick blanket of suds, don't worry. It's usually a simple fix. I always check these three things first:
- The Soap Mix: This is culprit number one. You're probably just running a little lean on soap. Try adding another ounce of your concentrated foam shampoo to the canister and see if that thickens things up.
- The Top Dial: Make sure the adjustment dial on your foam gun is turned all the way to the max foam setting. On most models, this is the "—" (minus) symbol. It restricts the water flowing through, which forces a richer soap-to-water mixture.
- The Soap Itself: If you've tried the other two fixes and you're still getting weak foam, it's time to look at your soap. As I mentioned before, not all soaps are created equal. Switching to a high-quality, dedicated snow foam will make a night-and-day difference in foam thickness and cling.
Ready to see what a real pre-wash can do for your car's finish? The SwiftJet makes getting that professional, scratch-free wash at home incredibly simple. Get your SwiftJet foam cleaning gun today and experience the difference.