
You've spent all that time washing your car, getting every bit of dirt and grime off. Now for the most important part: drying it. That flawless, mirror-like shine you’re after is won or lost in these final moments.
Proper drying is the critical barrier between a pristine finish and a surface riddled with imperfections. It’s what prevents those frustrating water spots and the microscopic scratches that can instantly dull your car’s paint. This isn't just about looks; it's about protecting your investment.
Why Perfect Car Wash Drying Is Essential
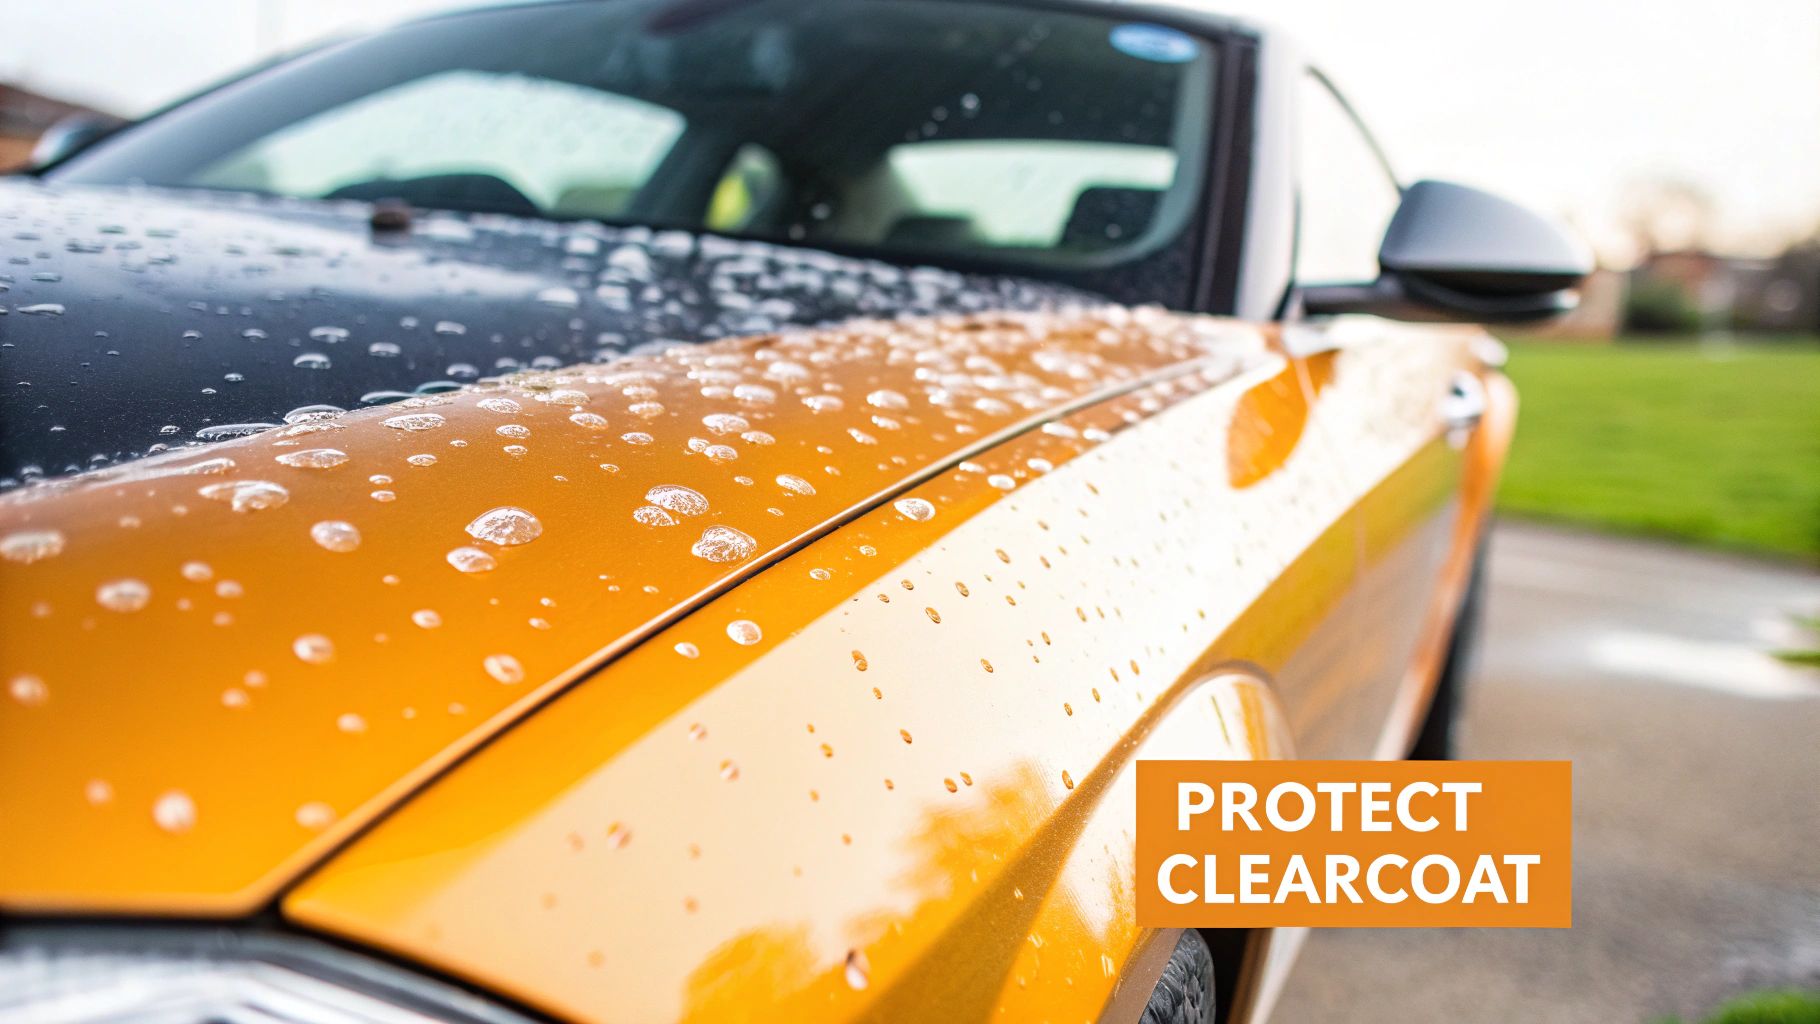
The moments right after the final rinse are more crucial than most people think. Every single water droplet left on your paint is a tiny ticking time bomb for your clear coat. As that water evaporates, it leaves behind all the minerals it was carrying—things like calcium and magnesium.
Those mineral deposits are what we call water spots, and they don’t just wipe away. If they get a chance to bake in the sun, they can become so concentrated they actually etch into your clear coat. The result is a dull, spotted finish that requires a machine polisher to remove. You can save yourself the headache by learning how to achieve a water spot-free finish from the get-go.
The True Cause of Swirl Marks
It’s a common myth that washing is the main cause of those fine, web-like scratches we call swirl marks. In reality, a huge number of them come from bad drying habits. Using an old bath towel, a dirty chamois, or even just pressing too hard with a clean microfiber can drag tiny, unseen dirt particles across your paint.
Think of it like using ultra-fine sandpaper. You’re inflicting thousands of tiny scratches that really pop in direct sunlight. The golden rule of safe car wash drying is to minimize, or even eliminate, physical contact with the paint whenever possible.
Adopting a Safe Touch Process
A professional detailer's approach to drying is all about a "safe touch" philosophy. It’s a combination of smart techniques and the right tools, prioritizing the safety of your paint over sheer speed. This ensures all your hard work washing isn't ruined in the last five minutes.
Here’s what that looks like in practice:
- Minimizing Contact: We start by getting most of the water off without ever touching the car, using tools like air blowers or techniques like "sheeting" the water off with a gentle stream.
- Using Proper Materials: When we do make contact, it's with ultra-soft, highly absorbent microfiber towels made specifically for automotive paint. No exceptions.
- Lubricating the Surface: Applying a quality drying aid or spray wax creates a slick buffer between the towel and the paint, which dramatically reduces friction and the risk of scratching.
Even the commercial car wash industry has caught on. In North America, over 70% of car washes now use high-powered air blowers—a massive leap from less than 40% back in 2005.
But even with those fancy systems, up to 30% of cars still leave with water hiding in crevices and tight spots. That's where a careful, hands-on final touch makes all the difference. This guide will walk you through exactly how to handle that last bit of water like a pro.
Choosing Your Ideal Car Drying Equipment
Picking the right tools for drying your car is every bit as important as the wash itself. Honestly, the gear you use is often what separates a stunning, swirl-free finish from a paint job covered in fine scratches. Think of it as building your own detailing arsenal; each tool has a job to do, and choosing the right one protects your car’s delicate clear coat while making the process a whole lot faster.
Your core drying kit really boils down to three things: great microfiber towels, some kind of air-moving tool, and a quality chemical drying aid. You don't have to break the bank here, but you do need to understand what makes each piece effective. Let's dig into the options so you can build the perfect setup for your car and your budget.
Decoding Microfiber Drying Towels
First things first: throw out the old bath towels, chamois, and water blades. Modern microfiber is the undisputed king of car drying for a reason. These towels are specifically engineered to be ultra-soft and ridiculously absorbent, safely pulling any lingering dust into their fibers instead of dragging it across your paint.
But not all microfiber is the same. When you're shopping for that main drying towel, keep an eye on these details:
- GSM (Grams per Square Meter): This is just a fancy way of measuring the towel's density and fluffiness. For drying the big panels, you want a high GSM—look for something 600 or higher. That's the sweet spot for maximum absorbency.
- Weave Type: The weave changes how the towel picks up water. Waffle weaves have little pockets that are fantastic for streak-free glass. For paint, a plush twist loop or a deep pile weave is what you want; they’re designed to gulp down huge amounts of water with barely any pressure.
- Size: A big towel, maybe around 25" x 35", is perfect for laying flat on a roof or hood and gently dragging it off. For door jambs, wheels, and all the fiddly bits, smaller towels give you much better control.
A great starting point for anyone is one large, high-GSM twist loop towel for the body, plus a handful of smaller, all-purpose microfibers for everything else. This simple setup gets the job done well. As you get more into it, you can explore a more comprehensive car detailing supplies list to find more specialized tools.
Comparison of Car Drying Towel Types
With so many weaves out there, it can be tough to know which towel to grab. This table breaks down the most common types to help you make the right choice for the job at hand.
| Towel Weave | Key Characteristic | Primary Use | Pros | Cons |
|---|---|---|---|---|
| Twist Loop | Long, twisted fibers | Large body panels | Extremely absorbent, glides easily over paint | Can be heavy when saturated |
| Waffle Weave | Woven pockets | Glass, windows, mirrors | Traps water for a streak-free finish | Less absorbent than twist loop on paint |
| Plush/Plush Pile | Deep, soft fibers | Final wipe-downs, detail sprays | Very soft and gentle, great for buffing | Can get waterlogged quickly, may leave lint |
Ultimately, having a couple of different types on hand is the best strategy. A twist loop for the heavy lifting and a waffle weave for the glass is a pro-level combination that delivers fantastic results every time.
The Power of Air Car Dryers
What’s the safest way to dry a car? Don’t touch it at all. That’s where air power becomes your best friend, letting you blast water out of every nook and cranny without any physical contact. You’ve got two main choices here: a dedicated car blower or your trusty leaf blower.
A dedicated car blower is the top-tier option. These are built from the ground up for detailing, and they come with two huge advantages: heated and filtered air. Filtered air is a massive deal—it means you aren’t accidentally sandblasting your clean paint with dust and pollen from the air. The warm air also helps water evaporate much faster, which seriously cuts down your drying time.
A leaf blower is a fantastic, budget-friendly alternative that still does a great job. If you go this route, just give the nozzle a quick wipe to make sure it’s clean before you start. While you won't get that filtered air, it’s still an incredibly effective way to blow about 90% of the water off the car. It’s especially brilliant for clearing water from annoying spots like mirror caps, grilles, and lug nut holes where drips always seem to appear later.
Leveraging Chemical Drying Aids
The final piece of the puzzle is a chemical drying aid. This is usually a spray-on product, like a spray wax, sealant, or a specific quick detailer, that you lightly mist over the car while it’s still wet, right before you touch it with a towel.
A good drying aid is a game-changer for two reasons. First, it adds a slick layer of lubrication between the towel and the paint. This lets your microfiber glide across the surface with almost zero friction, which dramatically cuts down the risk of causing swirl marks. Second, it leaves behind a quick boost of gloss and protection, creating a hydrophobic layer that makes your next wash even easier to dry.
This isn't just a trend for at-home detailers; the pros are all in on this. The number of car washes offering premium services that include surface protectants—which act as powerful drying aids—has been growing by about 15% annually. Car owners are demanding better, safer results, and the industry is responding.
Mastering Touchless Car Drying Methods
If you want the absolute safest way to dry your car, the goal is simple: don't touch the paint. Every single time a towel glides across your car's finish, you're running a small but very real risk of creating fine scratches and swirl marks. This is why so many professional detailers and die-hard enthusiasts have adopted touchless drying methods.
By using these techniques, you can blast away the vast majority of water from every surface, leaving only a tiny bit behind for a final, gentle wipe. It's a two-stage approach that first uses the power of water itself, then the force of air, to get your car almost perfectly dry without any real contact. It’s not just safer for your paint—it’s also a whole lot faster.
Harnessing Water With The Sheeting Method
The first move in a proper touchless dry happens before you even think about grabbing a towel or a blower. It’s a clever little trick called sheeting, and it uses water's natural surface tension to do the heavy lifting for you.
To get this right, just unscrew the spray nozzle from your garden hose. You're looking for a gentle, open flow of water, not a high-pressure jet. Start at the highest point of a panel, like the roof, and let the water flow smoothly across the surface.
You’ll see something cool happen. As that stream of water moves, it grabs all the little water beads and pulls them right off the panel in one big "sheet." This works like a charm on any car that has a decent layer of wax, sealant, or a ceramic coating, since the hydrophobic surface helps the water cluster together. Honestly, sheeting alone can remove up to 80% of the standing water on big, flat areas like your hood, roof, and trunk.
This simple trick is a massive time-saver. Instead of chasing thousands of individual water droplets with a towel, you're letting gravity and water cohesion clear the panels for you. It drastically cuts down the work that comes next.
Perfecting Your Air Blower Technique
Okay, once you've sheeted off the bulk of the water, it's time to bring out the big guns: the air blower. Whether you’ve got a dedicated car dryer or just a powerful leaf blower from the garage, the mission is to chase the rest of the water off the paint without making contact. This is how you get that final, nearly-dry finish.
A smart workflow is everything here. You want to avoid drips and re-wetting spots you've already dried.
- Work Top to Bottom: Just like when you're washing, always start at the top and work down. Hit the roof first, then the glass, followed by the hood and trunk, and finish with the side panels. This strategy stops water from dripping onto a panel you just spent time drying.
- Angle the Nozzle: Don't just point the blower straight down at the paint. Hold it at a shallow angle, maybe 30-45 degrees. This creates a "pushing" motion that sweeps the water in a controlled sheet right off the edge of the panel.
- Use Overlapping Passes: Think of it like mowing a lawn. Work in systematic, overlapping passes to make sure you don't miss any spots. This guarantees you’re clearing the water consistently as you move along.
This diagram shows how the tools work together in a smart drying process, with the blower doing the main work before a towel ever needs to touch the paint.
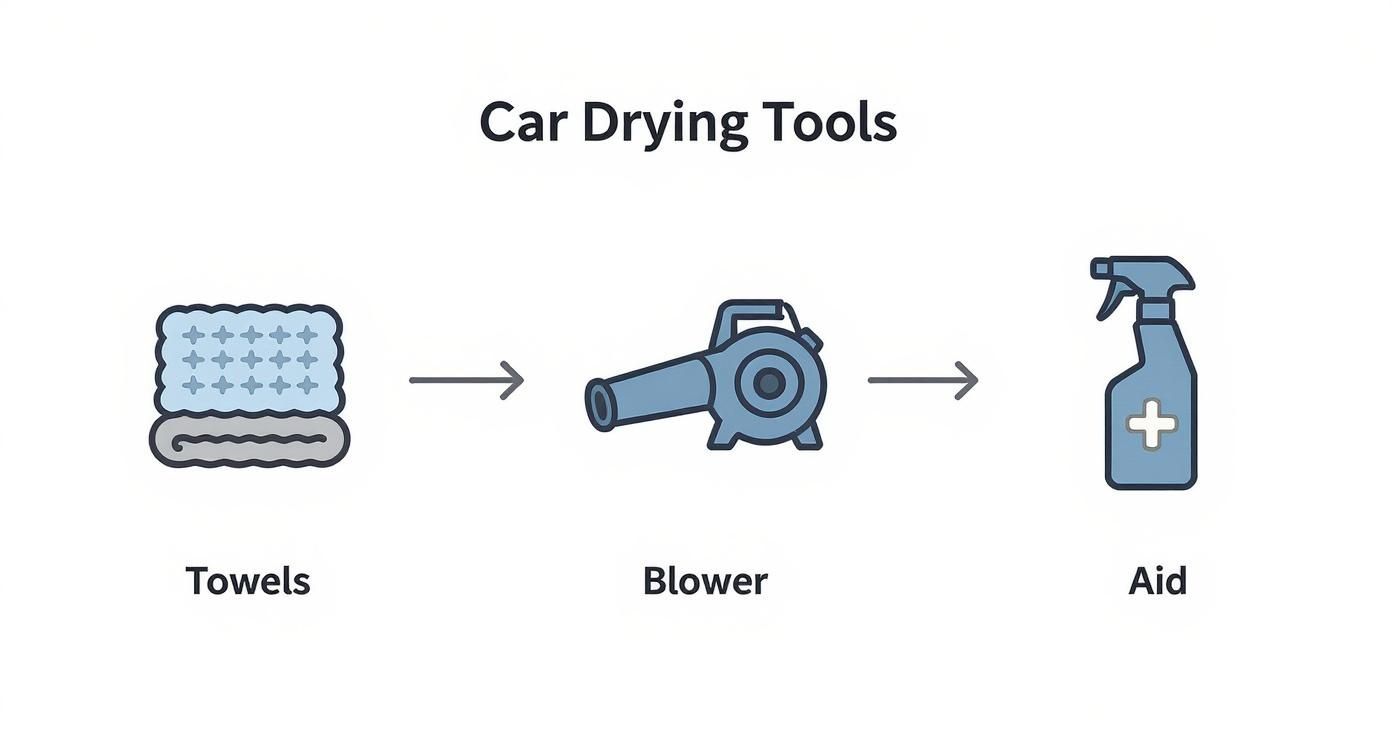
As you can see, the blower is the star of the show in a modern drying system. It minimizes physical contact, setting you up for a much safer final wipe with a lubricated towel.
Targeting Troublesome Drip Areas
Here's where an air blower really proves its worth: chasing water out of all the nooks and crannies. These are the spots that always seem to let loose an annoying drip just minutes after you've packed everything away, ruining your perfect, streak-free finish.
Point that stream of air directly into these common problem areas:
- Mirrors and Trim: Water loves to hide behind mirror caps and inside the rubber seals of your window trim. Blast air into every seam until it stops spitting water back at you.
- Grilles and Emblems: Front grilles and brand emblems are notorious water traps. Give them a good blast from a few different angles to force all the hidden water out.
- Door Handles and Fuel Door: Don't forget to get behind the door handles and inside the fuel filler area. They hold more water than you'd think.
- Wheels and Lug Nuts: This is a big one. Water pools deep inside lug nut holes and around the spokes. A focused blast of air is the only way to get them bone dry and prevent those ugly, rusty drips from staining your clean wheels later.
Once you’ve meticulously cleared out these hiding spots, your car should be about 95% dry. This leaves you in the perfect position for a final, minimal-contact towel dry to grab the last few droplets and reveal a flawless shine.
The Final Touch: Mastering the Microfiber Towel
After you've sheeted the water off and used a blower, your car is probably about 95% dry. Now comes the most critical part of the process—getting that last bit of water off without undoing all your hard work. This is where a gentle hand and the right technique make all the difference, transforming a good wash into a flawless, swirl-free finish.
The biggest mistake I see people make is treating their car's paint like a kitchen counter. Aggressive rubbing, wild circular motions, or taking a bone-dry towel to the paint is a recipe for disaster. You'll just grind any remaining microscopic grit into the clear coat, creating those tiny scratches we all hate. The secret is to let the towel do the heavy lifting, not your muscles.
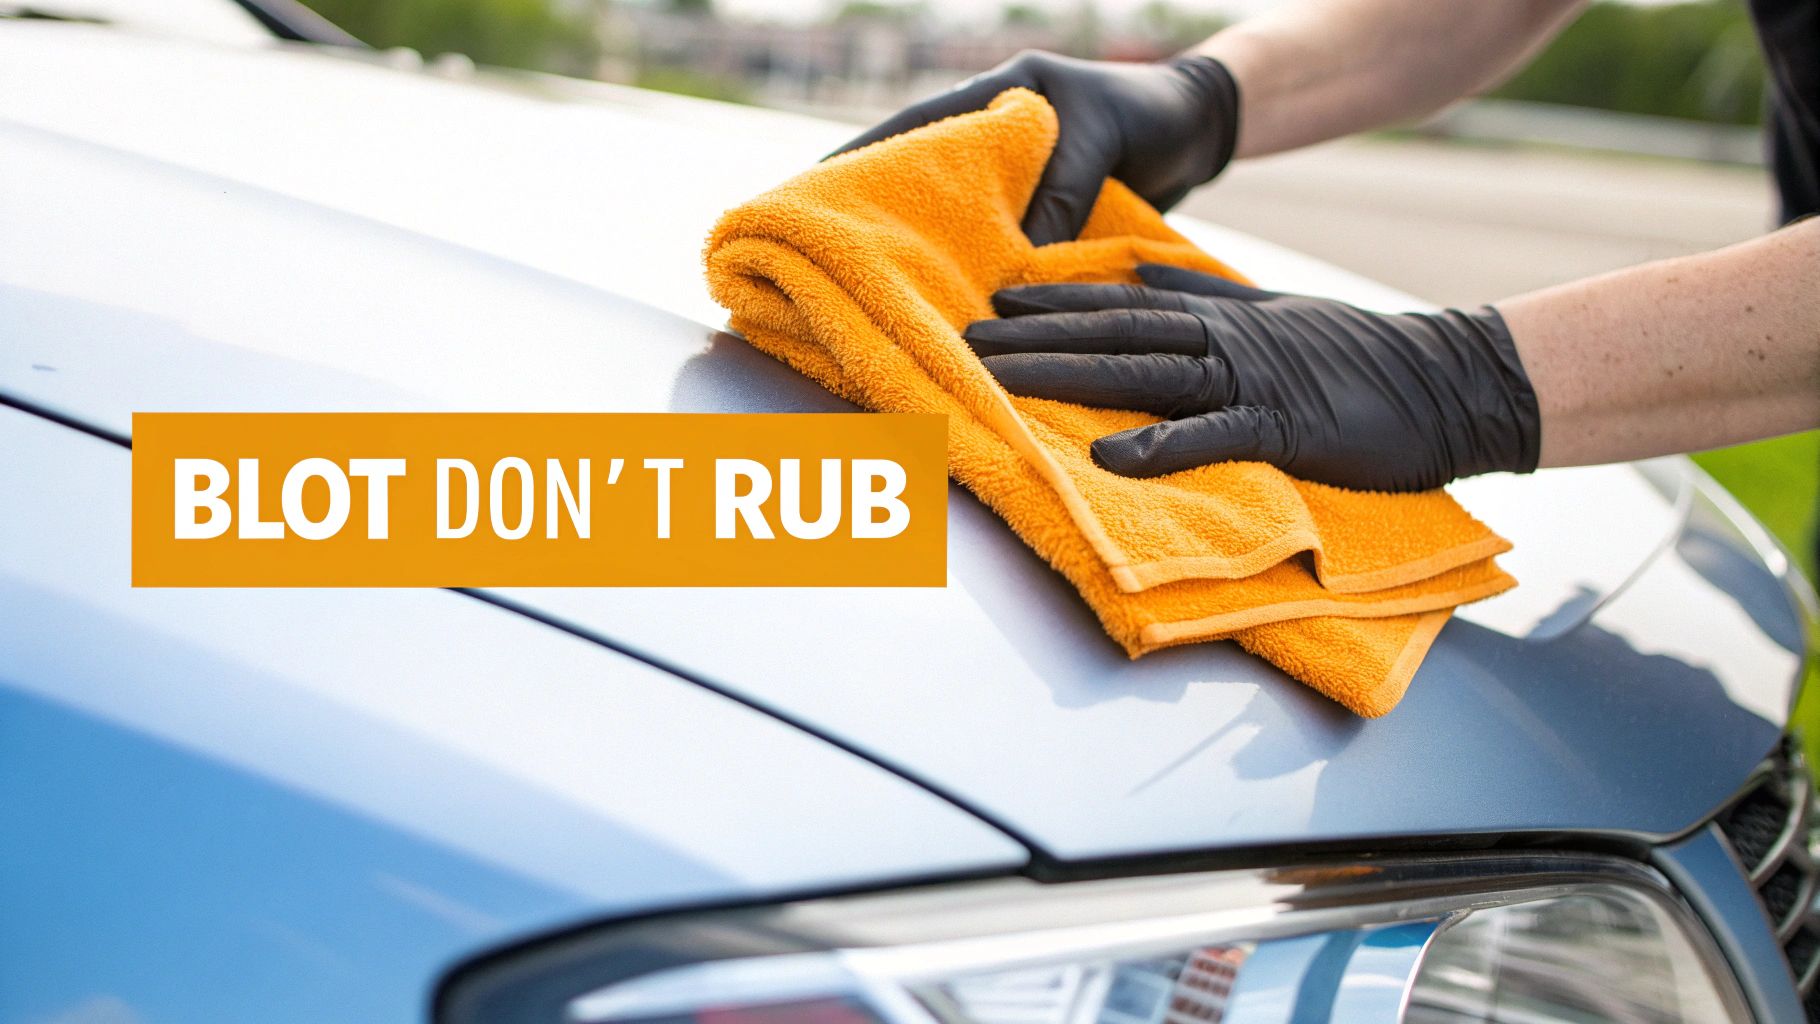
The Blotting Technique: Your Safest Bet
For large, flat surfaces like the hood, roof, and trunk, blotting is the gold standard for safe drying. It's exactly what it sounds like: you lay the towel down, let it soak up the water, and lift it straight off. There’s almost no friction, which means virtually zero risk of marring the paint.
A big, plush, high-GSM (grams per square meter) towel is your best friend here.
- First, give the panel and your towel a light mist with a good drying aid. This adds a crucial layer of lubrication, letting the towel glide if it does move at all.
- Unfold your towel and gently lay it across a section of the car.
- Lightly pat the back of the towel. You don't need to push down hard; the towel's own weight and the microfiber's wicking power will pull the water right in.
- Once the towel feels saturated, carefully lift it, find a fresh, dry side, and move on to the next spot.
It's a patient, deliberate method, but it's the ultimate way to protect your paint.
The Gentle Drag: For Everything Else
On vertical panels like doors or oddly shaped areas, blotting isn't always practical. That's where the gentle drag method comes in. The key here is to apply absolutely zero pressure. You’re just a guide, letting the towel slide across the surface under its own weight.
To do it right, hold two corners of your lubricated towel and slowly pull it across the panel in a straight line, always working from top to bottom. It should feel like it's floating. If you feel any catching or resistance, stop immediately and add more drying aid. Never, ever force it.
Key Takeaway: Lubrication is non-negotiable for both blotting and dragging. A quality drying aid creates a slick barrier between the towel and the paint. This simple step is one of the most effective ways to prevent swirl marks during the drying phase.
Smart Towel Management: Avoiding Cross-Contamination
Think about it: even after a good wash, the lower parts of your car are always dirtier than the top. The rocker panels, bumpers, and lower doors collect road grime and brake dust that you don't want to drag across your pristine hood. This is why having a system for your towels is a must.
- Your "A-Team" Towel: Use your best, fluffiest towel only for the upper painted surfaces—the hood, roof, trunk, and the top half of the doors and fenders.
- The "B-Team" Towel: Have a second, separate microfiber towel ready for the dirtier lower panels. This simple step is your best defense against cross-contamination.
- Specialty Towels: A third towel, usually a waffle weave, is perfect for glass and door jambs. This gives you a streak-free finish on windows and keeps the greasy gunk from the jambs far away from your paint towels.
As you work, remember to constantly flip your main towel to a clean, dry section. Once an area is saturated, fold it to reveal a fresh face. This ensures you're always lifting water off the surface, not just smearing it around.
For a deeper dive into picking the right tools for the job, check out our complete guide to the best car drying towels. This system guarantees every part of your car is dried safely, preserving that perfect finish you worked so hard to achieve.
Common Car Wash Drying Mistakes to Avoid
You can have the best tools and the fanciest soaps, but if you stumble at the finish line, all that hard work goes right down the drain. The drying phase is where a great wash can be completely undone in just five minutes. I've seen it happen time and time again.
These little errors might not seem like a big deal, but they are the direct cause of swirl marks, stubborn water spots, and those frustrating drips that appear long after you’ve packed up. Let's walk through the most common pitfalls so you can steer clear of them for good.
Drying in Direct Sunlight or on a Hot Surface
This is hands-down the biggest mistake I see people make, and it’s the number one cause of water spots. When the sun is beating down, your car's panels can get scorching hot, causing water to flash-evaporate before you can even get a towel on it.
When water disappears that fast, it leaves behind a nasty little present: all the minerals from your tap water. Those deposits—calcium, magnesium, you name it—bake right onto your clear coat. Now you've got etched spots that are a nightmare to remove without a machine polisher. Always, always dry your car in the shade or on a cool, cloudy day.
My rule is simple: if the panel feels warm to your hand, it’s too hot to dry. Pull it into the garage or just wait for it to cool down. This one change will make a massive difference in your results.
Using the Wrong Kind of Towel
Please, step away from the old bath towel. Grabbing whatever's lying around in the garage might feel resourceful, but it's a direct threat to your car’s paint. Bath towels are cotton, and those fibers are surprisingly abrasive on a delicate clear coat. They also tend to smear water around instead of actually absorbing it.
That old synthetic chamois isn't any better; in fact, it might be worse. It has zero pile to trap any leftover dirt particles. Any spec of grit you missed in the wash gets pinched between that flat surface and your paint, and then dragged across the panel like sandpaper. Do yourself a favor and stick with a high-quality, plush microfiber towel made for cars.
Applying Too Much Pressure
Your mission is to gently lift water off the paint, not to scrub it dry. Pushing down hard with your towel is a guaranteed way to inflict micro-scratches and swirls. Even the softest microfiber in the world can cause damage if you grind it into the paintwork.
Let the tool do the work for you. A quality microfiber towel is designed to soak up water with just its own weight. Whether you're blotting the panel or gently gliding the towel across, the key is a light touch.
A Flawed Drying Order
A little bit of strategy here prevents a world of hurt later. The classic rookie mistake is drying the whole car, then using that same towel on the filthy lower panels and wheels. This is a surefire way to drag brake dust and road grime all over your clean hood.
Here’s a better workflow to avoid that cross-contamination mess:
- Wheels & Tires First: Grab a separate, dedicated towel and dry your wheels first. They’re caked in brake dust and gunk you don't want anywhere near your paint.
- Jambs Next: Open the doors, hood, and trunk. Wipe down all the jambs with another utility towel. These spots trap greasy, dirty water.
- Paint Last: Finally, take out your clean, premium drying towel and tackle the painted surfaces, always working from the top down.
This sequence ensures the nastiest stuff stays isolated and never gets a chance to scratch your finish.
Forgetting About the Hidden Drip Spots
We've all been there. You finish drying, the car looks perfect, so you pack up your gear. Ten minutes later, you come back to find ugly water trails running down from your mirrors and door handles. Water is sneaky and loves to hide in tight spaces.
Before you call it a day, take an extra minute to hunt down these problem areas. Use a blower or just the corner of your microfiber to quickly blast out water from:
- Mirror caps and housings
- Around door handles
- The fuel door area
- Grilles and emblems
- Window trim and rubber seals
Chasing down these drips is what separates a pretty good job from a truly professional one. It’s the final touch that keeps your hard work looking flawless.
Your Car Drying Questions, Answered
Even after you've got your tools and techniques dialed in, a few questions always seem to pop up. Let's face it, getting the details right is what separates a decent car wash from a truly stunning one. Here are some of the most common things people ask, with straight-to-the-point answers to help you lock in that perfect, water-spot-free shine.
Can I Just Let My Car Air Dry?
I see this all the time, and it's probably the biggest mistake you can make after a wash. It seems easy, but letting your car air dry is asking for trouble.
Your tap water is loaded with minerals like calcium and magnesium. When a water bead evaporates on your paint, the water goes, but the minerals stay. These are what create those stubborn, chalky water spots. If the car is sitting in the sun, those spots can actually etch into your clear coat, leaving permanent damage.
Proper car wash drying is all about removing the water and its mineral cargo before this can happen. That's why using a quality microfiber towel or a blower is non-negotiable for a flawless finish.
A common myth is that soft or filtered water is a get-out-of-jail-free card. While it definitely helps reduce the mineral content, even purified water can lift residual grime off the car's surface. A dedicated drying step is always the best practice.
How Often Should I Wash My Drying Towels?
After every. single. use. No exceptions.
Your towel might look perfectly clean, but I promise you it has trapped a ton of minerals and microscopic bits of dirt. If you try to use it again, you're essentially grinding that contamination right back into your paint. That’s a one-way ticket to swirl marks and fine scratches.
For the best care, wash all your microfibers together, separate from your regular laundry. Use a dedicated microfiber detergent—and absolutely no fabric softener. Fabric softener will clog the fibers and kill their absorbency. Tumble dry on the lowest heat setting, or just let them air dry.
Is A Leaf Blower Really Safe For Car Paint?
Absolutely, and it's a fantastic trick of the trade if you don't have a dedicated car dryer. A leaf blower is my go-to recommendation for an effective and budget-friendly way to get a nearly touchless dry. The powerful airflow is a lifesaver for blasting water out of tricky spots like grilles, mirror housings, and behind emblems.
Just take one simple precaution: give the nozzle a quick wipe before you start to make sure there’s no dust or yard debris in there. While you don't get the heated, filtered air of a pro-grade unit, a leaf blower will safely get about 90% of the water off your car without you ever having to lay a hand on it.
What Is A Drying Aid And Do I Really Need One?
A drying aid is typically a spray wax or quick detailer that you lightly mist onto the wet panel just before you dry it with your towel. And to answer the second part of the question: yes, you really, really should be using one. It’s a game-changer for two big reasons:
- It adds lubrication. Think of it as creating a slick barrier between your towel and the paint. This lets the towel glide with almost zero friction, which dramatically cuts down the risk of accidentally scratching the surface.
- It boosts the shine. Most drying aids leave behind a slick layer of polymers, wax, or sealants. This not only amps up the gloss but also adds a bit of protection that makes your next wash that much easier.
It's cheap insurance for your paint job. The extra 30 seconds it takes to use a drying aid pays off big time in keeping your finish looking its best.
Ready to revolutionize your wash routine? The SwiftJet Car Wash Foam Gun connects to any standard garden hose to blanket your vehicle in thick, dirt-lifting foam, making cleanup faster and safer for your paint. Get professional results at home and see the difference for yourself. Upgrade your car wash game with SwiftJet today!