
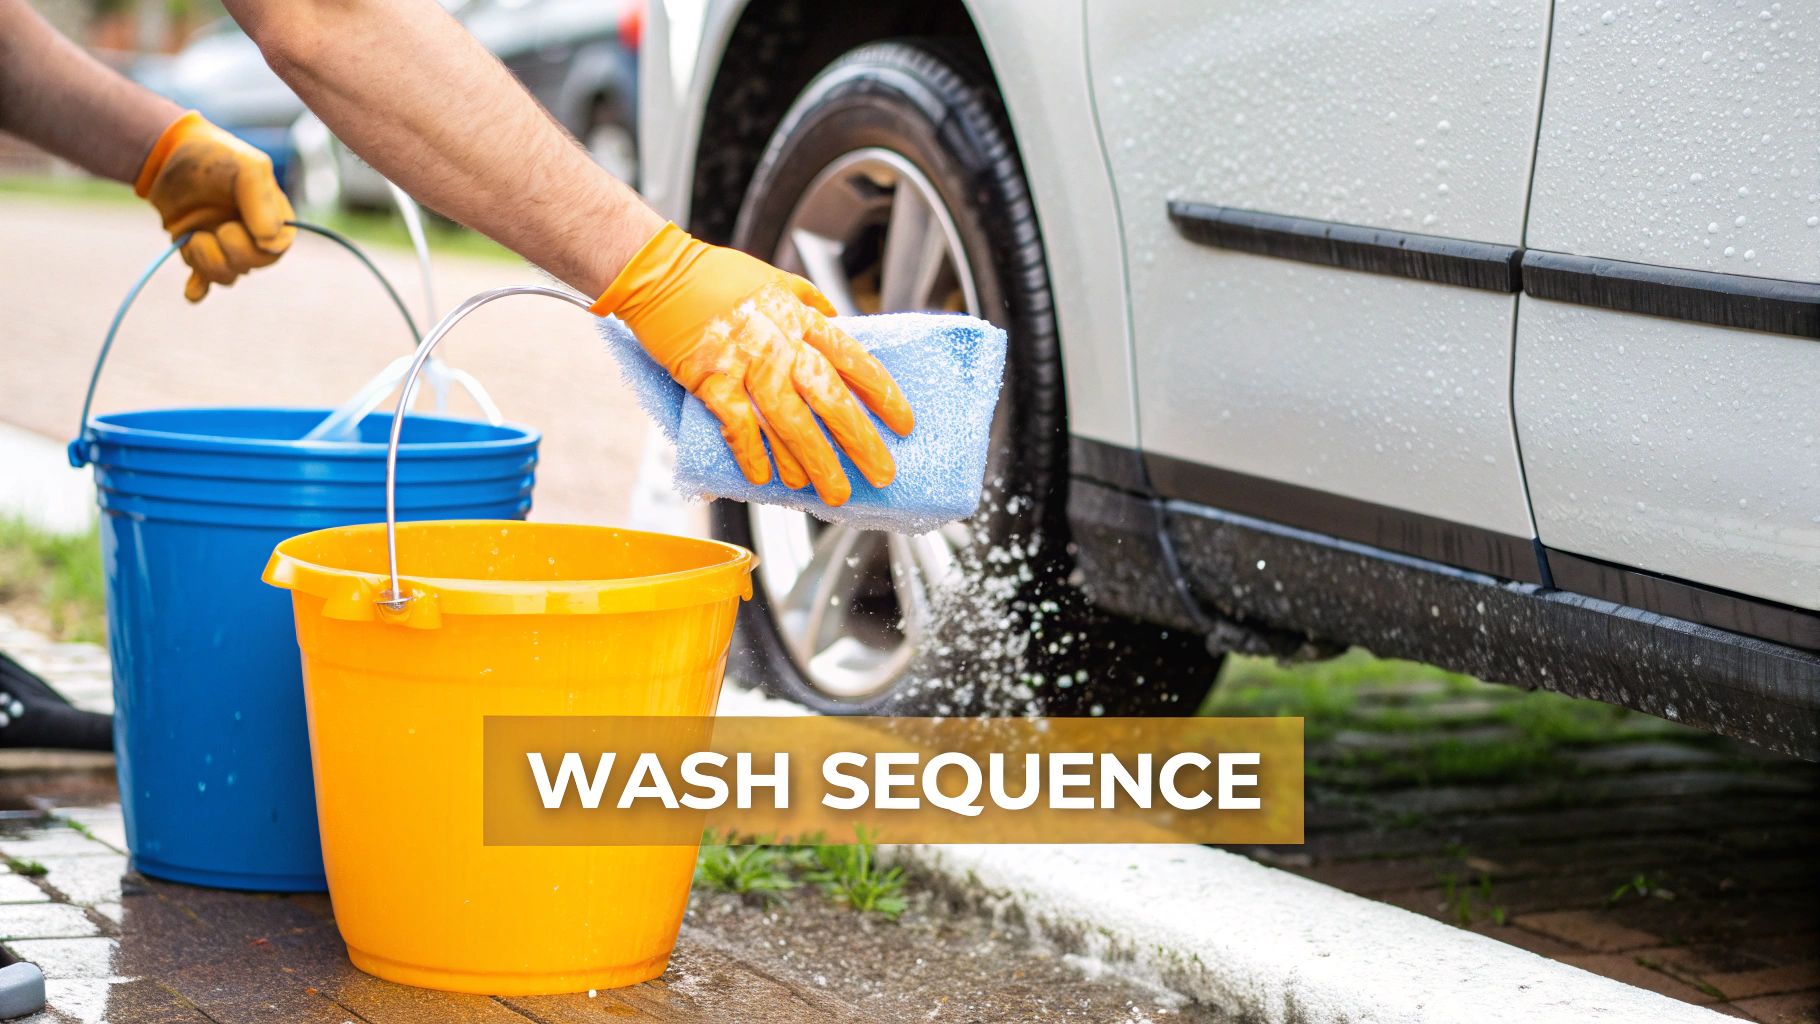
Let's cut right to it. The 2 bucket car wash is a time-tested detailing secret that’s all about preventing scratches. It’s that simple. By having one bucket for your fresh car shampoo and another just for rinsing your dirty wash mitt, you trap the dirt and stop it from ever touching your paint again.
This is single-handedly the best way to prevent the fine swirl marks that make a car look old and dull.
Why Pros Swear By This Wash Method
If you think road grime is what's scratching your car, I've got some news for you. Those tiny, web-like scratches that kill your car's shine? They almost always happen during the wash itself. This is the exact problem the two-bucket method was invented to fix.
The logic behind it is brilliant. Think about it this way: you’d never mop your kitchen floor, dunk the filthy mop back into your clean bucket of soap, and keep going, would you? Of course not. You'd just be smearing grime everywhere. A single-bucket car wash is doing that exact thing to your vehicle's delicate clear coat, grinding all that trapped grit right back into the paint.
Protecting Your Paint and Value
The entire system hinges on keeping your clean water clean and your dirty water separate. One bucket is your "suds" bucket, holding your high-quality car wash soap. The other is your "rinse" bucket, filled with nothing but plain water.
After you wash a single panel of your car, you dunk the mitt into the rinse bucket first. Wring it out. All that harmful grit you just picked up sinks to the bottom. Only then do you reload the clean mitt in your suds bucket.
This small change in your routine delivers some massive wins:
- Prevents Scratches: This is the big one. It physically stops you from dragging abrasive dirt across your paintwork.
- Maintains Shine: A smooth, scratch-free surface reflects light evenly, which is what gives you that deep, wet-looking gloss.
- Preserves Resale Value: A pristine exterior is one of the first things appraisers and buyers look at. It directly impacts your car's value.
This isn't just for die-hard detailers. It's a foundational technique for anyone who wants their car to look its best and protect their investment. It’s about working smarter to get that jaw-dropping shine, not scrubbing harder.
You don't have to take my word for it; the market reflects this growing appreciation for proper car care. The global car wash and detailing industry was valued at nearly USD 37 billion in 2022, and it's climbing fast as more people demand better results. You can read the full research about the global car wash market if you're curious about the numbers.
For those who get the detailing bug and want to take it pro, this guide on how to start a pressure washing business is a great resource.
At the end of the day, switching to the two-bucket method is a direct investment in your vehicle. When you combine it with other pro techniques, like those in our guide to a foaming car wash for a sparkling finish, you'll see results that make the extra five minutes totally worth it.
Gearing Up: Assembling Your Perfect Wash Day Arsenal

Getting that showroom shine isn't about having a garage full of expensive gadgets. It's about having the right tools for the job. A proper 2 bucket car wash setup is surprisingly simple, yet every single piece plays a crucial role in keeping your paint looking pristine. Think of it as investing in prevention—the right gear prevents the swirls and scratches that dull your finish over time.
Before we dive into the nitty-gritty, let's break down what you absolutely need versus what's nice to have. Having a well-stocked kit makes wash day faster, safer, and a whole lot more satisfying.
Essential vs. Recommended Gear for Your Wash Kit
| Item | Category | Purpose & Key Feature |
|---|---|---|
| Two 3-5 Gallon Buckets | Essential | Separates your soapy water from your rinse water to prevent cross-contamination. |
| Grit Guards | Essential | Traps dirt and debris at the bottom of the buckets, away from your wash mitt. |
| Microfiber Wash Mitt | Essential | Safely lifts dirt from the paint surface without scratching; holds plenty of suds. |
| pH-Neutral Car Shampoo | Essential | Cleans effectively without stripping wax, sealants, or ceramic coatings. |
| SwiftJet Foam Gun | Recommended | Pre-soaks the car with a thick layer of foam to loosen and lift heavy dirt. |
| Microfiber Drying Towel | Recommended | A large, plush towel to absorb water quickly without leaving streaks or scratches. |
| Wheel Brush | Recommended | Specifically designed to safely clean brake dust and road grime from wheels. |
While the "Recommended" items aren't strictly necessary to perform a two-bucket wash, they significantly improve the process and the final result. A foam gun, for instance, does a lot of the heavy lifting for you before you even touch the paint.
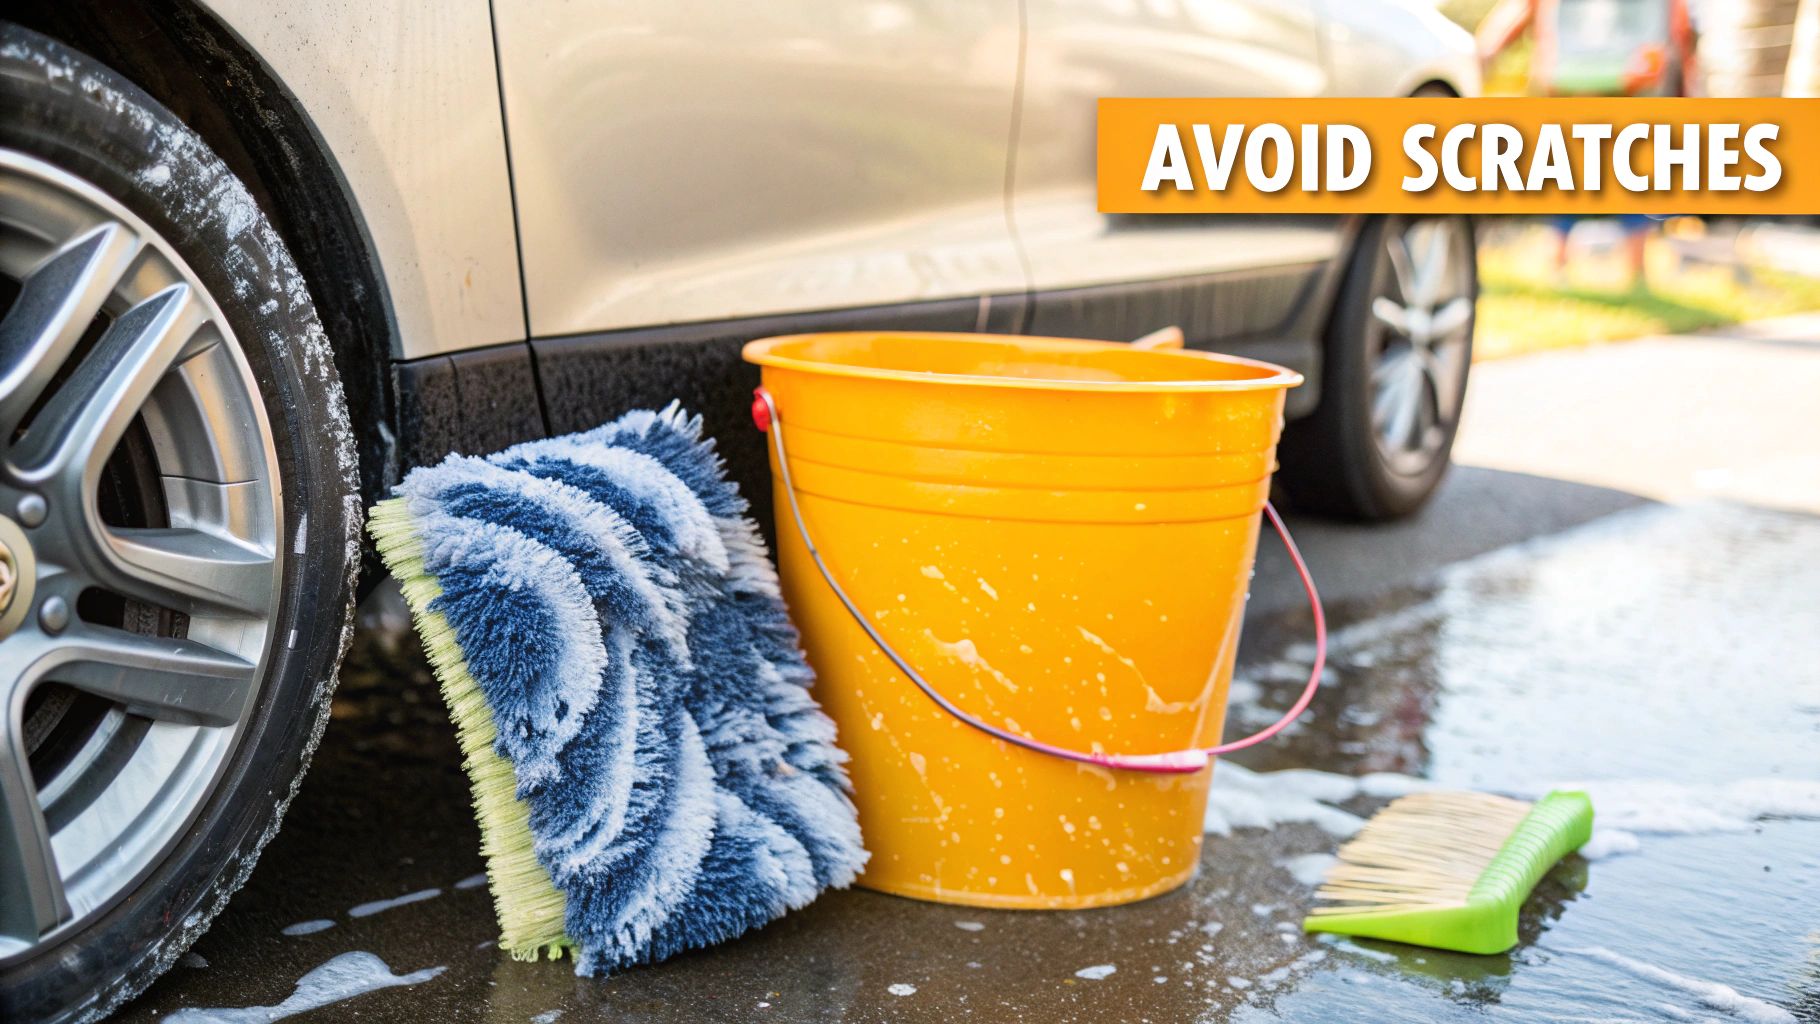
The Foundation: Your Buckets and Guards
The heart of this method is, you guessed it, two buckets. You'll want sturdy 3-to-5-gallon buckets. Here’s a simple trick I’ve used for years: get them in different colors. Maybe a blue one for your soap and a black one for your rinse water. It’s a dead-simple visual reminder that stops you from dunking a gritty mitt back into your clean, soapy solution.
Now for the most important accessory you'll buy: the Grit Guard. This simple plastic disc sits at the bottom of your buckets and is an absolute non-negotiable. Its grate-like design lets you scrub your mitt against it, releasing trapped dirt particles.
That grit then sinks to the bottom, trapped below the guard where it can't be picked up again. Since improper washing techniques are behind as many as 90% of all paint scratches, this little plastic insert is your single best defense.
I can't stress this enough: put a Grit Guard in both buckets. The rinse bucket is its main theater of operations, but having one in the wash bucket is cheap insurance against any rogue debris that finds its way in. It’s a small detail that makes a big difference.
The Tools of the Trade: Mitts and Soaps
Please, do your car a favor and throw away any old sponges or cotton rags. They are notorious for trapping dirt and dragging it across your paint, creating a web of fine scratches. Your wash medium is where quality really counts.
Here's the breakdown of what you should be using:
- Microfiber Mitts: These are the industry standard for a reason. Their deep-pile fibers gently lift dirt away from the surface and hold a massive amount of suds, which is key for lubrication. They’re durable, easy to wash, and the perfect all-rounder. Our own SwiftJet Foam Gun kit actually includes one to get you started on the right foot.
- Sheepskin or Lambswool Mitts: The peak of gentleness. Enthusiasts love these for delicate, dark, or soft paints because they glide effortlessly. The trade-off is they need more delicate care and won't last as long as a good microfiber mitt.
Finally, the soap you choose is critical. Never, ever use dish soap. It’s designed to aggressively strip grease, which means it will also strip every bit of wax, sealant, or ceramic coating off your paint, leaving it totally exposed.
Always reach for a dedicated, pH-neutral car shampoo. You want a formula that offers high lubricity—meaning it creates thick, slick suds that help your mitt glide safely over the surface instead of dragging against it. This lubrication is what truly protects your paint during the contact wash.
Alright, you’ve got your gear ready to go. Now it’s time to put it all together and see how the theory behind the 2 bucket car wash actually produces that flawless, mirror-like finish. This isn't just about soap and water; it's a specific rhythm, a process that ensures you're only cleaning, never scratching.
We'll break this down into four key phases. Think of it as carefully peeling back layers of dirt, starting with the loosest grime and ending with a delicate, final touch. Let’s get to it.
The Initial Pre-Rinse
Before you even think about touching the paint with a mitt, grab your hose or pressure washer. The first move is always a thorough pre-rinse. Start at the roof and methodically work your way down, using gravity to your advantage to wash away the easy stuff—dust, pollen, and any loose dirt that hasn't bonded to the surface.
Don't rush this. Spend a little extra time on the notoriously dirty spots: the lower body panels behind the wheels, the front bumper that’s a bug graveyard, and the rear of the car. The more of this contamination you can blast off with just water, the less work your wash mitt has to do later. That right there is your first line of defense against scratches.
Bring on the Foam
With the surface debris gone, it's time to get sudsy. This is where a quality foam gun, like the SwiftJet Foam Gun, really proves its worth. You're not just making the car look cool; you're laying down a thick blanket of foam that immediately starts to break down the tougher grime.
This foam serves two critical purposes:
- It Encapsulates Dirt: The soap gets in there and surrounds individual dirt particles, lifting them off the paint.
- It Provides Lubrication: This creates an incredibly slick buffer between your paint and any remaining grit, which is essential for the next step.
Let the foam sit and do its thing for a few minutes. You'll literally see it start to drip down, taking the road film and dirt along for the ride. Just be sure not to let it dry on the surface, especially in direct sun. This single step does a massive amount of the heavy lifting for you before your mitt ever touches the car.
The Art of the Contact Wash
Now for the main event—the methodical, two-bucket contact wash. This is where your technique is everything. The golden rule is simple but non-negotiable: always work from the top of the car down.
Your roof, windows, hood, and the upper half of your doors are almost always the cleanest parts of your vehicle. By washing these areas first, your mitt is at its cleanest for the most visible surfaces. You'll save the grimy lower sections, like the rocker panels and bumpers, for last. This keeps you from dragging the worst of the road grit across your pristine paint.
The image below shows the simple, yet brilliant, setup that makes this whole process work.

This configuration is designed to trap the dirt you remove in the rinse bucket, keeping your soapy water pure and your wash process safe.
With your buckets prepped, get into this rhythm for every single panel:
- Dunk your clean wash mitt into the soapy wash bucket first.
- Gently wash one small section at a time—say, half the hood or a single door panel—using straight-line motions. Never scrub in circles; that's how swirl marks are born.
- After that one panel, immediately dunk the dirty mitt into the plain water rinse bucket.
- Scrub the mitt against the Grit Guard at the bottom. You'll feel it release the dirt particles, which then sink safely beneath the guard.
- Squeeze out the excess water and only then return the clean mitt to your soap bucket for fresh suds.
This wash-rinse-repeat cycle is the heart and soul of the two-bucket method. It feels deliberate, maybe even a little slow at first, but this discipline is what guarantees you won't be putting scratches back into your paint.
These core principles of using the right tools and a careful, methodical approach apply to more than just cars. In fact, you'll find similar philosophies in guides explaining how to wash your RV, where protecting a large investment is just as critical.
The Final, All-Important Rinse
After you’ve washed the last panel, it's time to rinse everything off. Just like the pre-rinse, work from the top down and be thorough. You want every last bit of soap gone.
Here’s a pro tip for an easier drying experience: for the final pass, take the nozzle off your hose. Let a gentle stream of water flow over the car. This is called "sheeting," and it causes the water to run off in large sheets instead of forming thousands of tiny beads. Fewer droplets left behind means less work for your drying towel and a lower risk of water spots.
Drying Your Car Without Adding Scratches
It’s a heart-sinking moment for any car enthusiast: a perfect wash ruined in the last ten minutes. After all the meticulous effort of a 2 bucket car wash, the drying stage is where you either lock in that flawless shine or, unfortunately, introduce a fresh web of fine scratches.
This is where so many people go wrong. Improper drying is one of the biggest culprits behind swirl marks and those annoying water spots—the mineral deposits left behind when water evaporates.
The golden rule? Never drag a dry towel across your paint. I don't care how soft it feels; without lubrication, you're just creating micro-scratches. Your technique here is every bit as crucial as the tools you've chosen. The entire goal is to lift water off the surface with the least amount of friction possible.
Choosing Your Drying Method
When it comes to drying, you have two primary, safe options: going touchless or using a premium microfiber towel.
A touchless approach is, by far, the safest bet for your paint. Using a dedicated car dryer or even a powerful leaf blower (just be mindful of debris!) means you’re using filtered air to chase water off the panels. Nothing physically touches the paint. This is also fantastic for blasting water out of tricky spots like behind your mirrors, in the grille, and around emblems where drips always seem to appear later.
The more traditional route involves a large, plush microfiber drying towel. The secret is all in how you use it. Instead of rubbing and wiping, you should gently blot the water. Another great technique is to lay the towel flat across a panel and carefully pull it towards you. A quality towel can soak up an incredible amount of water, often enough to dry the whole car.
The Power of a Drying Aid
Want to make the process even safer and add a pop of gloss? Use a drying aid. This is a slick detailing spray that you lightly mist over a wet panel right before you dry it.
A drying aid is a game-changer. It creates a lubricating barrier between your towel and the paint, letting the microfiber glide effortlessly instead of grabbing. This dramatically cuts down on friction while adding a slick layer of protection and shine, making the whole job faster and better.
For a deeper dive into perfecting your technique, our complete guide on how to dry a car after washing has even more in-depth tips.
Ultimately, pairing a careful 2 bucket car wash with a safe, thoughtful drying routine is the secret to keeping that showroom shine for years to come.
Common Mistakes and Pro Tips for a Flawless Finish
Getting the hang of the 2 bucket car wash is one thing, but perfecting it means knowing which common traps to sidestep. It’s those little details and insider tricks that elevate your wash from just "good" to something you’d expect from a pro.
One of the biggest blunders I see is people washing their car in direct sunlight or when the paint is hot to the touch. This is a recipe for disaster. The heat makes your water and soap evaporate almost instantly, leaving behind stubborn water spots and soap scum that are a real pain to get off.
Always try to work in the shade. If that’s not an option, wash your car in the early morning or late afternoon when the sun isn't so intense. If you do get stuck with some tough mineral deposits, don't panic. We have a guide on how to remove water spots from your car that covers real-world solutions that actually work.
Avoiding Cross-Contamination
Even with a two-bucket setup, cross-contamination can still happen if you're not careful. Think about it: what’s the filthiest part of your car? The wheels, hands down. They’re covered in brake dust—which is essentially tiny, sharp metal shavings—and all sorts of heavy road grime. Using the same wash mitt on your wheels and then moving to your paint is a surefire way to inflict some serious scratches.
Here’s how you prevent that from ever happening:
- Wheels Get Their Own Tools: Dedicate a separate, cheap wash mitt and a good wheel brush only for the wheels. Don't let them touch anything else.
- Consider a Third Bucket: Many detailing pros actually use a "three-bucket method" with a dedicated bucket just for the wheels and tires.
Keeping your wheel-cleaning gear separate is the single best thing you can do to stop yourself from dragging the nastiest gunk across your car’s delicate clear coat.
What If I Drop My Wash Mitt?
It’s bound to happen sooner or later. If your wash mitt hits the ground, just stop. Do not—under any circumstances—put it back on your car's paint. The ground is covered in grit and sand. That mitt is now a piece of sandpaper. It has to be thoroughly cleaned out, or better yet, swapped for a fresh one. It’s a small price to pay to avoid a body shop bill for scratch repair.
Pro-Level Tips for a Better Wash
Once you have the basics down, a few extra details can make a world of difference. A common misconception is that a foam gun or foam cannon is a replacement for a good old-fashioned contact wash. While a tool like the SwiftJet Foam Gun is fantastic for pre-soaking the car and loosening up surface dirt, it won't get everything. You still need the gentle agitation from a quality wash mitt to lift away that bonded film of road grime.
Another huge pitfall is reaching for the dish soap. Yes, it creates great suds, but it’s designed to aggressively strip grease from your pots and pans. It will do the exact same thing to your car's wax or sealant, leaving your paint completely exposed and unprotected. Stick to a pH-neutral car shampoo, always.
This focus on proper technique is part of a massive industry. The car wash system market was valued at nearly USD 34.37 billion in 2024, showing just how much people care about both automated and detailed manual methods. By mastering these pro tips, you're not just washing your car—you're preserving its finish and value.
Clearing Up Your 2 Bucket Wash Questions
Jumping into the 2 bucket car wash method is a great move, but it's natural to have a few questions pop up once you get your hands dirty. We get it. Let's walk through some of the most common things people ask, so you can feel like a pro from your very first wash.
A big one we hear all the time is about modern paint protection. People invest a lot in ceramic coatings and want to know if this method is safe. The answer is simple: it's not just safe, it's the best way to care for them. The whole point of the two-bucket system is to be as gentle as possible, which is exactly what your expensive coating needs to last. Aggressive washing techniques are what destroy coatings, not this careful approach.
Getting into the Practical Details
Okay, let's talk about the water in your buckets. How often should you actually change it? There's no single magic answer, but a good rule of thumb is to take a hard look at your rinse bucket about halfway through the wash. If the water is dark and you can see a layer of gunk at the bottom, it's time for a fresh fill. If you're tackling a car that just came back from a muddy adventure, you might even need to change it after just a couple of panels.
This brings up another great question: Do I really need a foam gun?
- Is it essential? No, you can technically do a two-bucket wash without one.
- Is it a game-changer? Absolutely. A quality foam gun, like the SwiftJet Foam Gun, blankets your car in thick suds that start breaking down and lifting heavy dirt before your wash mitt ever touches the paint.
- The Bottom Line: Think of it as a crucial safety step. That pre-soak dramatically lowers the chances of you dragging a big piece of grit across the paint and causing a scratch. It's an upgrade that makes the whole process safer and, frankly, more fun.
What If I Only Have One Grit Guard? This is a common situation when you're just starting out. If you have only one Grit Guard, always put it in your rinse bucket. That's the bucket doing the heavy lifting of pulling contaminants off your mitt. Protecting your clean soap is good, but protecting your paint from the dirt you've already removed is the top priority. Of course, adding a second guard to your soap bucket is a small investment that pays off big time.
Answering these little practical questions is what separates a good wash from a great one. It’s not just about blindly following steps—it’s about understanding why you're doing them. That's how you'll get a flawless, swirl-free shine every single time, no matter how dirty the car is.
Ready to take your car wash from good to great? The SwiftJet Foam Gun is the perfect partner for your two-bucket method, delivering a safer, more effective clean. Check out the SwiftJet Foam Gun here and see the difference it makes.